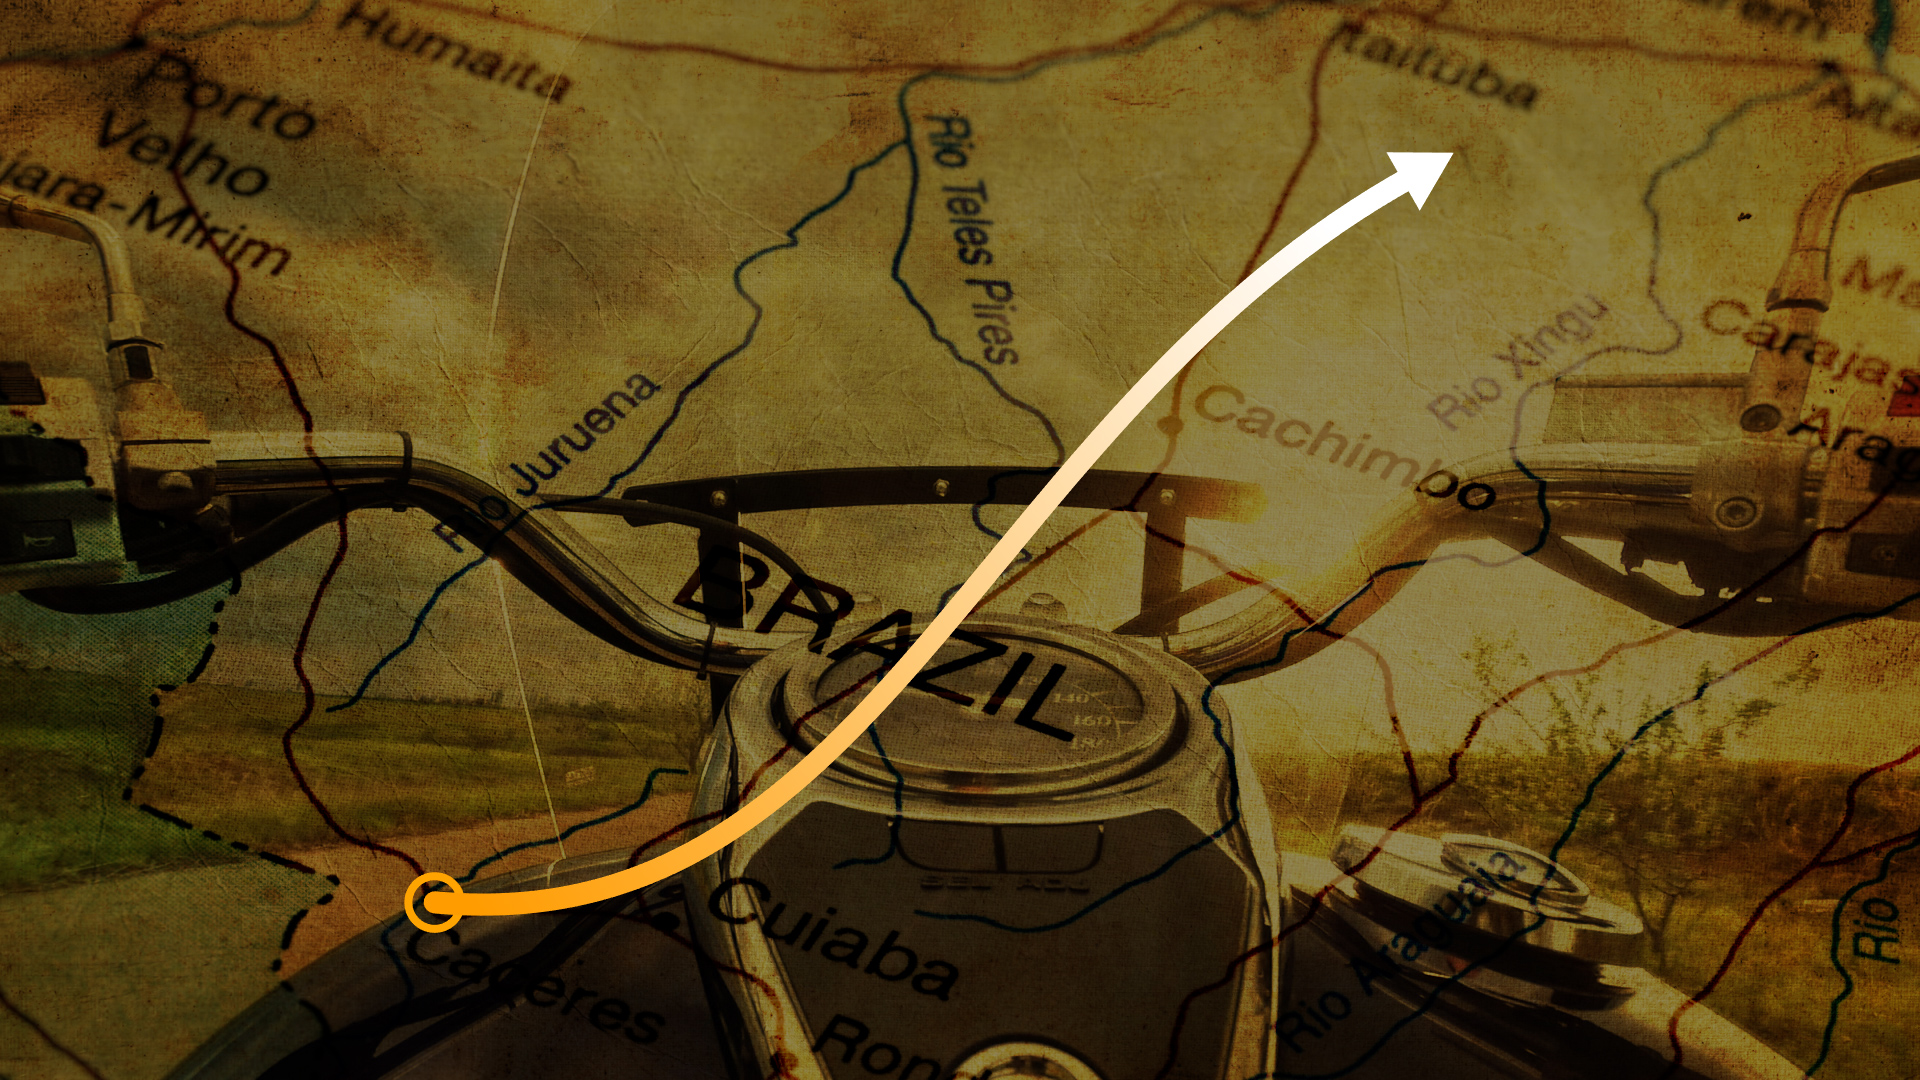
Create an animated straight or curved line between two points with elements that move along that path. Useful for flight path simulations, drawing paths on maps, and a variety of other motion graphics projects.
Presets
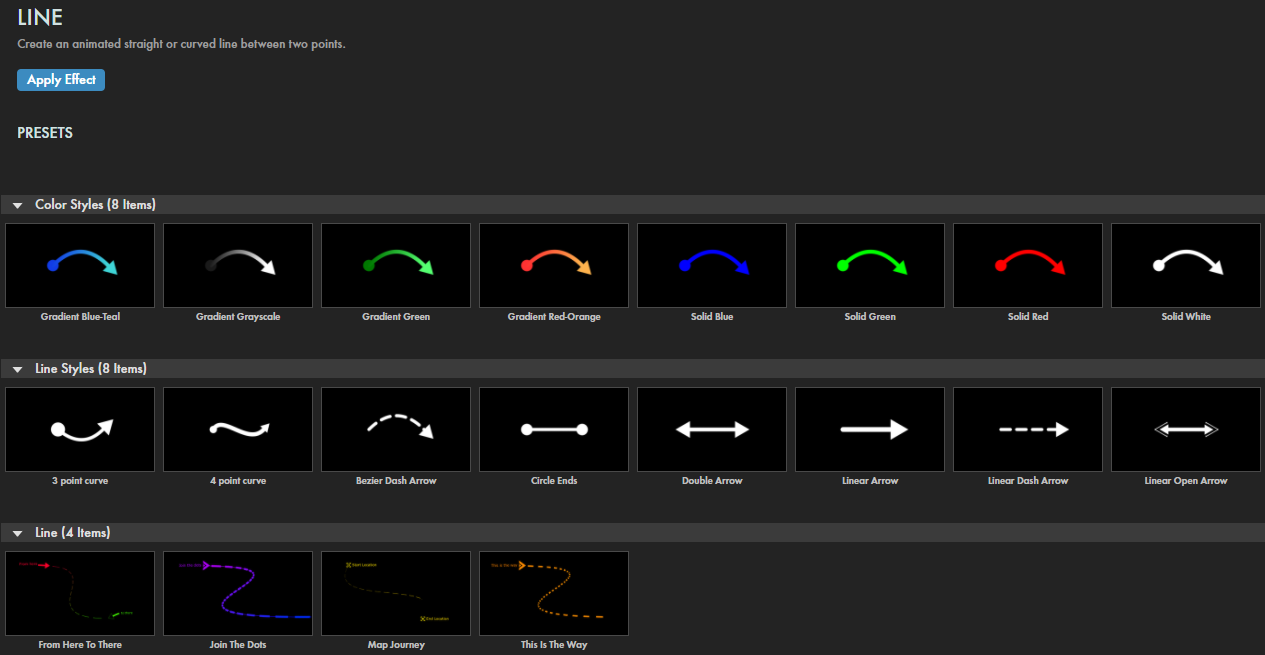
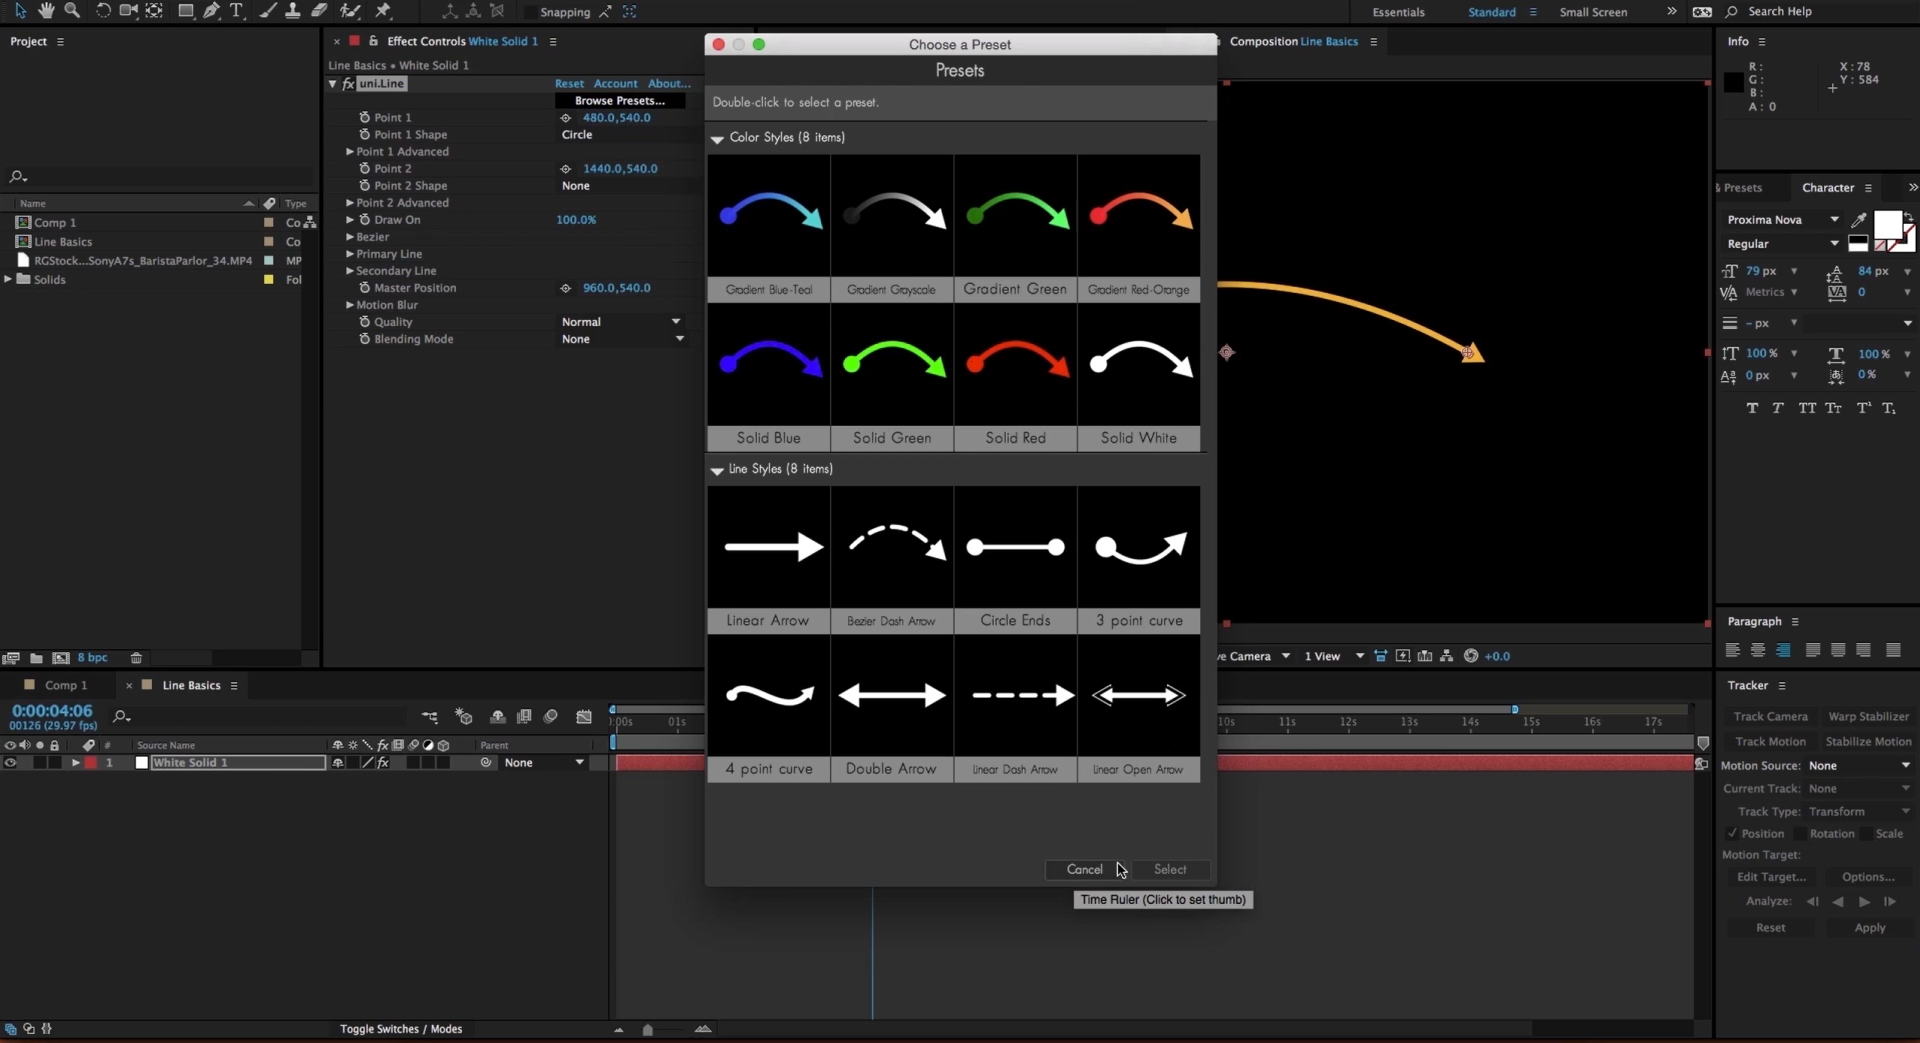
From gradient-colored arcs to animated, dotted paths, Universe Line presets are your convenient shortcut to line overlays. Find these presets via the blue Open Dashboard... button or the Choose a Preset... button below it.
Presets are available in three categories:
Color Styles
affect only the colors of the line, leaving style choices unaltered.
Line Styles
affect only the style of the line, leaving the color unaltered.
Line animations deliver a winding connection between two points, ready for you to fine tune.
As with all other Universe tools, you can modify or create a Line look and then save it under its own name by pressing the Save Preset... button.
Before we delve into each of Line's parameters, you might find it useful to begin with a video overview of the tool over on our Cineversity site. The Getting Started with Universe Line tutorial will take you from point selection to modifying curves to a couple of excellent use cases that involve applying Line with your host application. Once you've digested these concepts, this user guide will help explore Line's controls in more detail.
Modify the End Points
Point 1.
Either type in x and y values for the element position or use the cross-hairs to drag the point where you want.
Note that end points are not necessarily in the center of the end point. As you can see below, the point is in the center of Circle and Target shapes, but Triangle elements put the control point at the center of the triangle's base. (The Primary LinePrimary Shape, discussed later, has occasional exceptions to this orientation.)
Point 1 Shape
establishes the shape you want to be located at Point 1. The default setting is Circle, but you can choose from 14 different shapes or set it to None.
Point 1 Attributes:
Point 1 Color sets the color desired for the point shape.
Point 1 Opacity
controls the point shape's transparency.
Point 1 Size
governs the size of the point shape.
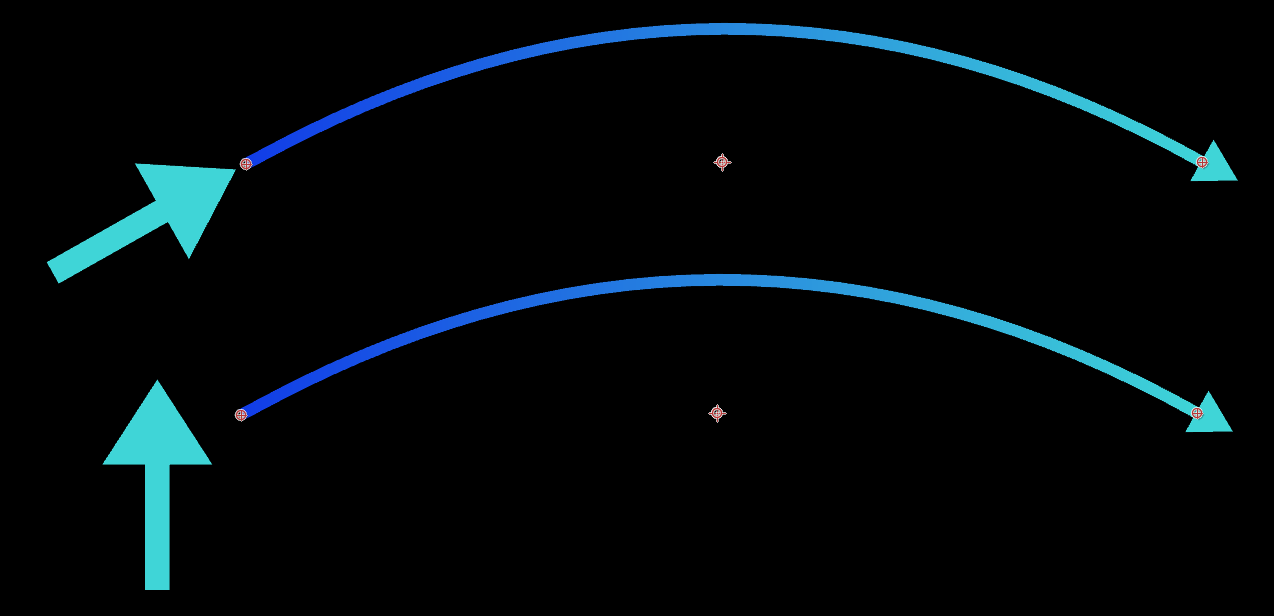
Orient Point 1 to Motion.
Lines have a directional motion from their start to end points. When the Orient Point 1 to Motion checkbox is enabled, the point shape will align its direction with this motion angle (shown in top image, below). If this checkbox is disabled, the shape rotation will orient in a neutral, due-north direction (bottom).
Point 1 Rotation
lets you select any given rotation angle for the point shape. Animate this value to create a spinning effect.
Point 1 Offset X/Y
shifts the point shape from its Point 1 location using the x and y controls.
This is how we got the arrows in the above image moved to the left and down from the Point 1 control marker.
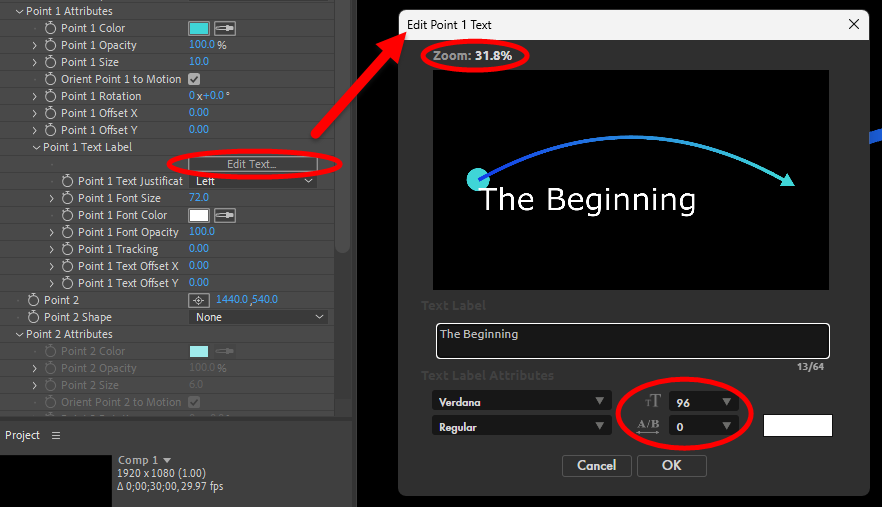
Point 1 Text Label:
Click
Edit
Text
to create and/or modify the point's label.
The label editor pop-up window, shown below gives you control over the label's font, style, and size as well as kerning/tracking. (These parameters are also available as controls in the ECP, as noted below.) Note the Zoom control near the top of the window and how this can help you have a clearer view of your label as you edit it.
Point 1 Text Justification
determines whether the label is aligned Left, Right, or Center relative to the point's control marker.
Point 1 Font Size
sets the font size.
Point 1 Font Color
chooses the label's text color.
Point 1 Font Opacity
adjusts the transparency of the label.
Point 1 Tracking
controls the spacing between the label's letters.
Point 1 Text Offset X/Y
adjusts the label position on the x or y axes relative to Point 1 control mark.
All these Point 1 controls are also available to modify Point 2.
Modify the Line and the Animation
Draw On
sets the amount of the line that has been drawn. Values span from 0% to 100%, with 100% representing the entire line. Use keyframes to add your own animation of the line being drawn. This value is disregarded if you select the Auto Animate feature (see below).
Bezier
changes the type of line that connects the points.
Bezier Style.
By default, this is set to Auto Curve. Drop-down options include:
Linear
creates a straight line between the end points.
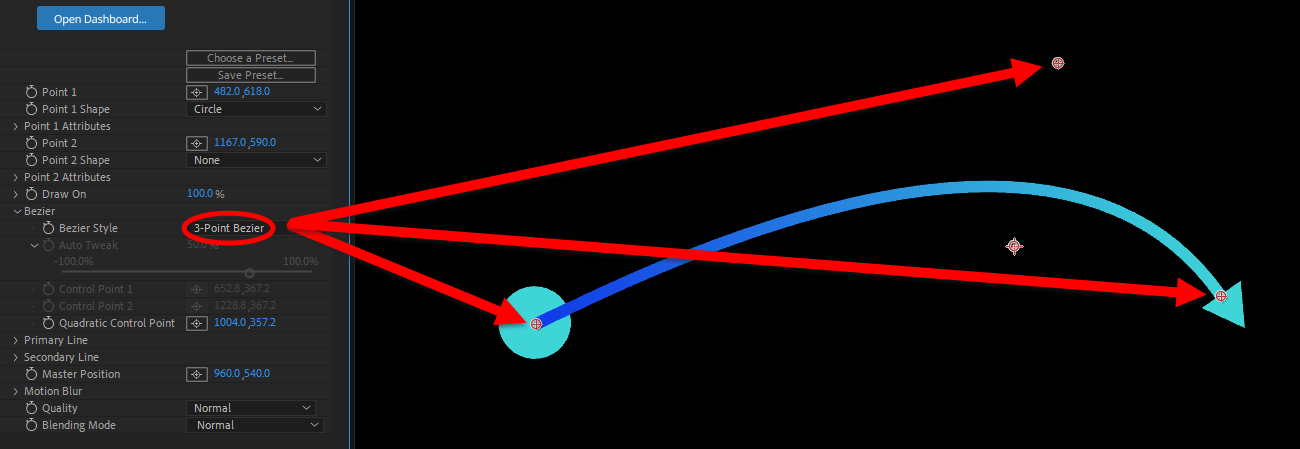
3-point Bezier:
Adds a control point in the middle between the two end points, giving you three points to control the shape of the curve. This also enables the Quadratic Control Point (below).
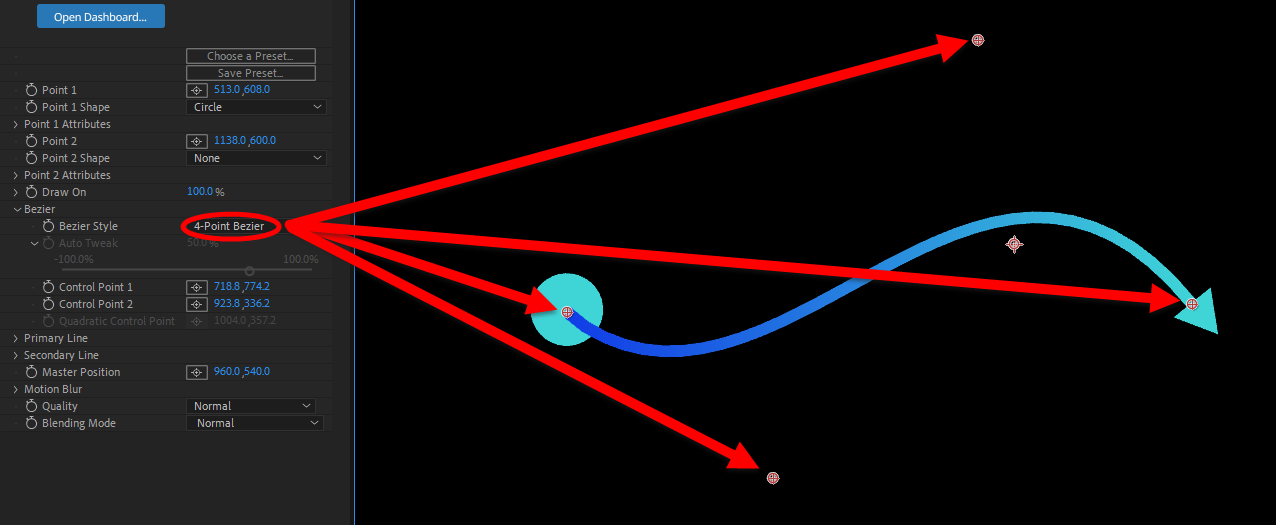
4-point Bezier:
Adds two points between the two end points, giving you four points to control the shape of the curve. This also enables Control Points 1 and 2 (below).
Auto Curve:
Adds a curve with controls only at each end point. The height of that curve is controlled by Auto Tweak (below).
Auto Tweak.
With Auto Curve enabled, Auto Tweak applies a 50% curve by default. Values can range from -100 (bottom) to 100 (top), as shown in the following combined image. A 0% value represents a straight line.
Control Points 1/2
enables when the 4-Point Bezier style is active. Either type in x and y values for the position of the points or use the cross-hairs to drag the points where you want.
Quadratic Control Point
enables when the 3-Point Bezier style is active.
Either type in x and y values for the middle point's position or use the cross-hairs to drag it where desired.
Primary Line
Primary Line Style.
Choose from
Solid, Dashed, or
None.
Primary Shape establishes the shape located at the end of the primary line. This shape will animate along with the end of the line, unlike the points above. The default setting is Basic Triangle, but you can choose from 14 different shapes or set it to None.
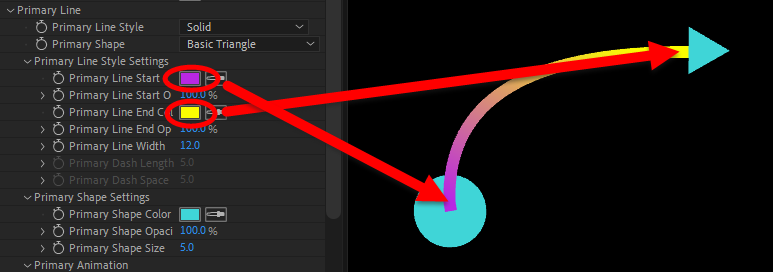
Primary Line Style Settings:
Primary Line Start/End Color sets the color desired for the two line ends.
If two different colors are chosen, a gradient will be created between them.
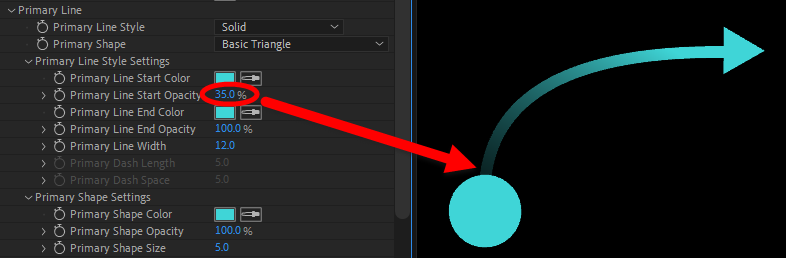
Primary Line Start/End Opacity adjusts the transparency level for either end of the line.
Primary Line Width
set the line's width.
Primary Dash Length/Space
control the length and spacing of your line's dashes (when Primary Line Style is set to Dashed).
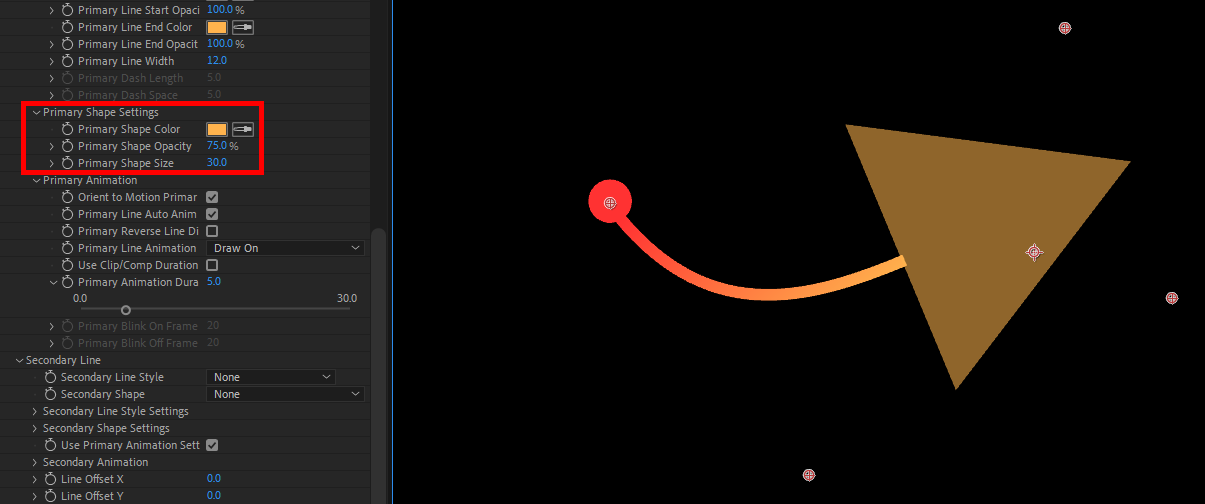
Primary Shape Settings
Primary Shape Color selects the color for the line's "end" shape.
Primary Shape Opacity sets the shape's transparency. (Note the 75% value in the above image.)
Primary Shape Size controls the shape's size.
Primary Animation:
Orient to Motion Primary.
Enabled by default, this control orients the primary shape rotation to the angle of motion for the primary line. (Said simply, the primary shape points where the line goes.) When turned off, the shape's rotation stays fixed no matter how the line motion changes.
Primary Line Auto Animate
automatically animates the line's draw-on animation when enabled, as shown below.
Primary Reverse Line Direction:
When checked, the primary line direction reverses between the two end points.
As the following animation shows, though, this function won't automatically reverse your Point 1/2 shapes.
Primary Line Animation Style
establishes what animation style (None, Draw On, Blink, or Draw On and Blink) the line should use.
Use Clip/Comp Duration Primary, when enabled, sets the line animation duration to the time length of your comp. When disabled, the Primary Animation Duration sets the animation length.
Primary Blink On/Off Frames.
When you select an animation style that includes Blink, these controls enable. Set the duration in frames for how long blinks should last when on or off.
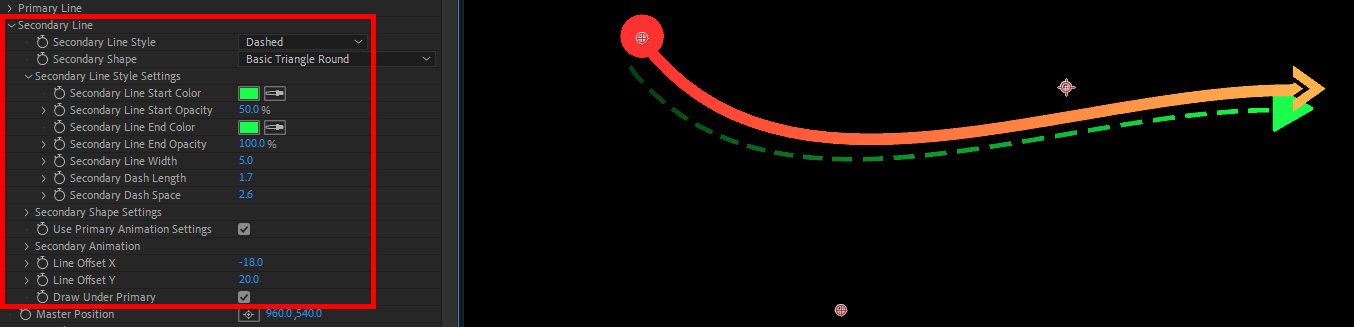
Secondary Line:
Secondary Line Style, Shape, Style Settings, and Shape Settings
work in the same way as the Primary Line controls (above).
Use Primary Animation Settings, when enabled, animates the secondary line in the same way you set for the primary line. Turn this checkbox off to enable the Secondary Animation controls.
Secondary Animation.
These controls enable when you un-parent the secondary animation from the primary by unchecking the Use Primary Animation Settings checkbox (above).
Orient to Motion Secondary, enabled by default, orients the secondary shape rotation to the angle of motion for the secondary line. When disabled, the shape's rotation stays stationary no matter how the line's motion changes.
Secondary Line Auto Animate. When enabled, this control automatically animates the line's draw-on animation.
Secondary Reverse Line Direction:
As with the primary line, this control reverses the secondary line's direction between its two end points.
Secondary Draw On Percent sets the amount of the line that has been drawn.
Values range from 0% to 100 percent. Use keyframes to add your own animation of the
line being drawn. This value is disregarded if you choose to use the Auto Animate feature (above).
Secondary Line Animation Style selects the animation style (None, Draw On, Blink, or Draw On and Blink) the line should use.
Use Clip/Comp Duration Secondary, when enabled, sets the line animation duration to the time length of your comp. When disabled, the Secondary Animation Duration sets the animation length.
Secondary Blink On/Off Frames.
If an animation style that includes Blink is chosen, these controls enable. Set the duration in frames for how long the blinks should last when on or off.
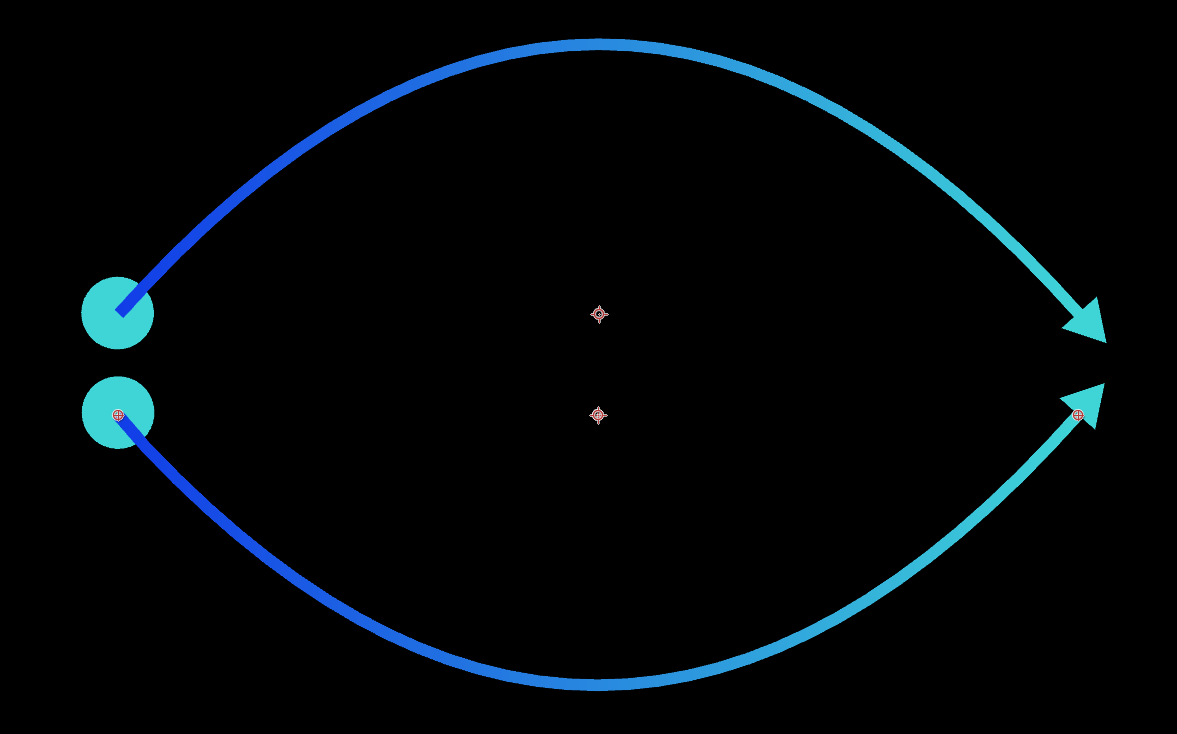
Line Offset X/Y
sets an offset in either x or y direction for the secondary line from the primary.
In the above clip, we show the green secondary line offset lower than the primary line.
Draw Under Primary , when enabled, draws the secondary line under the primary line.
Master Position sets the x and y values for the line element's base position. Shift this by adjusting the x/y values or use the cross-hairs to drag the Master Position where you want.
Motion Blur controls help create a smoother look to the effect. This group allows you to simulate the low shutter speed blur and frame blending commonly seen in film.
To turn on the Motion Blur effect, choose Low, Medium, or High from the
Motion Blur
drop-down. Higher quality blurs may affect render speeds.
Motion Blur Shutter.
A higher number will give more motion blur on the footage since it mimics a longer frame exposure.
Motion Blur Phase
allows you to synchronize or desynchronize the timing of the shutter opening and closing with the footage's frame rate.
Quality selects whether the line renders at Normal or High quality. Setting the quality to High may affect render times.
Blend Mode
selects the blending mode used to composite the line result over the original image.
Want More?
Universe Line by itself is great, but it has much more to offer when combined with other tools. If you skipped that video we recommended at the top of this page, maybe you'd like to give it a second chance when you see how to combine Line with tracking.
Or maybe you'd like to know how to create an Indiana Jones-style panning map line? Same video.
Or just perhaps you'd like some ideas on how to combine Line with other Universe Tools. Wouldn't you know it? We've got a video on mashing together Universe Line with ChromaTown and Turbulent Noise. Have fun experimenting!