BPR filters are post-process effects applied to your Best Preview Render. There are several advantages to using these filters. First, it avoids the extra step of doing post-render work in another program like Photoshop. Second, the BPR filters can use internally computed information like depth or masking. This means you can apply the effects to a local area rather than to the entire image. This local application of the filters is also what sets BPR filters apart from the other render filters from previous versions of ZBrush.
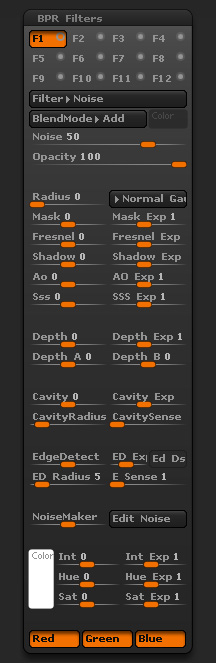
Render > BPR Filters sub-palette
F1 – F8
Click on the F1 to F8 buttons to display the corresponding slot which can receive a filter. By default, no filters are activated. You must click on the small circle at the top right of the Function button to enable/disable the filter.
Filter (default> Noise)
The Filter selector. Click to select a filter to apply to your render. The same filter may be applied in multiple slots, with each instance receiving its own settings.
BlendMode (default> Add)
Change the mode by which the filter effect will be combined with your render. Each filter has a default blend mode that will be selected by default but you are free to change it to get the exact result you are looking for.
Color picker
By clicking on the Color box you can change the color applied to the filter. Some filters like Red, Blue or Green are not affected by this option.
Strength
Define how strongly the filter will be applied to your render. At 0, the filter has no effect, while at 1 it applies the effect at 100%. Negative values are also possible and will reverse the filter’s effect (such as turning the Blur filter into a Sharpen filter).
Radius
Alter the current filter by increasing its spread. This setting is modulated by the Strength slider
Blur (default> Normal Gaussian)
Filter Blur Type
Mask
Modulate Strength By Mask. Modulates the filter by the model’s silhouette. When at its maximum value, the filter will be applied only within the parts of the canvas that are covered by your model. With a value of -1 the filter will only apply to the background. This information is always available and doesn’t need to be enabled in the Render settings to be applied to the image.
Mask Exp
Filter By Mask Exponent
Fresnel
Modulate Strength By Fresnel (Negative=Front,0=Center,Positive=Sides). Modulates the filter based upon surface orientation. By adjusting the modulator’s value the filter can be applied to the front surfaces of the model or to surfaces angled away from the camera. This information is always available and doesn’t need to be enabled in the Render settings to be applied to the image.
Fresnel Exp
Filter By Fresnel Exponent
Depth
Modulate Strength By Depth (Negative=Near,0=Center,Positive=Far) Modulates the filter based upon the depth information in the scene. This information is always available and doesn’t need to be enabled in the Render settings to be applied to the image.
Depth Exp
Filter By Depth Exponent
Shadow
Modulate Strength By Shadow. Modulates the filter by which parts of the surface are in shadow. When at its maximum value, the filter will only be applied where there are shadows in the render. This information is always available and doesn’t need to be enabled in the Render settings to be applied to the image.
Shadow Exp
Filter By Shadow Exponent.
Ao
Modulate Strength By AO. Modulates the filter based upon how close surfaces are to each other. When at its maximum value, the filter will only be applied where Ambient Occlusion shadows are cast within the render. This information is available only when Ambient Occlusion has been enabled in the Render >> Render Properties sub-palette prior to rendering.
AO Exp
Filter By AO Exponent
Sss
Modulate Strength By SSS. Modulates the filter by where light is able to pass through the model via its SSS settings. When at its maximum value, the filter will be applied only to the translucent areas within the render. This information is available only when Sub Surface Scattering has been enabled in the Render >> Render Properties sub-palette prior to rendering.
SSS Exp
Filter By SSS Exponent
Color
Filter By Color
Int
Filter By Color Intensity. Modulates a filter based on the intensity of the color that is selected in the associated Color Swatch. The Int Exp slider will control the size of the intensity roll off being applied to the model. Higher settings will result in less of the render being affected by the filter.
Int Exp
Filter By Intensity Exponent
Hue
Filter By Color Hue. Modulates a filter based on the hue of the color that is selected in the associated Color Swatch. The Hue Exp slider will control the size of the hue roll off being applied to the model. Higher settings will result in less of the render being affected by the filter.
Hue Exp
Filter By Hue Exponent
Sat
Filter By Color Saturation. Modulates a filter based on the saturation of the color that is selected in the associated Color Swatch. The Sat Exp slider will control the size of the saturation roll off being applied to the model. Higher settings will result in less of the render being affected by the filter.
Sat Exp
Filter By Saturation Exponent