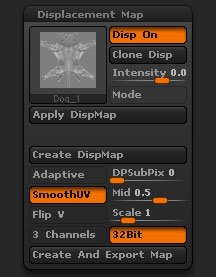
Tool > Displacement Map sub-palette
Displacement Map thumbnail
The Displacement Map thumbnail displays the most recently created (or selected) displacement map. Each SubTool may have its own displacement map. Click the thumbnail to select an image from the Alpha pop-up palette if you wish to apply a displacement map.
Disp On
The Displacement On button will turn the displacement on or off on the current selected Subtool.
Clone Disp
The Clone Displacement button will create a clone of selected displacement to the Alpha Palette. The displacement can be exported in a variety of file formats from the Alpha Palette.
Intensity
The Displacement Intensity slider determines the strength of the displacement effect.
Mode
The Displacement Mode button selectes one of two types of displacement effects for display in ZBrush. If un-pressed the effect is Bump Only mode. In this mode, the outline of the object is unchanged, and displacement effects are only visible on portions of the object facing you. If pressed, the effect is Full Displacement mode. In this mode, all displacement effects are created by deforming the object’s shape.
Apply DispMap
The Apply Displacement Map button deforms the mesh by displacing polygons as mapped by the current displacement map. When displacing, ZBrush interprets grayscale data as follows: areas at 50% gray are unchanged; lighter areas (greater than 50%) are displaced outward; darker areas (less than 50%) are displaced inward. This button reads the value of the Displacement menu Intensity slider and is disabled if the slider is set to zero.
Create DispMap
The Create Displacement Map button generates a displacement map for this object. Height and width of the map are the same size, and are determined by the Displacement Map Image Resolution slider, above. The new displacement map is added to the Alpha palette.
Adaptive
The Adaptive Scan Mode button affects the quality of the next Displacement Map generated by the Create Displacement Map button. If pressed, the map will be more accurate in detailed areas, and will likely take longer to generate. This button is similar to its counterpart in the Normal Map sub-palette. If normal and displacement maps are intended to match, this mode should be enabled or disabled for both.
DPSubPix
The Displacement Map Subpixel Accuracy slider determines the accuracy of the next displacement map created for this object. Higher values cause a higher-quality map to be generated.
SmoothUV
The Smooth UV button, if pressed, determines that UV coordinates are smoothed when the next displacement map is generated.
- When SmoothUV is enabled for generating maps, all UV borders will remain frozen when smoothing.
Mid
The Displacement Mid Value slider is used by ZBrush’s displacement algorithms to determine a midpoint value. This slider is set to 50 by default.
Flip V
The Flip V button will vertically flip the Displacement map but only when Create and Export Map is selected.
Scale
The Scale will set the scale of a 32Bit Displacement Map of selected Tool. This setting is only relevant when the 32Bit button is selected. This button will only work when the Create and Export Map is selected.
3 Channels
The 3 Channels will export a 3 channel RGB displacement map in TIFF format. This button will only work when the Create and Export Map is selected.
32Bit
Export 32-Bits Floating-Point Map
Create And Export Map
The Create and Export Map will create and export a displacement map to selected directory based on the settings in this menu.