- For full information about using ZRemesher see the User Guide ZRemesher page.
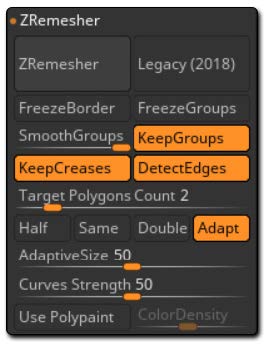
Here is a list of the ZRemesher settings which can be changed to precisely control the results of your retopology. All settings are found in the Tool > Geometry > ZRemesher UI section.
ZRemesher can of course produce very high quality results with its default settings. However, depending on the needs of your specific model, you may find that changing these parameters can improve the results.

The ZRemesher v3 controls
ZRemesher
The ZRemesher button launches the retopology calculation for the visible portions of the selected SubTool.
The generated retopology is modulated by the ZRemesher options, which can drastically change the resulting mesh.
Legacy (2018)
When enabled, this mode uses the ZRemesher 2 algorithm found in ZBrush 2018. Its functionality is the same as in the previous version and so it won’t be able to use the Keep Creases and Detect Edges functions explained below.
Freeze border
When enabled, Freeze Border mode forces ZRemesher to maintain the same vertex numbers and their positions along mesh’s openings. If the model is partially visible, the retopology will be done only on the visible polygons and this result will automatically be connected to the rest of the mesh.
The polygon count may not precisely reach that defined by the Target Polygons count slider. This is because the algorithm must respect both the exact edge vertices and the setting for the Adaptive Size slider.

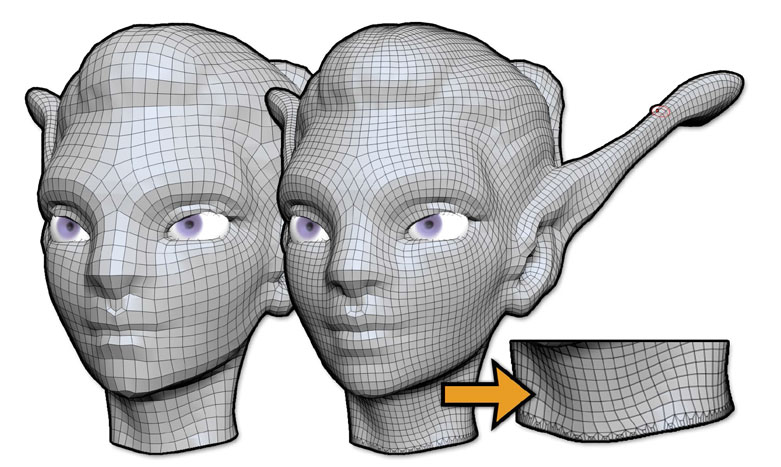
On the left, the Freeze Border option has been disabled. On the right, it has been enabled. Notice the increase in polygon density. The first loop of polygons at the neck has been subdivided locally to preserve the original vertex positions.
Freeze Groups
The Freeze Groups mode retopologizes each PolyGroup independently, keeping their borders frozen and then welding the edge vertices together along each PolyGroup border.
This results in a model with the same PolyGroups, but with a different topology flow within each group.
Smooth Groups
Adjust the Smooth Groups slider to control the amount of smoothing applied to the polygroup borders.
Keep Groups
Keep Group mode retains the existing boundaries of each of the model’s PolyGroups to reproduce those groups in the retopologized model.
Unlike Freeze Groups option (which retains the same topology along the PolyGroup borders), the Keep Groups option alters the topology while keeping the boundary shape. This results in a better topology flow.
Keep Creases
The Keep Creases function will use the existing edge creases applied on your model to drive topology creation. These will help ZRemesher have a better understanding of your model’s structure, benefitting hard surface designs.
The resulting topology will keep these crease edges.
Detect Edge
When enabled, the Detect Edge mode will try to identify a model’s hard surface edges. It is advised to use this mode when you are working with CAD type models or the result from Live Boolean operations.
Adaptive Size
The Adaptive Size slider allows the creation of non-square polygons. It also factors the size of the polygons, based upon the model’s curvature.
Put another way, it tells ZRemesher to put greater emphasis on the model’s overall shape rather than rigidly uniform polygon size and distribution. This provides a better polygon flow, especially in your model’s more tightly detailed areas like the ears, fingers, etc.
This setting increases the number of polygons where necessary to maintain the model’s original shape. As a result, the final number of polygons generated may not match the Target Polygon Count value.
Please read the Adaptive Size section above for more information about this setting and the impact it has on model quality.
Target Polygons Count
The Target Polygons Count slider defines the number of polygons that you would like ZRemesher to produce. It called a target for a reason: Sometimes conditions will not allow a “bulls eye” and the new topology will have a number of polygons that is different from what was specified by this slider. The Adaptive Size can especially have an impact on this number.
If having a precise number of polygons is more important to you than polygon optimization, disable ZRemesher’s Adaptive Density mode as explained below.
Half, Same, Double
The Half, Same and Double buttons provide an easy way to set the target polygon count relative to the number of polygons found in the original model.
- Half sets a target that is equal to half the model’s original polygon count.
- Same sets the target to match the model’s original polygon count.
- Double will actually tell ZRemesher to create topology with twice as many polygons as were found in the original model.
These values can be combined with the Adaptive Density mode (explained below).
Note: As with the Target Polygon Count slider, the numbers of polygons that will actually be generated by ZRemesher can be different what’s specified. The only way to have an exact polygon count is to disable the Adaptive Density mode.
Adaptive Density
By default, ZRemesher gives the Adaptive Size setting higher priority than the Target Polygon Count because of the Adaptive Density mode which is enable by default. But when this mode is disabled, ZRemesher will adjust its topology calculations to give equal weight to your Target Polygon Count value.
Put another way, ZRemesher will normally try to hit the target count, but only where doing so will not compromise the topology quality dictated by the Adaptive Size slider’s setting. Turning Adaptive Density mode off means that ZRemesher will come in very close to the target polygon count, even if a different count would have produced a more “ideal” mesh.
Curve Strength
The Curve Strength slider is used in collaboration with the Curves created by the ZRemesher Guide brush to influence the edge loops that will be created by the plug-in.
A low value will attract your topology edges toward the curves, while a high value will strongly guide the polygon flow. Please read the “Working with Curves” section above for more details on how to use Curves in association with ZRemesher.
As a general rule, the higher you set this slider, the fewer Curves you should draw. Otherwise you risk creating topology restrictions that are impossible to resolve.
Use PolyPaint
The Use PolyPaint mode tells ZRemesher to pay attention to PolyPaint color when determining local polygon density as it creates the new topology.
How PolyPaint affects the density is determined by the specific color used:
- Pure red specifies a higher polygon density within the painted area.
- Pure blue means a lower polygon density within the painted area.
- White (no PolyPaint) gives ZRemesher total control over polygon density.
Of course, the opacity of the color will have an impact of the changes of density: a light blue will slightly reduce the polygon density while a full opacity blue will have a strong reduction of polygons density.
The opacity of the color gives weight to the results. For example, a light blue will slightly reduce the polygon density while 100% RGB Intensity will reduce polygon density in the painted area by the maximum amount possible.
When painting these colors, simply use the Standard brush in RGB mode only. Make sure to turn off ZAdd and ZSub, so you don’t sculpt the mesh.
To make a smooth transition between colors and avoid visible steps between different color densities, simply blur the edges of the painted areas by using the Smooth brush in RGB mode only. (No ZAdd or ZSub.)
Color Density
The Color Density slider sets the factor by which ZRemesher will adjust polygon density when using PolyPaint.
If the slider is set to 4 then ZBrush will paint pure blue and these areas will have four times as many polygons as the unpainted portions of your mesh. If the slider is set to 0.25 then ZBrush will paint pure red and these areas of the mesh would have a density that is only ¼ that of the unpainted portions.
A setting of 2 doubles polygon density, while a setting of 0.50 halves the density.
Note: This PolyPainting control is exactly the same as that used by UV Master.