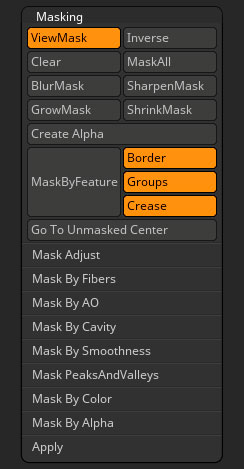
Tool>Masking sub-palette
The Tool > Masking sub-palette provides options for masking a 3D object. Masking modifies all editing (sculpting) actions, whether applied directly or adjusted in the Deformation sub-palette.
Masks can be applied in a number of ways:
- Paint them directly on an object on the canvas in Edit mode by holding the CTRL key and paint the mask. While holding Ctrl different masking Stroke options can be selected.
- Project the selected Alpha onto the object by holding the CTRL key and dragging over the top of the object.
- Wrap the selected Alpha onto the object’s surface by pressing the Mask By Alpha button.
View Mask
Turning on the View Mask switch will show the masking for the selected SubTool.
Masking shields areas of a 3D object from deforming or sculpting. The object’s mask is displayed as a darker region on the object’s surface; the degree of darkness of the region reflects the intensity of the mask.
In addition to the options in this sub-palette, masks can be painted directly onto an object in Edit mode (with Draw Pointer selected) by holding the Ctrl key and painting on its surface.
Also, while holding the Ctrl key, you can apply the current Alpha as a mask by clicking and dragging from outside the object.
Inverse
The Inverse button will invert the object’s mask so that dark (masked) areas become light (unmasked) and vice-versa.
Clear
The Clear button will remove all masking from the object, so that all parts can be deformed or sculpted.
MaskAll
The MaskAll button will mask the whole object. If part of the object is hidden, the visible part only will be masked. Areas can be unmasked by holding the Ctrl+Alt key and painting.
BlurMask
Pressing the BlurMask button will blur the edges of the current mask. Additional presses will result in more blurring. This is particularly useful when masking an area that will be sculpted to blend smoothly into the surrounding area, as you can quickly draw a mask and then blur it to the desired degree.
SharpenMask
SharpenMask will sharpen the edges of the current mask. This is the inverse of the BlurMask operation, though blurring and sharpening a mask will not normally give you exactly the original mask – use undo for that.
GrowMask
The GrowMask button will add a blurred mask around the existing mask outline, extending it. Any part that is already fully masked will remain fully masked.
ShrinkMask
The ShrinkMask button will soften the mask at its edges, reducing the masked area. Those parts of the object that are completely unmasked will not be affected.
Create Alpha
The Create Alpha button provides a means of storing the current mask for later use by creating a grayscale image that is added to the Alpha palette. The button will only be enabled if the model has UV mapping assigned. The mask can be restored by selecting the image in the Alpha palette and then pressing the Mask By Alpha button (see below).
Mask By Features
The Mask By Feature button will apply a mask to the geometry Border, PolyGroup border and/or Creased edge, depending on the options selected to the right of the button. The options can be selected however you want, either on their own or together.
-
- Border – when turned on masking will be along the visible border of a mesh. Either the mesh must be ‘open’ or part of the mesh must be hidden for this option.To see Mask By Features > Border in action:
- Load the LightBox > Tools > DemoHead.ZTL.
- Make sure Border is turned on and click the Mask By Features button.
- Only the edges of any openings will be masked.
- Groups – when turned on masking will be along the borders of all PolyGroups.
- Crease – when turned on masking will be along creased edges.
- Border – when turned on masking will be along the visible border of a mesh. Either the mesh must be ‘open’ or part of the mesh must be hidden for this option.To see Mask By Features > Border in action:
Go to Unmasked Center
This button will position the Gizmo3D at the center of the unmasked mesh. It is the same as the Gizmo3D function of the same name. The button is provided to give access to the function when the Gizmo3D isn’t visible on screen and to allow a hotkey to be assigned.
Masking sub-palette sections
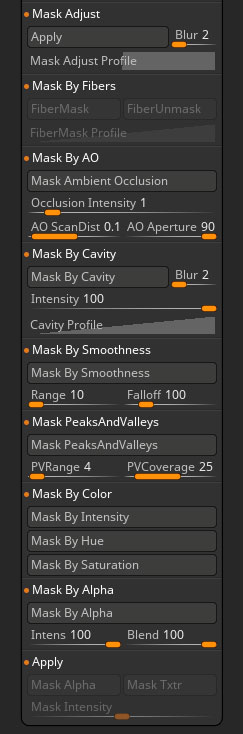
 Mask Adjust
Apply
The Apply button will adjust the current mask according to the degree of blur set in the Blur slider and the Mask Adjust Profile curve. The effect is absolute rather than accumulative, so repeated button presses make no difference unless the blur value is changed.
Blur
The amount of blur that will be applied to the current mask. Higher values result in greater blurring, lower values may sharpen a mask that is already blurred.
Mask Adjust Profile
The masking adjustment can be varied by changing the profile curve.
Mask By Fibers
FiberMask
The FiberMask button will allow you to use the Mask Profile curve below to mask any part of the fibers. From left to right on the curve represents the root to the tip of a fiber. Adjust the curve to mask fibers in a variety of ways.
FiberUnmask
The FiberUnmask button will allow you to use the Mask Profile curve below to adjust the masking of any fibers already fully masked.
When masking fibers with any masking brush ZBrush will automatically mask the entire fiber. This button will allow soft masking of these fibers.
FiberMask Profile
The FiberMask Profile curve allows you to control how fibers are masked along their length. The left side of the curve represents the root and the right side represents the tip. The pale part under the curve represents the unmasked area, the darker part above the curve is the masked area.
Mask By AO
Mask Ambient Occlusion
The Mask Ambient Occlusion button will create a mask based on an ambient occlusion. The best way to view the Ambient Occlusion mask is to set the selected SubTool’s material to Flat Color, or to set the render to Flat.
The settings of the Occlusion Intensity, AO ScanDist and AO Aperture slider affect the results.
The mask can be converted to a texture by pressing New From Making in the Tool > Texture Map sub-palette.
Occlusion Intensity
The Occlusion Intensity slider increases the strength of the Ambient Occlusion, resulting in a larger area of black.
AO ScanDist
The AO ScanDist slider will increase the distance of the secondary colour for the Ambient Occlusion.
AO Aperture
The AO Aperture slider will affect the scale of the Ambient Occlusion. If this is set to a low value then there will be less of an Ambient Occlusion.
Mask By Cavity
Mask By Cavity
automatically creates a mask based on the cavity geometry of the model. This allows you to, for example, easily paint on the surface of a dragon’s scales but not in the grooves between them.
Blur
The Blur slider will apply a blur to the cavity mask. By setting the slider to 100 the cavity masking will be softened.
To best view cavity masking, set Preferences>Edit>Masked Object Dimming to 5 and change the material to Flat Color.
Intensity
The Intensity slider creates a harder edge around the cavities. Negative values will invert the Cavity Mask.
Cavity Profile
The Cavity Profile curve controls how the cavities on the mesh are masked. The left side of the curve is the base of the cavities, the right side is the surface. The dark area of the curve is the masked area and the light area is unmasked.
Mask By Smoothness
Mask By Smoothness
The Mask By Smoothness button will mask the object based on the surface curvature. This is similar to the way the Transpose Smart brush works when masking.
Before pressing Mask By Smoothness button set the Range and Falloff sliders.
Range
With the Range slider set to a higher value the mask will cover more of the surface from any point where ZBrush determines there should be a mask. A lower setting will keep the mask closer to the point where the surface changes.
Falloff
If Falloff is set lower then there will be a more gradual transition between masked and unmasked areas. A higher setting will result in a sharper mask.
Mask PeaksAndValleys
MaskPeaksAndValleys
When the Mask PeaksAndValleys button is pressed ZBrush will mask all peaks and valleys of the selected SubTool’s surface.
PVRange
The PVRange slider will control the falloff distance of the mask.
PVCoverage
The PVCoverage slider will control the mask amount that will be applied to all peaks and valleys of the selected SubTool.
Mask By Color
Mask By Intensity
Mask By Intensity derives a mask from the color intensity values in an applied texture, or if no texture is on the model, polypaint will be used. Darker areas receive higher masking values than lighter areas.
Mask By Hue
Mask By Hue derives a mask from the colors in an applied texture, or if no texture is on the model, polypaint will be used. Masking values of different colors are arbitrarily assigned based on the order of colors in the Color Selector, with the masking value at 100% at the left edge, decreasing to 0% at the right edge.
Mask By Saturation
Mask By Saturation derives a mask from the color saturation values in an applied texture, or if no texture is on the model, polypaint will be used. Highly staturated areas receive higher masking values than do less saturated areas.
Mask By Alpha
Mask By Alpha
Mask By Alpha uses the currently selected alpha in the Alpha palette to apply masking. Your model should have UVs so that the alpha is applied correctly.
Intens
The Intensity Value slider determines the intensity of future masks applied to the selected SubTool. An Intensity value of 50 means deformations and sculpting actions would be applied at half-strength in masked regions.
Blend
The Blending Value slider determines how new masks mix with masks that are already applied to the selected SubTool. At 50%, the two masks are averaged together; at 100% the new mask overwrites the old mask.
Apply
Mask Alpha
The Mask Alpha button will apply the mask of a mesh to the selected alpha in the Alpha palette. This button is only enabled if there are UV coordinates assigned to the mesh, and these UVs are used when copying the mask.
The Mask Intensity slider will set the amount of intensity that will be applied.
Mask Txtr
The Mask Txtr button will apply the mask of a mesh to the selected texture in the Tool > Texture Map sub-palette. This button is only enabled if there are UV coordinates assigned to the mesh, and these UVs are used when copying the mask.
Mask Intensity
The Mask Intensity slider affects the degree of masking that is applied to the image when using either Mask Alpha or Mask Txtr.
A setting of 100 will mean that fully masked areas are copied as black; lower values will mean the masking is copied as shades of gray.