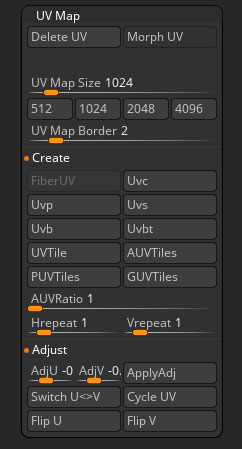
Tool > UV Map sub-palette
Delete UV
The Delete UV button will delete the UVs of the current selected SubTool. SubTools must have UVs in order to apply any Texture or Displacement map.
Morph UV
The Morph UV will unwrap the selected SubTool into the UV layout. This mode can also be used with ShadowBox.
UV Map Size
The UV Map Size slider will allow you to set a custom size for your UV map. If you were to set the slider to 8192 then the map size for all maps generated (such as texture, normal and displacement maps) will be 8192 x 8192.
512
The 512 button will set the Map Size to 512×512.
1024
The 1024 button will set the Map Size 1024×1024.
2048
The 2048 button will set the Map Size 2048×2048.
4096
The 4096 button will set the Map Size 4096×4096.
UV Map Border
The UV Border slider will applay an overpaint to the UV borders. The number of pixels that will be overpainted is controlled by this slider.
 Create
FiberUV
The FiberUV button will automatically apply UV coordinates to the individual fibers of a FiberMesh object. All fibers will share the same UV space so that one texture can be applied to all fibers.
Uvc
The Uv Cylindrical button maps the selected texture onto the selected 3D object as if it were a cylinder. It applies the texture based on the current orientation as it appears in the Preview window.
Uvp
The Uv Planar button maps the selected texture onto the selected 3D object as if it were a flat plane. It applies the texture based on the current orientation as it appears in the Preview window.
Uvs
The Uv Spherical button maps the selected texture onto the selected 3D object as if it were a sphere. It applies the texture based on the current orientation as it appears in the Preview window.
Uvb
The Uv Box button maps the selected texture onto the selected 3D object as if it were an opened out box.
Uvbt
The Uv Box Tiles button maps the selected texture onto the selected 3D object as if it were a box with the same texture map on each of the six faces.
UVTile
The UV Tile button maps the selected texture onto the 3D object by assigning the whole area of the texture to each polygon.
AUVTiles
The Adaptive UV Tiles button maps the selected texture onto the selected SubTool by assigning a small rectangular area of the texture to each polygon.
The portion of the texture assigned varies according to the polygon’s relative size. Larger polygons are mapped with a larger portion of the texture. The maximum ratio allowed is governed by the AUV Tiles Ratio slider (below).
When the AUV Tiles Ratio slider is set to 1, all polygons are mapped with an equal portion of the texture, making it possible to use the same texture on multiple deformations of the same model.
Adaptive UV Tiles is most effective when the texture’s width and height are powers of 2, i.e. 1024×1024, 2048×2048, etc.
PUVTiles
The Packed UV Tiles button assigns a mix of AUVTiles and GUVTiles which will try to fill as close as possible 100% of the UV space. This is the most accurate UV unwrap that maximizes the UV space.
GUVTiles
The Group UV Tiles button assigns a different portion of the selected texture to each polygroup in the 3D object. The relative sizes of assigned texture portions can be regulated with the AUVRatio slider below.
AUVRatio
The Adaptive UVTiles Ratio slider affects the way the Adaptive UV Tiles button (above) maps a texture onto the 3D object.
Larger polygons are assigned larger portions of the selected texture. This slider determines the maximum size ratio beyond which size differences are ignored. For example, if this slider is set to 10, the largest polygons in the object are assigned a texture portion no larger than 10 times that of the smallest polygon.
When this slider is set to 1, all polygons are mapped with an equal portion of the texture, making it possible to use the same texture on multiple deformations of the same model.
HRepeat
The HRepeat slider determines how many horizontal repetitions of the selected texture are wrapped onto the surface of the selected SubTool.
VRepeat
The VRepeat slider determines how many vertical repetitions of the selected texture are wrapped onto the surface of the selected SubTool.
 Adjust
AdjU
The Adjust U Coords slider sets the texture offset to adjust the current U map coordinates. A positive setting will shift the coordinates to the right; a negative setting will shift the coordinates to the left. Press Apply UV Adjustments to apply the change.
AdjV
The Adjust V Coords slider sets the texture offset to the current V map coordinates. A positive setting will shift the coordinates up; a negative setting will shift the coordinates down. Press Apply UV Adjustments to apply the change.
ApplyAdj
The Apply UV Adjustments button applies the changes set in the AdjU and AdjV sliders.
Switch U<>V
The Switch U<>V coordinates button will switch the U space with the V space.
Cycle UV
The Cycle UV button will cycle through the UV coordinates. This rotates the alignment of the UVs on each polygon. Pressing the button once will rotate by 90 degrees, so pressing four times will return the alignment to the same point as you started. Sometimes when are models imported into ZBrush with UVs already assigned, the texture map will appear stepped or fragmented. Cycling the UVs can fix this.
Flip U
The Flip U button will flip the UV coordinates horizontally.
Flip V
The Flip V button will flip the UV coordinates vertically.