In this section, we’ll continue the “Bamboo” project by adding the bamboo itself. This will be accomplished by deforming parametric objects to be snapshot onto the canvas.

Create a Parametric Cylinder
In the previous section we used the very simplest of primitive objects a plane to create the background for our scene. In this section, we’ll take things a step farther by using more complicated objects to add visual interest. While the objects themselves are more complex, the basic techniques are still the same. If this is a new ZBrush session, load your scene file from the previous section by pressing Document:Open. If you have not yet followed that tutorial, you can load the source file that we have provided. It is called Chapter3-1 and is located in the Documentation\SourceFiles\Chapter3 folder.
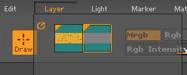
- Begin by pressing Layer:Create to create a new layer.
ZBrush layers can best be thought of as parallel universes. Each layer contains the entire 3D space of the ZBrush canvas. This means that objects on one layer can literally exist inside of those on another layer. In short, while some features (such as material-based transparency) require multiple layers, their most common purpose is to provide a means for organizing your scene. For example, you can place objects on different layers and then paint on one object without worrying about affecting what lies on the other layers. In this tutorial, we’ll use the new layer to contain our bamboo.

When the new layer is created, it appears next to the first one in the small thumbnails at the top of the Layer palette. Each thumbnail shows a continuously-updated view of the unshaded colors that are present on that layer. This makes it easy to tell what’s on a particular layer without bogging the computer down with more rendering than is necessary. Layers can be turned on or off. Visible layers are identified by a teal background and a triangle in the upper left corner. Invisible layers have a gray background and no triangle. The currently-active layer has a box around it. By default, the layer that you just created is active. To make a layer active, click on it. To turn it off, click on it a second time. To turn it back on, click it again.
- Hold down the Shift key and click on the active layer.

The shift key provides a shortcut to toggle visibility for all layers at the same time. We have just turned all layers off. This hides the background layer, so that it will not distract us while we begin modeling on this layer, as well as freeing up system resources. Incidentally, the active layer will always be visible on the canvas, even if it is turned off. In this way, you can switch from one layer to another without having to turn them on and off individually. They can all be turned off, so that switching from one to another will hide the former while unhiding the new.
- If you have AA Half view active, press 0 to switch to actual size.
While modeling, it is almost always easiest to view actual size. We’ll switch back to AA Half when we start placing objects.
- Select the Cylinder3D tool.
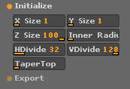
- In the Initialize menu, set X Size and Y Size to 5, and VDivide to 128.
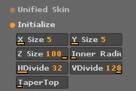
This changes the cylinder so that it is 20 times longer than it is across, and also has 8 times more polygons along its length than the default value.
- Draw the cylinder on the canvas.
- Activate edit mode by turning on the Edit Object switch.
- Rotate the model so that it is seen from the side. When close to the angle that you wish, hold down the Shift key to snap the model into position.
- Press Alt and click once on any empty part of the canvas.
The Alt+click combo is a shortcut to center the object on the canvas and resize it to fit. In short, it provides a “fit object to screen” function. You can also accomplish the same thing by clicking once on either the Move or Scale button.
Create the ‘Rings’ on the Bamboo
To create bamboo-like ribs, we’ll be using the Inflate deformation. Before we can do that, though, we must use masking to specify where we want the deformation to take place.
We could accomplish this by holding down the Ctrl key and tediously dragging the mask across the particular polygons that we want. Since this is a parametric object, there is an easier way which makes it easy to unmask by letting ZBrush count polygons.
- Press Tool:Masking:MaskAll
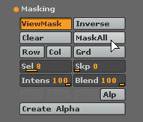
This masks the entire object, which must be done before the next step can be possible. The Select and Skip sliders are used to specify how the unmasking will take place. Select specifies how many polygons will be unmasked. Skip specifies how many will be remain masked. This pattern will be continued across the entire model.
- Sel is already at 8. Leave it alone. Set Skp to 1.
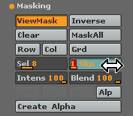
This tells ZBrush to unmask 8 polygons, leave 1 masked, then repeat the pattern. Now we need to tell ZBrush whether we want the pattern to be applied to Rows, Columns, or both (in a Grid).
- Press Row
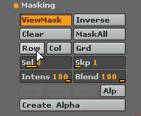
ZBrush now immediately unmasks the entire cylinder in the specified pattern.
At this point, it would actually be possible to continue unmasking by column instead, to turn each ring into a series of segments. By applying overlapping unsmask routines, very complicated patterns can be created if your work calls for them. This project only needs the rings as they are, however, so we will stop here. You will notice that one end has more unmasked polygons than the other. This is because the total length of the object is not evenly divisible by 9 (the total of the Select and Skip values). If it was a case that mattered, we could have used an initialize value that would have allowed the ends to be even, but this is nature that we’re modeling, where nothing is truly perfect. We’re now ready for the deformation.
- Tool:Deformation:Inflate at -10. There is no need to change the X Y Z settings for this operation.
A negative value causes shrinkage rather than inflation. If we had used a positive value here, the model would have been given a series of rings cut into its length rather than protruding from the surface.
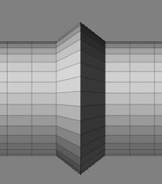
Take a close look at the image above. Here you can see that while masking applies to an entire polygon, deformation actually take place at the points. When a polygon is masked, two of its points will be masked while two will be left unmasked. This is an important distinction to keep in mind while you are modeling, as it allows more precision than if all four points were masked.
- Turn off Quick 3D Edit.
This enables ZBrush’s smoothing routines.
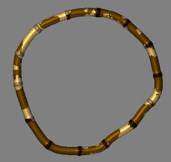
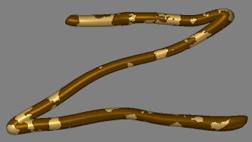
Texture the Bamboo
The bamboo is now ready for a material and color to be applied.
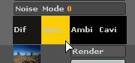
- Select a nice yellowish-orange color and the NoisePattern2 material.
- Modify the material as follows:
- Diffuse 56
- DiffuseCurve Focal Shift -62
- Specular 50
- NoiseCurve to match the graph:
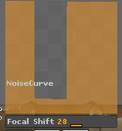
- Noise Radius 40
- Color Bump 5
- Colorize Specular 100
- High Dynamic Range 1.1
- Lastly, drag from the Spec color patch at the bottom of the material modifiers to a yellow-gold color on the color thumbnail.
All color patches in ZBrush can be set by selecting a color and then clicking on the patch or by dragging from the patch onto any part of the interface or canvas. Since the color of the model is still “live” because it’s in edit mode, we don’t want to use the first technique.
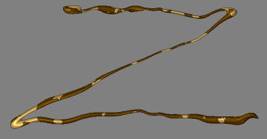
The model should now look something like the image above. We’ll actually leave the masking in place, since it helps make the rings stand out realistically.
- Save the model using Tool:Save As, and name it bambooStick.
- Press T to exit edit mode, then Ctrl+N to clear the layer.
Now that we’ve created the stick, we’ll also create a bamboo ring.
- Select the Ring3D tool.
- Draw it on the canvas, enter edit mode, and center the object on the canvas.
- For the Initialize values, set SRadius to 0 and LDivide to 128.

This gives us a very thin ring with 128 rows of polygons around its circumference.
- Enter Edit:Move mode by activating the Move switch.
This allows us to move points around by dragging them. The default Draw Size of 64 allows us to move several points at once. This is also why we’ve made the ring so thin.
- Reshape the ring a little by moving parts of it around.
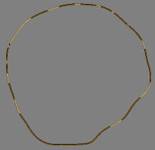
You will get the best results by moving in short steps rather than making long drags.
- Apply the Smooth deformation 3 or 4 times to soften the edits and get rid of any irregularities.
This is important, since our next step would magnify any irregularities in the mesh.
- Perform the Inflate deformation with a value of 50.
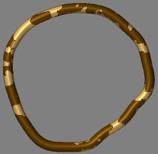
You’ll now have a fatter ring, which is nicely smoothed. Now all we have to do is use the same technique to create the ribs that was used for the stick:
- In the Masking menu press MaskAll
- Set Skp to 1
- Press Col
For the Ring3D object, the columns wrap around the model while rows form its circumference.
- Inflate -10
- Save the model as BambooRing
- Press T to exit Edit mode, then Ctrl+N to clear the canvas.
Last of all, we need to create the Z. This will be created from a cylinder using a combination of the techniques that were used on the stick and ring.
- Select the Cylinder3D.
- Set X Size and Y Size to 1. Set VDivide to 128.
- Draw the object on the canvas, enter Edit mode, and center the object.
Press W to activate Edit Move mode. Working in small increments, reshape the cylinder into the letter “Z”.
- Use the Smooth deformation several times to relax the shape.
- Edit the shape a little more if you like, then Smooth again.
- When you are satisfied with the shape, Inflate it with a value of about 8.
- Save the model as bambooZ, then exit Edit mode and clear the canvas.
- Shift+Click on the active layer’s thumbnail to toggle layer visibility back on again. Make sure that the active layer is the empty one.
- Return to the AA Half zoom level.
- Now select a slightly lighter shade of yellow and draw the Z on the canvas. Use the gyro to move, scale and rotate it into position.

Make sure that the Z is positioned so that it’s resting on the ground layer. The easiest way is to draw the object and move it into position, then rotate it. Remember that you can adjust the object’s depth while the Rotate gyro is active.
- Select the stick object and choose a more orange-gold color to provide contrast with the Z.
- Draw several copies of the stick around the edges of the scene.
After drawing the first, it is easiest to press the Snapshot button (or Shift+S) to leave a copy of the stick at its current location without having to deactivate the gyro. This makes it easy to place instance after instance of the object without the need to redraw it every time.

- Save your document as Chapter3-2.zbr
In Conclusion
In this section, we have learned about how layers can be used to separate your work, along with more techniques for masking objects and using those masks to control deformations. The advantage of being able to paint with 3D objects can clearly be seen: even with the time spent sculpting our shapes and fine tuning our material, it has still taken very little time to create an image with all of the shadows and realism of a 3D scene. While the techniques described here provide one way to create this type of object, there are certainly others! Another approach would be to use ZSpheres. An excellent tutorial on the subject is located at ZBrush Central. Click Here This section is also available in ZScript format. Please see the Help Topics\Supplemental Reading\Bamboo.