Modeling a Ladybug
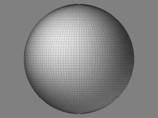
- Draw a Sphere3D on the canvas. Enter Edit mode and rotate the sphere so that the poles are at the top and bottom. Hold down the Shift key to snap the model into position.
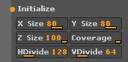
- Set the Tool:Initialize:X Size and Y Size values to 80.
- Holding down the Ctrl key, drag a bounding box across the bottom of the sphere.
The Ctrl key by itself activates ZBrush’s masking mode.
- In Tool:Deformation, perform an Inflat XY at a value of -50
Remember that you can click on the Z next to Inflat to deactivate that axis.
- Mask one more row of polygons.
- Do a Squeeze XY at -10.
- Press Tool:Selection:Masking:MaskAll
- Also in Masking, set Sel 2 and Skp 30. Press Col.
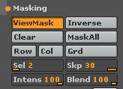
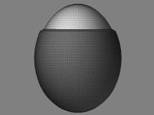
- Mask the remaining head polygons by holding Ctrl to paint a drag-rectangle.
- If you rotate to the side, you’ll see that there are other groups of unmasked polygons. Mask them, as well, so that only the double row on the back remains unmasked.
- Perform an Inflat XY at a value of -30.
- Unmask the model.
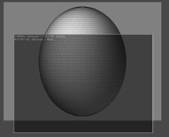
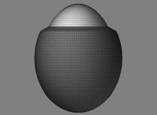
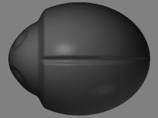
- Again in Deformation, do a Flatten Y at a value of -80.
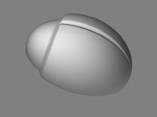
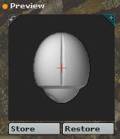
Your model should now look like the image above. Depending upon the orientation of the model when you were masking it, you might have to use the X axis for Flatten or a positive value instead of the negative 80. If that’s the case, simply undo and use the different settings.
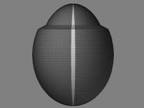
- Activate Transform X to turn on symmetry.
- Turn on Transform:StdDot, and set Z Intensity to 80. Change the Draw size to 40.
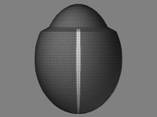
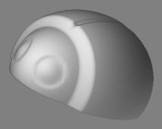
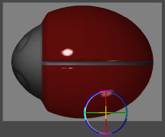
- Hold down the Alt key to switch to Zsub. Place a pair of eye sockets on the model.
- Let go of the Alt key and set Draw:Focal Shift to -40. Place eyes inside the sockets.
Now that the stylized beetle has been created, it needs a texture. We’ll use Projection Master to do the job. Since the model is a parametric object, it already has the most appropriate UV mapping assigned. In this case, that’s spherical mapping.
- Create a blank texture by setting Texture:Width and Height to 1024. Click New.
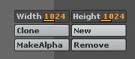
Although the texture can be any dimension you like, ZBrush is optimized for powers of 2. Therefore, the best options are 256×256, 512×512, 1024×1024, 2048×2048, or 4096×4096.
- Rotate the model so that its back is to the camera and click the Projection Master button on the top shelf.
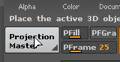
The Projection Master panel will appear in front of the canvas.
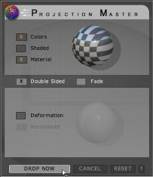
- Turn on Material and Double Sided, turn off Fade, then click Drop Now.
Double Sided tells PM to texture the side facing the camera and the opposite side of the model at the same time. Fade means that the colors being applied will not be faded as the polygons angle away from the camera. (For most texturing, you would leave this on, since it allows even blending as you rotate the model over the course of several drops.) Material tells ZBrush to also embed any selected materials as a part of the texture.
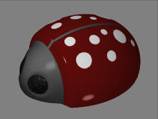
Texturing the Ladybug
Now that the model has been dropped, you can use all of ZBrush’s tools to texture it.
- Set Rgb Intensity to 100.
- Select Alpha 00 and the Basic Material.
- Paint a stroke to cover the entire model.
- With the Toy Plastic material and a dark red color, paint another stroke. Move and scale it to cover one half of the shell.
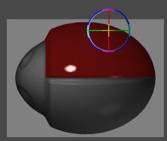
- Click the Snapshot button on the right shelf, then move the painted stroke down to the second half of the shell.
- Press Q to dismiss the gyro.
- Select the Circle3D tool and a white color.
- Activate Rgb and turn off Zadd.
- Paint a spot on the beetle’s back and press W to activate the move gyro.
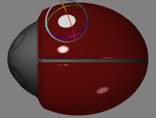
3D objects can be used to draw all kinds of shapes when Zadd is turned off. No depth is applied, so all that you get is the object’s filled shape.
- Using move, scale and snapshot, paint several dots on the shell.
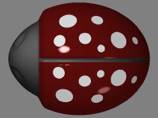
When move is active, it’s best to click inside the gyro (without clicking on one of the rings). This keeps the circle object aligned to the surface beneath it.
- Click the Projection Master button and then the Pickup Now button.
The model is now fully editable again, and can be rotated to a new angle. You’ll also see that the Texture thumbnail has updated to reflect the painting that you just did.
- Rotate the model so that its bottom is facing the camera.
- Activate Projection Master and turn off Double Sided before clicking the Drop button.
We don’t want the shell pattern on the beetle’s belly, so we’ll remove it.
- Select the Simple brush, Alpha 14, and the Dots stroke type.
- Drag from the Material thumbnail onto the grey part of the beetle. Release the mouse.
This selects the Basic Material again by sampling it from the canvas.
- Do the same with the foreground color patch to match the grey of the head.
Any of the color patches in the ZBrush interface can be used as pickers by dragging from them onto the canvas. Whatever color the picker is over when the mouse is released will be the selected color.
- Turn off Zadd, make sure that Rgb Intensity is at a value of 100, and paint the belly except for a bit of shell around the edges.
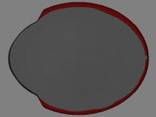
There’s no need to be really accurate with this, since the underside will probably never be seen.
- Press G to pick the model up from the canvas again, and then rotate it so that the eyes are facing forward. Press G again to drop it in this new position.
- With the Circle3D tool again, DoubleDotsMetal material, and a dark shade of grey, paint the eyes.
- Press G to activate Projection Master, and pick the model up.
- It’s still a little fat, so do Tool:Deformation:Size Y at -20.
- If you wish, you could also rotate it in the Tool:Preview so that it faces down.
This will make it easier to draw the model in the scene.
- Use Tool:Save As to save this model as Ladybug.ztl

- When asked if you would like to include the texture, click Yes.
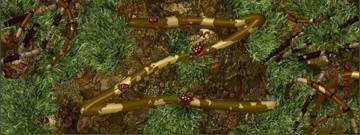
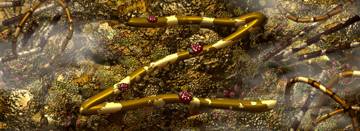
Paint Ladybugs onto the Scent
Now that our little ladybug is finished, it’s time to put it in the scene.
- Click Document:Open, and load your favorite version of the scene from the last section.
- Paint several beetles in strategic locations.
Lighting and Rendering
Now it’s time to make the scene more dramatic. We’ll do this with lighting and render effects, which will bring out the detail.
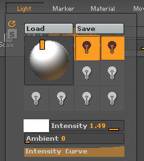
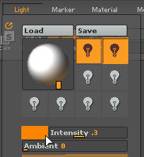
- In the Light palette, set Ambient to 0.
This removes ambient light from the scene, so that all the lighting comes from the lights themselves.
- Set the Intensity to 1.2
- Adjust the Focal Shift of the Intensity Curve to 86.
This makes the light slightly more focused.
- Drag the orange square in the light thumbnail so that it’s positioned as shown.
Lights can be moved around the canvas using this thumbnail. Some light types can also be precisely positioned by dragging Light:Placement:P onto the position in the scene where you want the light. Clicking on the square in the light thumbnail changes it from a front light to a back light. Clicking again turns it into a front light once again.
- Select the second light and give it an orange color by choosing that color in the Color palette and then clicking on its color patch.
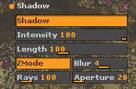
- Select the first light again, and open the Shadow menu. Set Intensity to 1.5, Length to 200, and turn on ZMode.
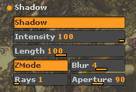
ZMode is a special way of rendering shadows that takes the depth of the pixols at the edges of objects into account. It results in more accurate shadows.
- In the Render palette, turn off Fibers (if your scene is using materials to create the grass), and turn on Shadows.
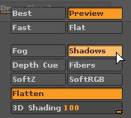
This cluster of switches is used to activate ZBrush’s render effects. They are only used during a Best render. While basic shadows are generated by the Preview renderer, you need to activate the render setting and do a Best render to see the high quality shadows controlled by the Light:Shadow menu.
- Click the Best button to render the scene.
Pay close attention to the shadow outlines. If the shadows look right, your shadow length setting is good. If parts of the shadows seem to be missing where the model is farthest from the surface that the shadow is being cast on, you’ll need to increase the setting. You may find holes in the shadows in places that obviously have nothing to do with the shadow length. This is because 1 ray is not enough for high quality ZMode shadows. We don’t want to increase the number of rays until necessary, however, as that also increases render time.
- When satisfied with your other light settings, set Light:Shadow:Rays to 100 and Aperture to 20.
- Render the scene.
The render will take longer this time because more rays are being cast. The shadows are probably too indistinct now. This is because the shadow-casting objects in the scene are very narrow in diameter and we’re using quite a lot of rays in order to get really good shadow accuracy. Lowering the Aperture setting further “tightens” each ray, making the shadow edges more distinct while still retaining the softness of Global Shadows. The more rays that you use and the more distinct you wish your shadows to be, the lower you will need to set the Aperture.
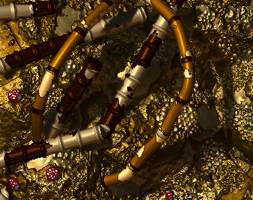
- Set Aperture to 10 and render again.
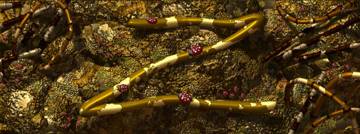
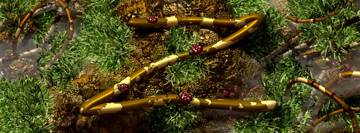
The play of light and shadow should now be pretty dramatic.
- You can make it even more dramatic by turning on Render:Adjustments:Adjust and setting the Contrast to 20.
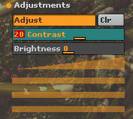
The Adjustments menu gives several controls for manipulating the overall appearance of a scene without the need to render it again.
- Turn Shadows off, return to the Preview renderer, and then activate Fog.
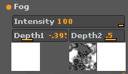
Fog is another render effect that can be used for a variety of purposes. It has several controls, found in the Render:Fog menu.
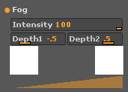
The two color patches are used to set the near and distant fog colors. We’ll leave them alone. The Depth1 slider sets the closest fog depth, while Depth2 specifies the farthest depth.
- Click on Depth1 and drag it onto the canvas to a high ground point just behind the Z.
This sets the near depth to the point at which the cursor was released. Now the fog is localized so that it won’t obscure the Z at all.
- Change the fog curve’s Focal Shift setting to something like -55.
This makes the fog reach its maximum intensity sooner. There are two special patches between the color patches. These are used to give the fog a texture and an alpha.
- Click the alpha patch and select the shown texture from the popup menu.
Nothing will change in the document, since we’re using the Preview renderer.
- Do a Best render now.
The while the curve and depth settings determine the fog intensity at various depths, the alpha determines its intensity at various XY values across the canvas. The closer to white the alpha is, the more intense the fog will be. Now we’ll tie everything together, doing the final render.
- Switch back to Preview for a moment.
This keeps the engine from doing a new Best render for each setting change.
- Turn on Shadows and Fibers (if you’re using Material fibers).
- Click Best again.
If the results are to your liking, there is one last step to take:
- Activate Zoom:AAHalf.
This turns on ZBrush’s special antialiased display mode. The document is not resized, but any exported image will be.
- Save your document as Chapter3-4.ZBR, and then Export the document.
In Conclusion
Congratulations! You’ve just completed a 2.5D project. In this section, we’ve covered a lot of ground. We used a parametric object to sculpt a simple beetle, which was textured using Projection Master. We then worked with ZBrush’s lighting and rendering effects to make the image more dramatic. These same techniques can be used to sculpt/paint far more impressive scenes that what was created in this tutorial. While the bamboo may not be incredibly dramatic, it was chosen as a project specifically for the wide variety of techniques that are employed. You should now be able to sculpt a variety of shapes from primitives, understand the difference between an editable object and a snapshot, and be able to create custom materials. You should also be able to texture using Projection Master, and be comfortable with painting using various combinations of material, color, and depth.
Remember that there are MANY ways to accomplish various tasks in ZBrush. As you become more familiar with the software, you will come to learn the techniques that work best for your personal style and needs. This tutorial has been meant to give you a broad understanding of 2.5D painting, which you will then be able to expand upon during your own sessions. Now that you have the basics down, the remaining chapters of this manual will cover more specialized portions of the ZBrush software.