This section explains the different ZModeler Actions that can be applied to the edges of a model. To access the Edge menu, simply hover over an edge and either right-click or press the space bar.
Edge Actions may generate different results depending on which Target option is chosen.
For descriptions of the Targets see the Edge Targets page.
Add to Curve
The Add to Curve Action will generate a curve corresponding to the selected Target. The created curves can later be used with Curve Actions or other Curve brushes.
Align
The Align Action will take a series of edges in continuous order and unifies their positions based on the selected modifier.
Before using the Action you must establish the first and last edges of the poly loop you want to affect. After clicking the last edge you will be able to align the edges in various ways such as a straight line or a partial circle.
Modifiers
- Bezier Curve, Spline, Circle, Arcs, Arcs and Line, Round Corners, Small Round Corners, Tight Round Corners: Define the shape of the edges aligned between the two clicked one.
- One Line: Produces a flattened strip of polygons between the two clicked edges.
Options
- Interactive, Specified Curvature: Defines the curvature of the alignment, either interactively or through a numerical value.
- Align to Normal, Tangent: Defines how the alignment will initially be calculated, based on surface normal. This option is not used when the One Line modifier is selected.
- Overwrite, Additive Position: Defines if the curvature that is generated by the alignment is replacing the existing edge position or is added to the existing position, creating an offset in the alignment.
- Variable, Constant Width:
Bevel
The Bevel Action generates a new planar surface along the edges corresponding to the selected Target. The width of the bevel is determined by clicking and dragging.
Modifiers
- Single, Two, Four, Eight Row(s): Define the number of edges inserted in the bevel topology.
- Linear, Sharp, Soft Edge: Define the shape of the bevel. Not only is the visible roundness of the bevel affected but also the distance between the edges. This allows the bevel to look correct when using Dynamic Subdivision.
Bridge
The Bridge Action connects one or more edges with polygons. This Action makes it possible for you to connect two edges or two edge borders together.
With Edges Target, the Bridge Action connects two edges together with a single polygon. When hovering over and edge with this Action selected, a widget with “Click first edge” and “Click second edge” will be visible. Upon clicking the second edge, the polygon will be created.
When using the Bridge Two Edges function, use caution. It can be easy to create invalid topology by clicking two edges which are not connected.
With Two Holes Target, the Bridge Action connects the edge borders of two holes together to create a tube-like shape between them. The shape of the Bridge can be drastically impacted by the different options and modifiers explained below.
When hovering over and edge with this Action selected, a widget with “Click first edge” and “Click second edge” will be visible. It is important to continue holding the second click to enable the interactive part of this Action. This allows you to reshape the bridge in accordance with the selected modifiers.
Modifiers (Two Holes Only)
While continuing to hold the second click, dragging the mouse vertically and horizontally will reshape the bridge. Horizontal movement increases or decreases the curvature while vertical movement controls tessellation of the spans.
Pressing the Shift Key will snap to the optimal curvature depending on the modifier that is selected.
- Interactive Curvature, Optimal Curvature, Half Curvature: Define the curvature of the bridge, allowing it to be interactive or automatically optimized.
- Interactive Resolution, Optimal Resolution, Minimum Resolution: Define the resolution (tessellation) of the bridge, either interactively or automatically.
- PolyGroup Columns, PolyGroup Rows, PolyGroup Flat: defines how the PolyGroups are created along the bridge.
- Pivot on Hole Center, Pivot on Clicked Edge: Defines the pivot point to define how the curvature of the tube will be created. Clicking two edges of a larger distance will generate a longer curve, while clicking two edges of shorter distance will generate a shorter curve.
- Auto Align Edges, Align Clicked Edges: These are similar to the Pivot modifiers and define which edges will be used when aligning the edges.
Options (Two Holes Only)
- Circle, The Spline, Arcs, Arcs and Line, Round Corners, Small Round Corners, Tight Round Corners and Straight Lines: Define the shape of the tube between the two holes, based upon any Action modifiers.
- One Line: Produces a straight bridge between the two clicked holes.
Alternative Operations (Two Holes Only)
- Shift: Press this modifier while doing a click and drag to automatically create the shape selected in the Bridge options. (For example, the Circle type of bridge produce a clean partial circle.)
Close Hole
The Close Hole Action fills openings in the model. This process contains two Targets.
Close Concave Hole fills the hole using the same algorithm used in the Tool >> Geometry >> Modify Topology >> Close Hole function. It simply closes the hole of the clicked open edge loop.
When associated with the Convex Target, the Close Hole Action uses a different algorithm to fills the space. The shape of this fill can be drastically impacted by the options and modifiers described below.
It is important to continue holding the click after selecting the edge of the hole. This enables interaction for you to reshape the created surface.
Modifiers (Convex Hole Only)
While continuing to hold your click open edge loop, moving the cursor horizontally or vertically modifies the shape of the surface being created. Horizontal movement changes the curvature and elevation. Vertical movment affects the amount of tessellation that is applied.
- Converge to Center, Converge to Edge, Converge to Point: Define how the shape of the structure is created and which direction the center point moves in during creation. The direction of your stroke also determines where the new topology converges to.
- Interactive Curvature, Optimal Curvature, Curvature Value: Define the curvature of the created geometry to be either interactive or automatically optimized.
- Interactive Resolution, Optimal Resolution, Resolution Value: Define the resolution (tessellation) of the geometry, with it either being interactive or automatically controlled by ZBrush.
- No Twist, 360 Degrees Twist, Twist Value: Define the behavior of the generated geometry. This function can be used to generate helix-shaped surfaces.
- PolyGroup columns, PolyGroup Rows, PolyGroup Flat: Define how the PolyGroups are created along the bridge.
Options (Convex Hole Only)
- Circle, The Spline, Arcs, Arcs and Line, Round Corners, Small Round Corners, Tight Round Corners and Straight Lines: Define the shape of the geometry closing the hole.
- One Line: Produces a flat hole with no elevation. With this option selected, only tessellation can be changed.
Alternative Operation (Convex Hole Only)
- Shift: Press this modifier during the click and drag to let ZBrush use the optimal shape.
Collapse
The Collapse Action will remove the selected edge, fusing the connected vertices together.
When used with:
- Edge Target: The edge point closest to the cursor is fused with the second edge point.
- Hole Target: All the vertices along the boundary of the hole merge together at the center of the hole.
- PolyLoop: All the vertices of the loop closest to the clicked edge are fused with the polyloop that is opposite the clicked edge.
Crease
The Crease Action applies edge creasing to the Targeted edges.
Alternative Operation
- Alt: Uncrease an already creased edge and vice versa.
Delete
The Delete Action deletes the edge(s) corresponding to the selected Target.
Do Nothing
The Do Nothing Action is an empty Action. When this is active it will prevent the possibility of accidentally performing an Edge Action by mistake while using the ZModeler brush. If you know that you only want to use Poly or Point Actions, having this active and hovering over a point will default to a Poly Action instead.
Extrude
The Extrude Action will extrude a selected edge on a model. The extrude edge Action creates a polygon between the clicked edge and the opposite edge. When using this Action, triangles will be created on the extruded part.
The position of the cursor when clicking on the Target edge defines the direction of the extrusion.
Alternative Operations
- Ctrl: Stop the extrusion process and switch to an Edge Move Action.
- Shift: Disconnect the polygons adjacent to the extrusion.
- Alt: Change the PolyGroup of the extruded part.
Modifiers
- Straight, Rotate to 15 Degrees, Custom Rotation: Define the steps the extruded edge. Straight provides no constraints while 15 Degrees add steps of 15 degrees. Custom rotation allows you to add a custom constraint by the value set in this slider.
Insert
The Insert Action creates an edge loop along the clicked ring of edges. The insert Action will continue across the entire edge loop.
If you want the Inserted edge to only be generated through part of an EdgeLoop, you can use a mask to protect the portions of the model where you do not want the Inserted edge to be generated.
The Insert Action uses two Targets: Multiple EdgeLoops and Single EdgeLoop (circled below). If using the Multiple EdgeLoops Target, you will have access to modifiers that help generate advanced shapes.
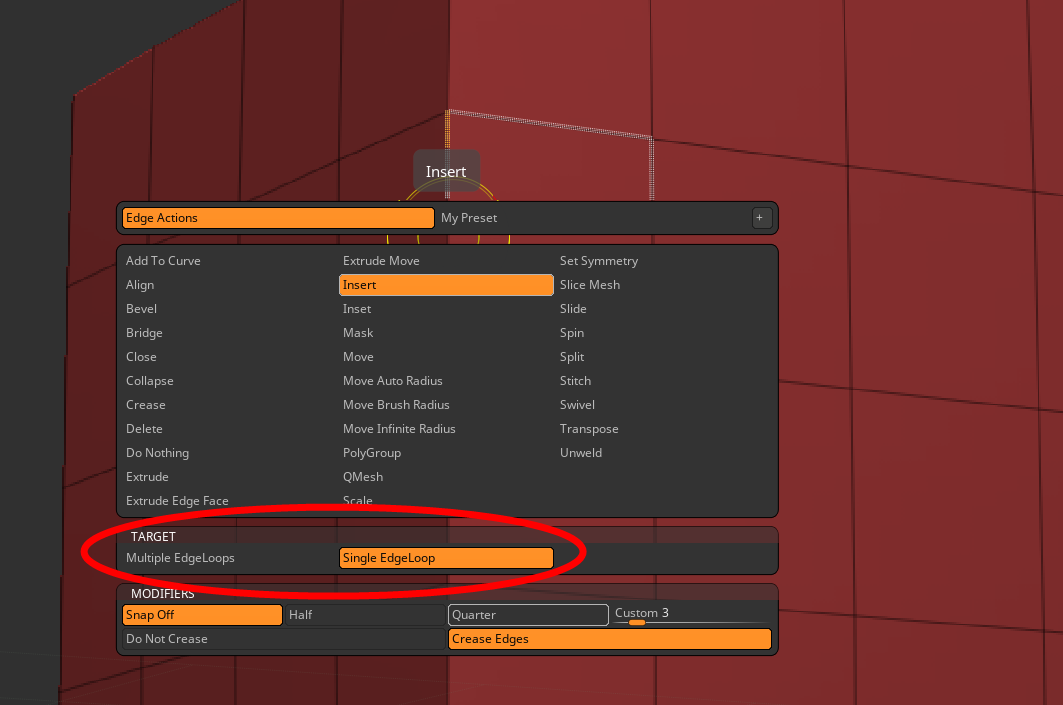
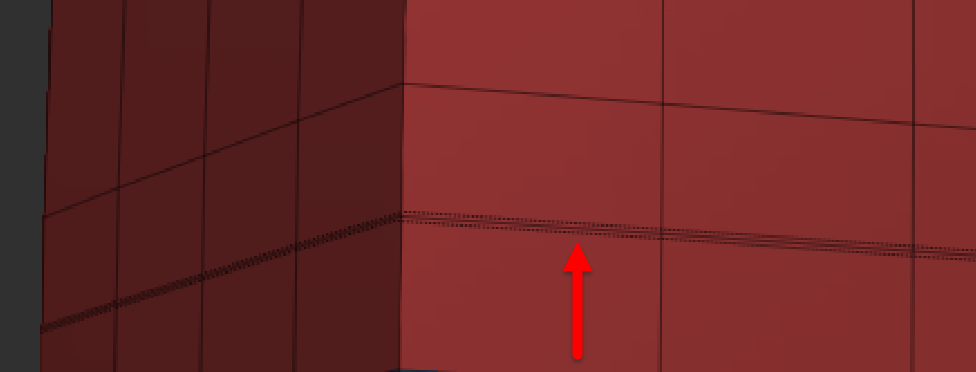
For both Single and Multiple EdgeLoop creation, you can enable the Create Edges option (visible above at the bottom-right of the Insert QuickMenu). This makes your new EdgeLoop into a crease. These creases are visibly distinguished by their thicker lines when compared to regular edges. (See the arrow pointing at the crease below.)
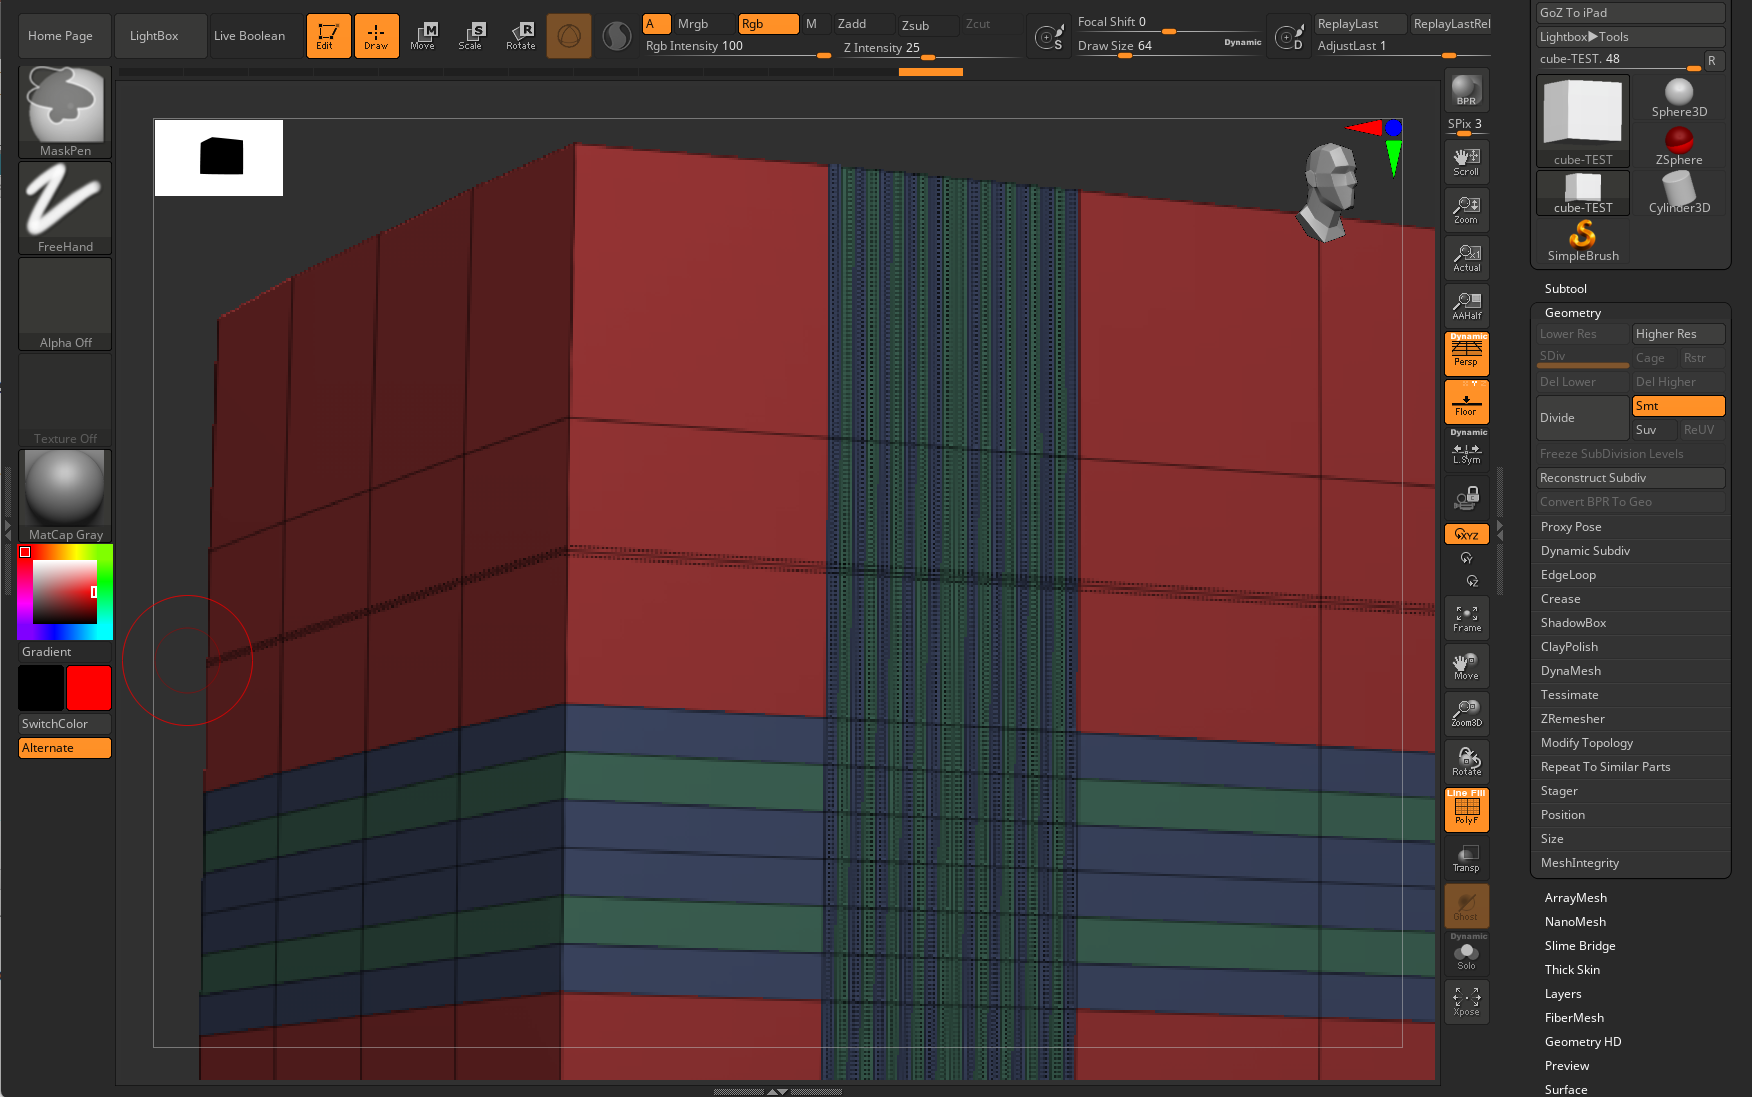
With Multiple EdgeLoops selected, clicking on and dragging from an edge creates multiple (optionally creased) EdgeLoops. In the below image, you see both how starting from a top edge creates vertical loops while starting from a side edge creates horizontal loops.
Modifiers
- Interactive Resolution, Specified Resolution (Multiple Edgeloops Target only): Define the number of inserted edges. You can move the cursor up and down interactively or enter a numerical value.
- Specified Resolution, Interactive Elevation (Multiple Edgeloops Target only): Defines the elevation of the inserted edge(s). When set to Interactive Elevation, moving the cursor left and right will change the elevation.
- Spline, Radial, Linear, Flat (Multiple Edgeloops Target only): Define the shape of the elevation.
- Per Polygon Normal, Clicked Normal, Average Normals (Multiple Edgeloops Target only): Define the direction of the Elevation modifier.
- Snap (Single Edgeloop Target only): Snap settings allow you to position inserted edge loops precisely at specific distances. The Off option lets you freely move the edge loop without snapping. The Quarter option snaps the inserted edge loop to the nearest quarter position within the available space, while the Half option snaps it to the center halfway point. The Custom option lets you define a snap distance, with ZBrush identifying the closest edge loop to the cursor on the target edge as the starting point for the custom distance.
Alternative Operations
- Alt: Remove the clicked edge loop.
- Shift: When used with the Single EdgeLoop Target, this will move the inserted edge proportionally to the cursor.
Inset
The Inset Action inserts a new polygon within the selected face or group of faces.
The different modifiers not only change the shape of the inserted polygon(s) but also allow for control over how these new polys are connected to the original surface.
Modifiers
- Center and Border, Border Only, Center Only: Define how the new polygons are created. Center and Border will create all the polygons. Border Only will not create the center polygon. Center Only will create the center polygon(s) without any border polygons.
- Inset Each Poly, Inset Region: Define whether the inserted polygons are created individually or connected all together as a region.
Alternative Operations
- Alt: Change the PolyGroup of the inserted part.
- Shift: Change the shape of the inserted polygon(s) to be square rather than matching the original polygon.
Mask
The Mask Action applies a protective mask to the clicked edge, preserving it from manipulation until the mask has been cleared.
It is possible to click on multiple items, masking all of them if needed.
Alternative Operation
- Alt: Unmask the clicked Target. Like the Mask Action; click unprotect as many edges as needed.
Move
The Move Action lets you freely relocate the selected edge relative to the screen’s working plane.
Alternative Operation
- Shift: Constrains the Move Action along the closest X, Y, or Z working (canvas) plane. It is important to adjust your camera angle before using this modifier with the Move Action.
Move Auto Radius
Move Auto Radius shifts the whole edgeloop by slowing decreasing the strength of the move.
Alternative Operations
- Alt: Moves the edges like they were inflated.
- Shift: Slides all Targeted edges along the adjacent polygons.
Move Brush Radius
Move Brush Radius moves the edges based on the Draw Size.
Alternative Operations
- Alt: Moves the edges like they were inflated.
- Shift: Slides all Targeted edges along the adjacent polygons.
Move Infinite Radius
Move Infinite Radius shifts the whole edgeloop based on depth of the camera view.
Alternative Operations
- Alt: Moves the edges like they were inflated.
- Shift: Slides all Targeted edges along the adjacent polygons.
PolyGroup
The PolyGroup Action sets a new PolyGroup for the Targeted edge. The modifiers below define how these PolyGroups are created.
Modifiers
- Overwrite, Additive: Define how the new PolyGroups are created. Overwrite will apply a new PolyGroup with the first click and reuses it for each subsequent click while the Additive modifier will create a different PolyGroup with each click.
QMesh
The QMesh Action creates an extrusion of the edges corresponding to the selected Target. This extruded edge creates a polygon between the clicked edge and the opposite edge, creating a triangle shape on the side of the extruded part.
By default, the QMesh operation is exactly the same as Extrude Edge, except that:
- The created mesh will fuse to the adjacent polygons when possible.
- The created mesh can be completely deleted when performing a negative extrusion.
The Draw Size has impacts the attraction of the fusing operation: a small Draw Size will trigger a strong fuse operation while a larger Draw Size will apply weaker fusing.
The position of the cursor when clicking on the Target edge affects the direction of the extrusion. It is important to carefully position your cursor before executing the Action.
Options
- Full, Half, Quarter Step: Define the number of steps that the QMesh extrusion will have between the clicked edges and its maximum height. These options have no effect when the extruded edge isn’t in contact with adjacent polygons.
Modifiers
- Straight, Rotate to 15 Degrees, Custom Rotate Angle: Define the value of the steps when extruding the edge. Straight provides no constraints while 15 Degrees add steps of 15 degrees. The custom rotation adds a custom constraint determined by the slider value.
- Normal Attraction, Weak Attraction, No Attraction: Define the sensitivity of the fusing detection.
Alternative Operations
- Ctrl: Stops the extrusion process and switches to a Move Action.
- Shift: Disconnects the extrusion’s adjacent polygons.
- Alt: Changes the PolyGroup of the extrusion.
Scale
The Scale Action resizes the Targeted edges. When scaling a single edge its two points will be affected. While scaling a polyloop, a larger part of the model may be scaled depending its path.
Slide
The Slide Action shifts the Targeted edges along their connected polygons.
Spin
The Spin Action rotates the clicked edge counter-clockwise around the two adjacent polygons. This Action is very convenient when you wish to change the model’s topology.
Alternative Operation
- Alt: Produces a clockwise spin.
Split
The Split Action inserts a point on the clicked edge and connects it to all adjacent edges. Dragging the point during the Split Action allows you to move it along the edge.
Alternative Operation
- Alt: Collapse the edge by welding its two points together at the location of the one closest to the click.
Stitch (Hole)
The Stitch Action closes the edges of a hole, welding them together. Since the two clicked edges are welded together, the alignment of the clicked edges will define the resulting topology.
The Stitch Action produces better results when the hole has constant and uniform topology, such as with a poly loop shape.
Swivel
The Swivel Action rotates the clicked edge or edge loop around the polygon’s opposite edge. The Action is performed by clicking the edge and dragging.
TransPose
The TransPose Action automatically masks all edges except the clicked edge and switches to TransPose Move mode. At this stage, you can perform all the usual TransPose operations.
Please keep in mind that while you are in TransPose, you are no longer in Draw mode and so the ZModeler brush will no longer be active. To switch back to it, return to Draw mode.
Unweld
The Unweld Action disconnects the clicked edges corresponding to the Target and creates creasing on the border edges. Extruded polygons are created to keep the original shape visually separate when Dynamic Subdivision is enabled.
The Unweld Action doesn’t split the model in multiple SubTools; it just disconnects the topology.