Find below the list of the deformers found in the Gizmo 3D. Some of them simply apply a deformation to the current model while others may apply topology modifications like adding edge loops or more drastic changes.
Bend Arc
The Bend Arc deformer bends the current SubTool along an arc (part of a circle). The arc center is defined by one side of the bounding box and each side of the bounding box can generate its own arc, producing a bend with multiple angles.
From left to right: the original model, the Bend Arc applied on one axis, then on two axes.
Settings:
-
- Radius: Defines the radius of the arc circle.
- Twist: Performs a rotation of the model around the arc.
- Angle: Defines the angle of the arc from 0° (horizontal) to 180° (a vertical angle).
Bend Curve
The Bend Curve deformer bends the current SubTool along a curve which can be modified through control points. The density of the control curve and the associated control points can be interactively modified as well as their positions in space, which will apply the corresponding deformation to the active selection.
Each control point can receive extra deformation for precise control.
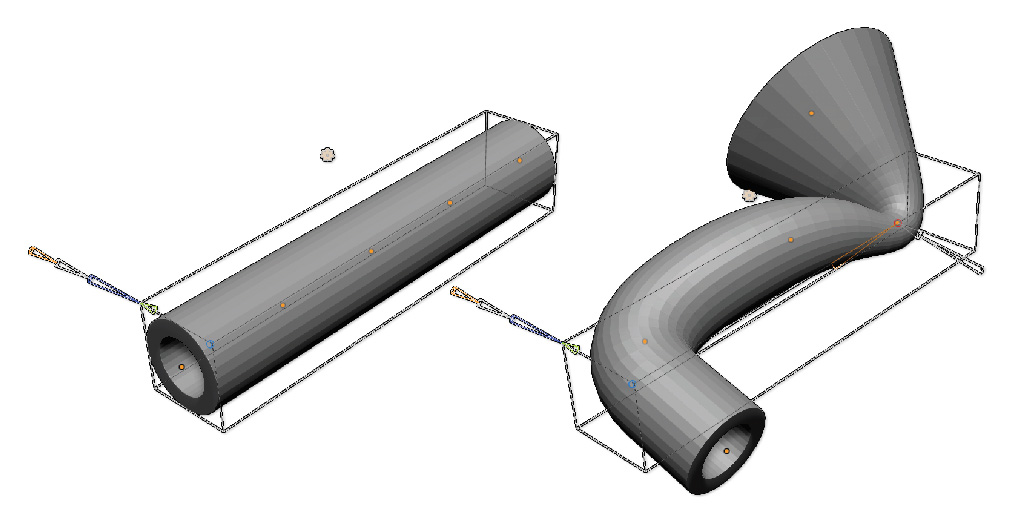
On the left, a simple tube with the BendCurve deformer applied and associated with 4 control points. On the right, all the points have been moved to completely change the shape of the tube.
Settings:
-
- Curve Resolution: Defines the number of control points on the curve.
- Smoothness: Allows the line to be more rounded or angular.
- Axis: Defines the axis of the bounding box on which the curve will be used (X, Y or Z).
- Symmetrical: Sets a symmetry on the curve itself, where control points located on each side of the curve will receive the same transformation.
- Smooth: Applies smoothing to the control curve. This can be useful if your modification has too strong of an effect on your deformation.
- Twist (on control points): Applies a twisting around the curve at the point location.
- Scale (on control points): Applies a scaling deformation at the point location.
- Squeeze (on control points): Applies a non-uniform scaling deformation at the point location where a value below 1 will squash the model and above 1 will stretch it.
Bevel
The Bevel deformer applies a bevel on the edges closest to the bounding box orientation. This deformer will provide the best results on hard surfaces meshes.
The bevel deformer applied on the right. Notice that not all the edges have been beveled, but only the ones that have been defined by the Crease Angle cone value.
Settings:
-
- Bevel: defines the radius of the bevel.
- Resolution: defines the tessellation density of the bevel.
- Crease angle: defines the minimum edge angle to apply the bevel.
Crease
The Crease deformer applies a crease tag to all the edges which fall into the defined angle threshold. The crease edges can later be used with subdivision surfaces or applying bevels.
The Crease deformer applied on the right. Notice that not all the edges have been creased, but only the ones which have been defined by the Crease Angle cone value.
Setting:
-
- Crease angle: by defining this value, you will set the detection of the edges which need to receive a crease tag.
Deformer
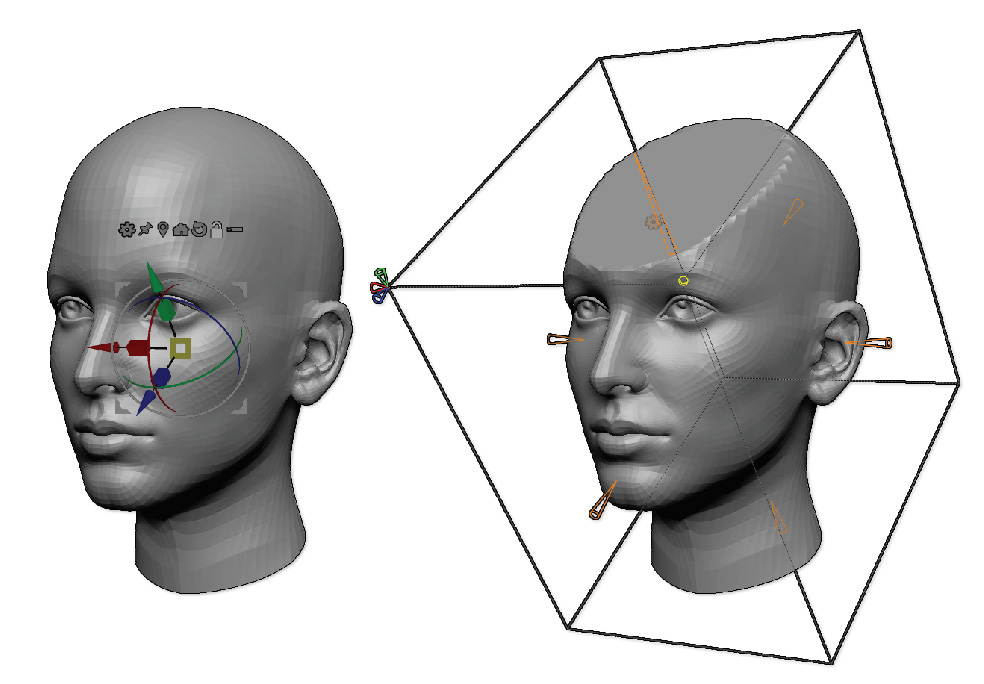
This deformer display a deformation cage on the SubTool. By deforming and manipulating the cage points, you will apply the corresponding deformation to your model. This is also referred to as FFD for Free Form Deformation.
To manipulate a single point, you can simply click and drag on the point to move it across the screen working plane.
You can also select a single or multiple points at the same time by clicking once on a control point. It will turn to a white dot. To add or remove other points, press the Shift key while clicking on new points. These points can be manipulated by the Gizmo 3D for both Move, Scale and Rotate operations.
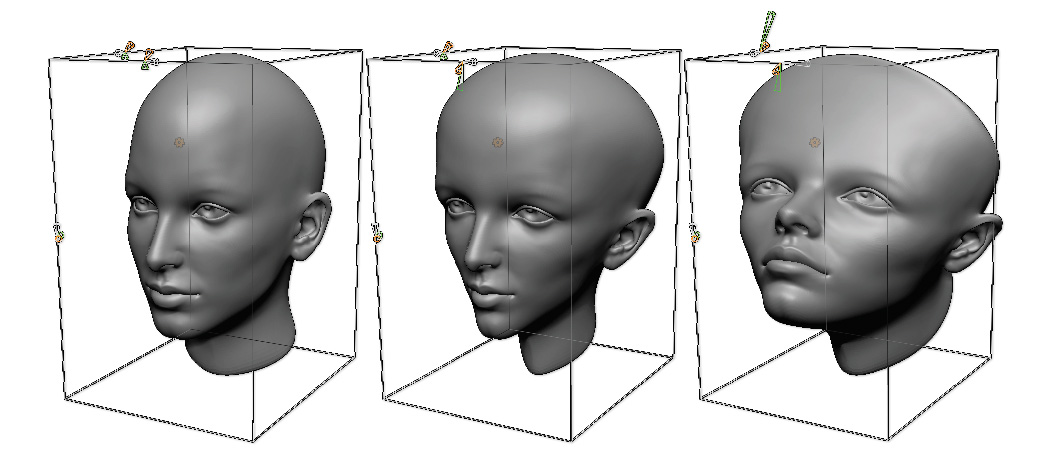
On the left, the Deformer applied to the head with the top point selected. On the right, the Gizmo 3D has been used to scale down and rotate these points, applying a soft and local deformation which would have been difficult to do with the classic sculpting tools in ZBrush.
Settings:
-
- X, Y and Z Divide: Defines the definition of the cage. More control points mean more accuracy in a local area, while fewer points work better for global deformation.
- X, Y and Z Symmetry: Sets the symmetry plane for the deformation. This symmetry, like that found in the Transform palette, can be parallel or mirror type (regular symmetry).
Deformer Hard and Soft
These two Deformers are alternatives to the main Deformer Deformer. These Deformers allow you to apply deformation to your model by manipulating a Free Form Deformation Cage or Lattice. The only difference with the original Deformer Deformer is that these Deformers will apply a soft deformation or a hard deformation to the model, based on the points you are selecting.
To manipulate a single point, simply click and drag on the point to move it across the screen working plane.
You can also select a single or multiple point at the same time by clicking once on a control point. It will turn to a white dot. To add or remove other points, press the Shift key while clicking on new points. Use the Masking commands as well to do multiple selection at once. These points can be manipulated by the Gizmo 3D for both Move, Scale and Rotate operations.
On the left, the Soft Deformer applied to the head and on the right, the Hard Deformer applied. You can see that even if the cage deformation is the same, the result is different.
Settings:
-
- X, Y and Z Divide: defines the definition of the cage. More control points mean more accuracy in a local area, while fewer points work better for global deformation.
- X, Y and Z Symmetry: sets the symmetry plane for the deformation. This symmetry, like that found in the Transform palette, can be parallel or mirror type (regular symmetry).
Extender
The Extender deformer by default inserts a loop of polygons along the bounding box axis of your choice. This loop of polygons can be divided and moved along the model by dragging its associated dot. It can also be applied to multiple axes at the same time.
This deformer is a great way to quickly create advanced primitives for creating “kit bashed” style models.
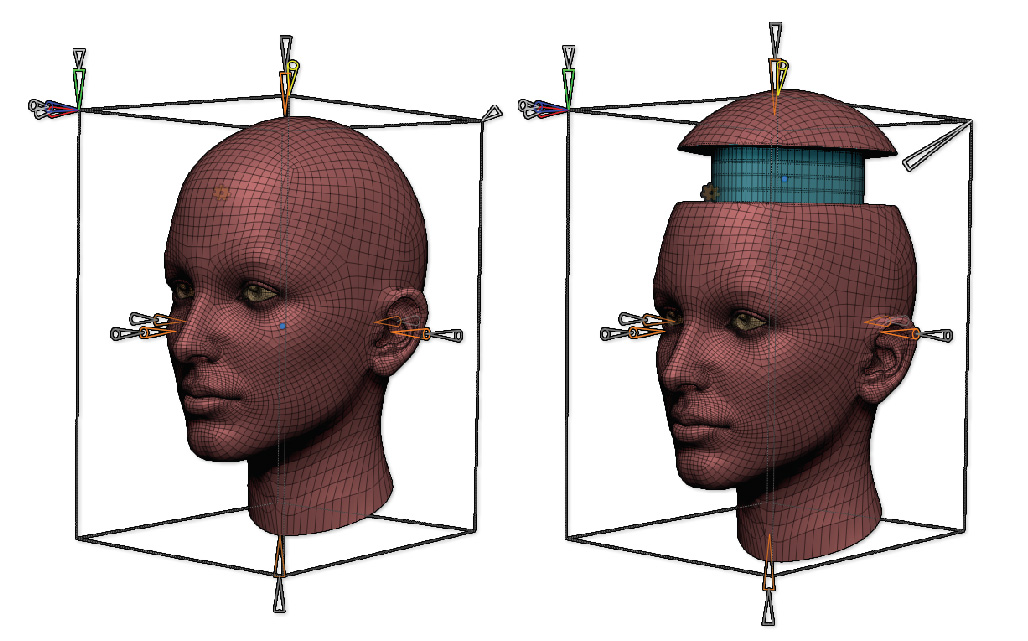
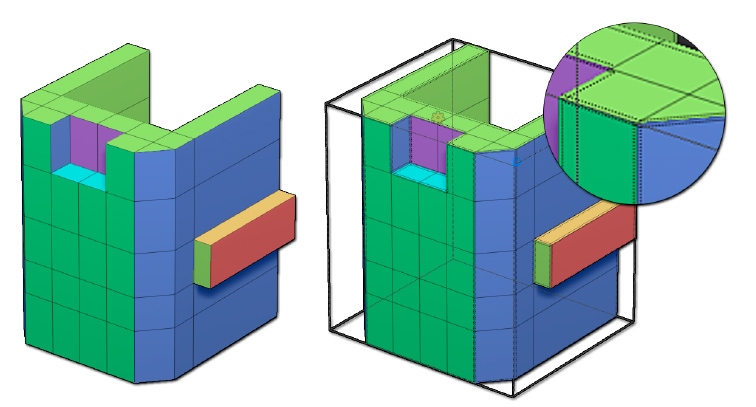
The Extender part has been added to the top of the head. The Inflate cone has then been manipulated to do a negative extrusion.
Settings:
-
- Extender: Defines the inserted loop size along the associated bounding box side.
- Size (X, Y and Z): Defines the size (scale) of the deformation on the side of the manipulator.
- Symmetry (X, Y and Z): Allows the Extender deformation to be applied symmetrically.
- Resolution: Adds multiple edge loops inside the inserted loop of the Extender.
- Apply Creasing: Adds a crease to the border of the Extender.
- Inflate: Applies an inflate on the Extender area, creating thickness which can be positive or negative.
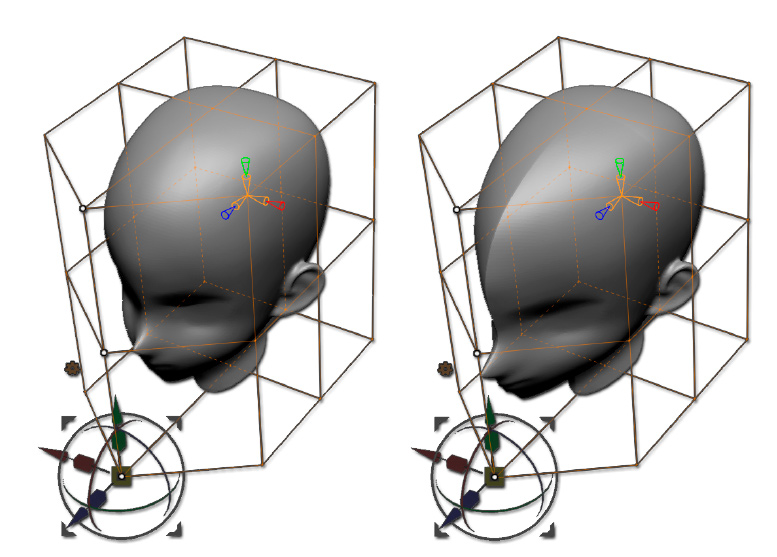
Flatten
The Flatten deformer clips the current selection based on the planes of the deformer bounding box. Please note that the polygons of your selection won’t be removed or sliced. They are simply flattened on top of each other, similarly to the Clip Brush.
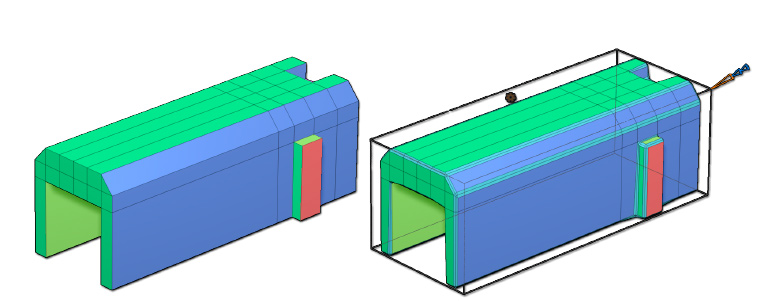
On the left, the original mesh, with the Gizmo 3D rotated. On the right, notice that the deformation box has been oriented with the same angle as the Gizmo 3D, then the Flatten deofrmation has been applied to the top part.
Settings:
-
- Flatten: Defines the depth of the deformation along the corresponding working plane.
- Slice Topology: Adds an creased edge loop around the flattened area of the selection. This option will drastically improve the results of the Flatten deformation when used in combination with Dynamic Subdivision.
- X, Y and Z Symmetry: Sets the symmetry plane for the deformation. This symmetry, like that found in the Transform palette, can be parallel or mirror type (regular symmetry).
Inflate
The Inflate deformer applies an Inflate deformation to your selection, based on the size of the deformer bounding box. The resulting effect can be modulated through the Smooth setting, giving you alternative inflate deformations.
The transformation is applied with a 100% deformation value on the bounding box face manipulated by the cone through a progressive transition to 0% of deformation value for the opposite face.
Settings:
-
- Inflate: defines the amount of inflation (or deflation with negative value) to your model.
- Smooth: applies a global smooth to your model, useful if your inflate modification produces overlapping and crossing polygons on angles.
- X, Y and Z Symmetry: sets the symmetry plane for the deformation. This symmetry, like the one found in the Transform palette, can be parallel or mirror type (regular symmetry).
Multi Slice
The Multi Slice deformer inserts one or more edge loops along the X, Y and/or Z axis. These edge loops do not follow the existing flow of the topology, instead slicing the way around the model.
The transformation can be freely moved across the model by clicking and dragging the blue dot located at the center of the modified topology. The width of each modified area can be interactively modified as well.
On the left, the original mesh. In the center, Multislice was used to insert multiple edge loops in the center on the model. On the right, the blue dot manipulator has been moved up to set another location for the slices.
Settings:
-
- X, Y and Z Resolution: Defines the number of slices to insert in the area of transformation.
- Slice Width (per axis): Defines the width of the Multi Slice insertion area.
- Apply Creasing: Applies an edge crease to all slices inserted in the model.
Offset
The offset deformer is very similar to the Move transformation of the Gizmo3D as stretching a cone from the model bounding box will move the model along this cone.
Both opposite cones of the bounding box are doing the same operation.
The benefit of this deformer is to allow you to precisely orient the bounding of your model box based on the Gizmo3D orientation that you can set before selecting this deformer. Then you can use this new orientation within your deformer.
Settings:
-
- Offset: moves the model along the axis of the selected cone.
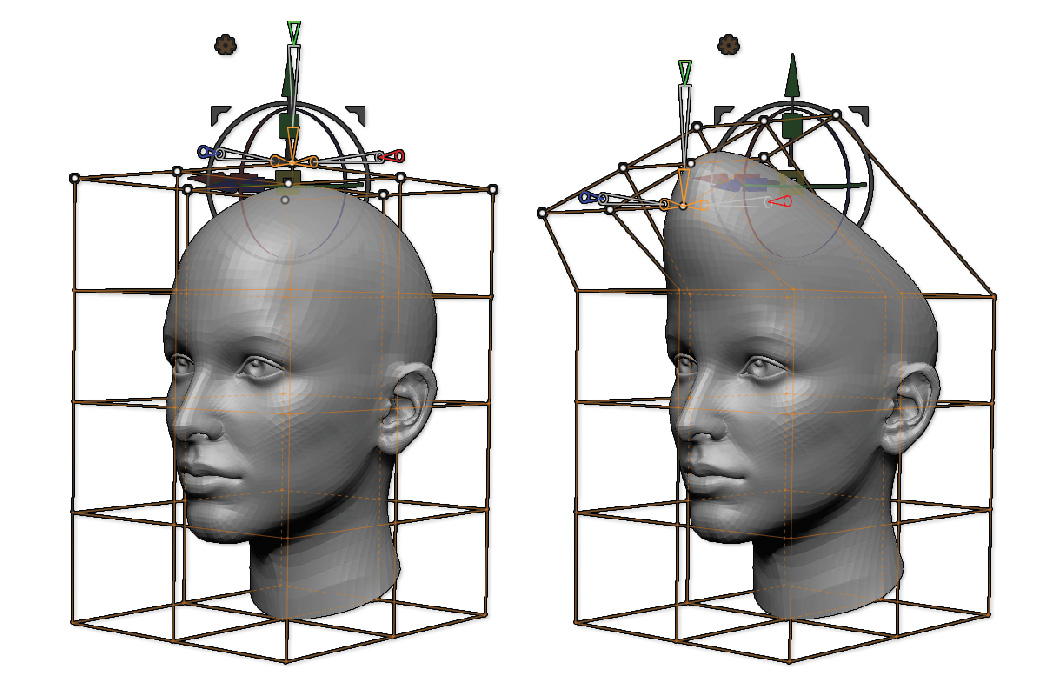
Project Primitive
This Project Primitive modifier is a full creation and modification tool. Even if as it is considered a modifier, it will let you build complex models in no time by projecting parametric primitives like cubes, spheres, cylinders or prism type shapes onto an existing model. The shapes are based on superquadratic formulas.
When using this Deformer ZBrush will allow you to manipulate these basic models by changing their shapes and then transforming them with the Gizmo3D to move, scale and rotate. These shapes will then be projected onto the surface of the original model. As an example imagine taking a ball and putting a piece of cloth over it. The balls shape will be projected through to the piece of cloth.
Since the Deformer is projecting the new shape onto the topology of the existing surface this can result in stretched polygons. ZBrush can add extra polygons on the fly to produce cleaner surfaces where it is needed. This smart and automatic tessellation brings the capability to add new projected primitives on top of previous projected ones, letting you stack projections the one after the other.
The Project Primitive includes multiple controls which will affect not only the shape itself, but also its projection transition. It can be associated with the classic axis symmetry as well as its own Radial Symmetry for intricated shapes.
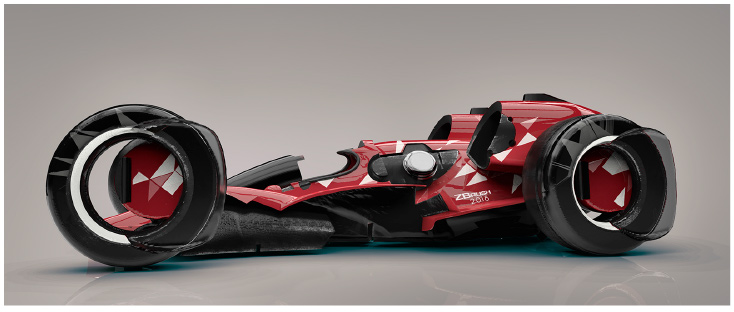
An example of a model built only by using the Project Primitive deformer. Model courtesy of Joseph Drust.
Projected primitive has four important behaviors that you must keep in mind:
-
- When the center of the projected primitive is located inside the model, it will pull the polygons outside, adding the projected shape to the model
- When the center of the projected primitive is located outside the model, it will push the polygons inside, creating a negative projection of the shape
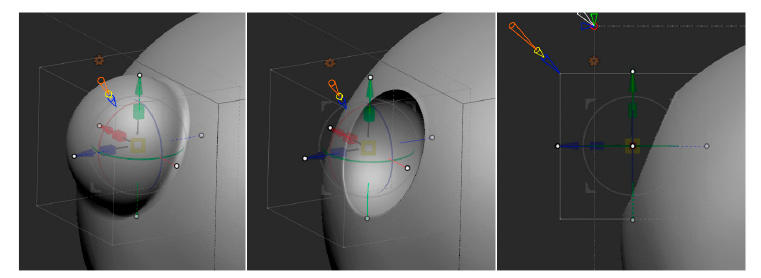
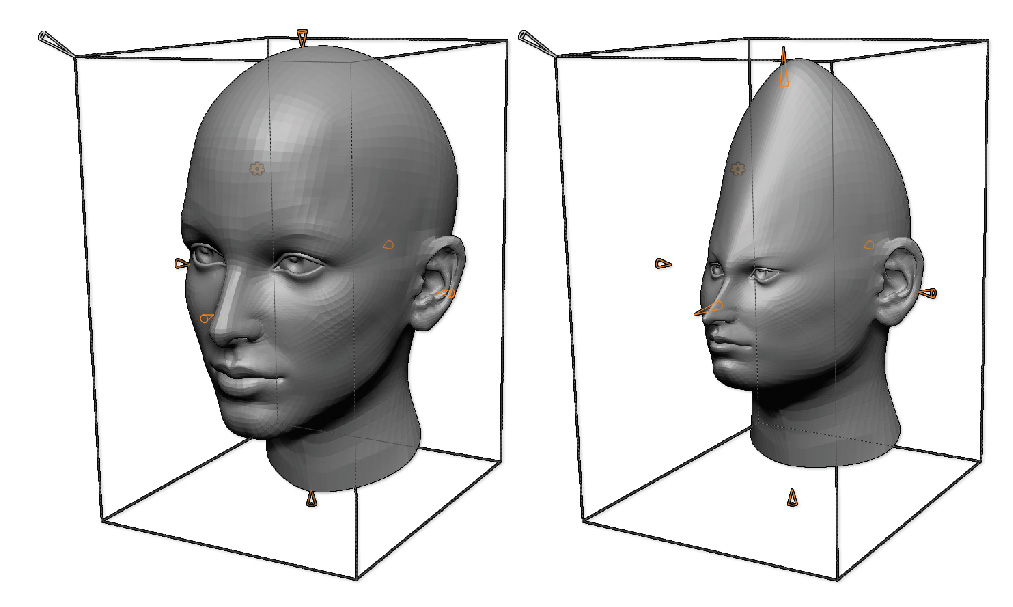
On the left, the center of the projection is inside the model, resulting of the partial sphere on top of the surface. On the center, the projected sphere has been slightly moved in a way that the center is now outside of the model: the projection is now done on the other direction, creating this partial sphere cut. On the right you can see that the center is outside, like is showing the Gizmo 3D.
-
- The projected primitive can be seen as it can become a new mesh to start working with or just being “invisible” to do its deformation, by changing the New Surface cone value. Making the projected primitive visible is also a helpful option if you wish to see the shape of your projected primitive to change its shape with more ease.
- The intersection between the projected primitive and the 3D model can be a soft transition (by default) or can be sharp, based on the Blend cone mode.
If you wish to realign the projected primitive on the symmetry axis of the model, simply press the shift key while using the Gizmo3D until it snaps to the symmetry axis.
Project Primitive – Clip Manipulators
In addition to the cones to change the mathematical aspect of the primitives, the deformer includes clipping controls, aligned with the Gizmo3D axis. By pushing and pulling their controls represented with white dots, you will manipulate a clipping plane perpendicular to the manipulation axis.
If you want to clip the model symmetrically, press the Shift key while dragging a Clip dot, the opposite one will be moved in the opposite direction.
With this Clip control, combined with the Cones to change the primitive shapes, you will have a very large array of primitives to build and deform your models.
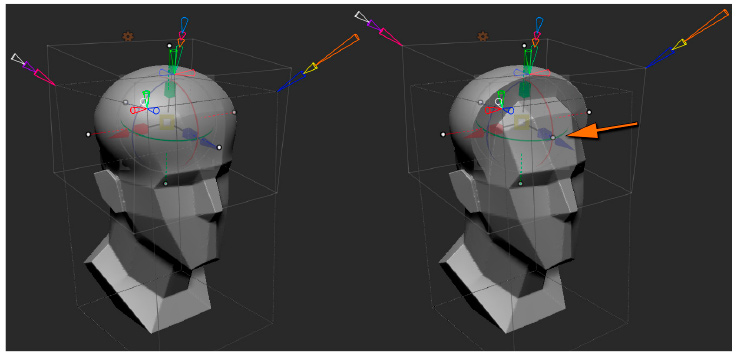
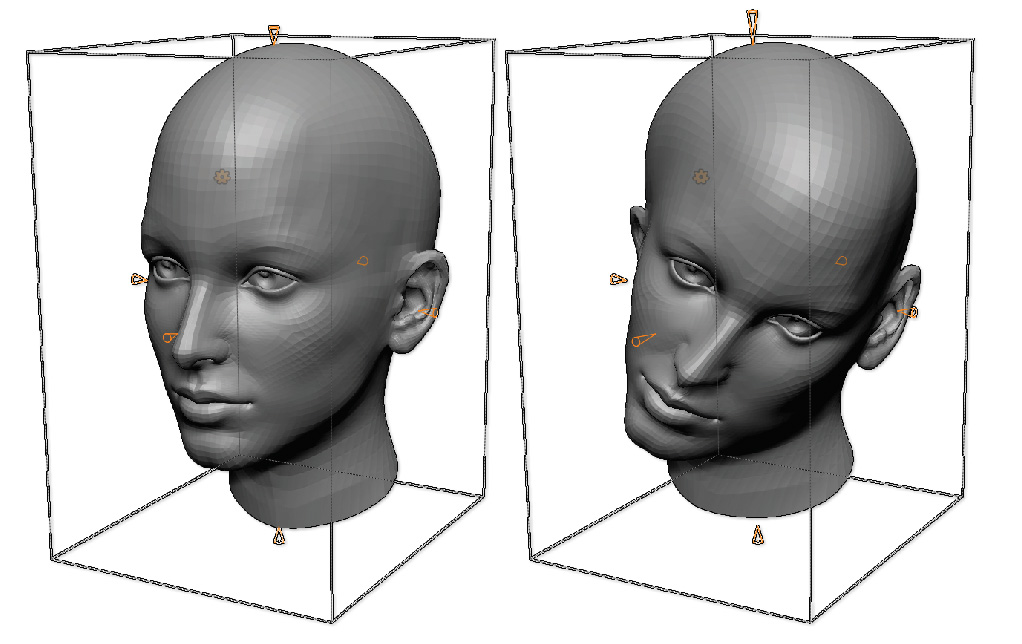
On the left, the original model with a Sphere projected on the top of the head. On the right, the front clip dot (orange arrow) has been pushed inward to trip the sphere shape.
Using the Project Primitive Modifier
This is an example project showing the basic usage of the Project Primitive modifier.
-
-
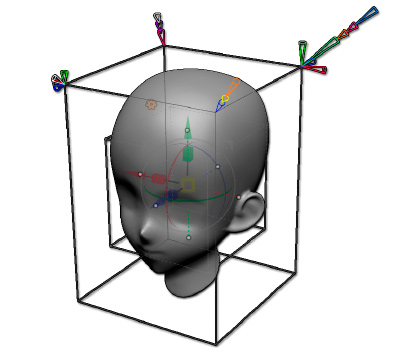
- Load the DemoAnimeHead.ZPR project in Lightbox
- Select the Gizmo3D by choosing Move, Scale or Rotate then click on the small Gear icon on the top left of the Gizmo3D.
- A popup will open, select “ProjectPrimitive”. You should see all the cones appear as well as the Gizmo3D.
-
-
-
- Click and drag the green arrow of the Gizmo3D to move around the top of the head the default primitive, which should be a sphere. If you move too much to the top the projected primitive, the effect will be transformed from a pull to a push effect. Keep the projected sphere inside of the model to have a pulled deformation.
-

-
-
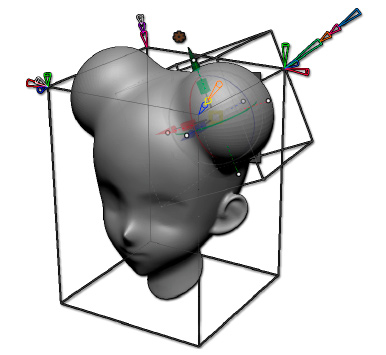
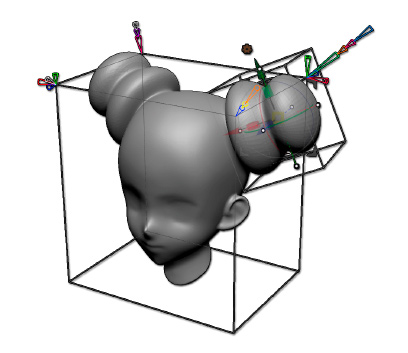
- Now click and drag the red cone on the top right corner of the model bounding box to enable the X symmetry. The click and drag the red arrow of the Gizmo3D to move the projected primitive on the side of the head, to create a kind of hair bun, resembling a famous rebel princess.
-
-
-
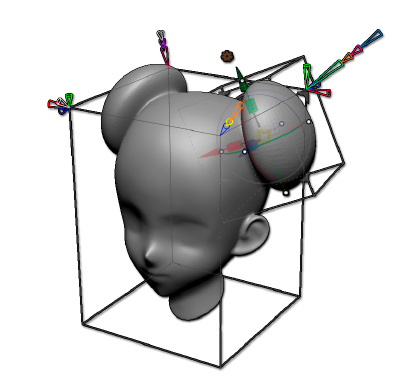
- Of course, you can use the other axes of the Gizmo 3D to move around the projected sphere to refine its position. Use the X scale manipulator as well to do a non-uniform scaling of the projected sphere which can be followed by a rotation along the Z Axis. As you can see, a Projected primitive can be manipulating like all type of 3D meshes and can be modified on the fly by the Gizmo3D.
-

-
-
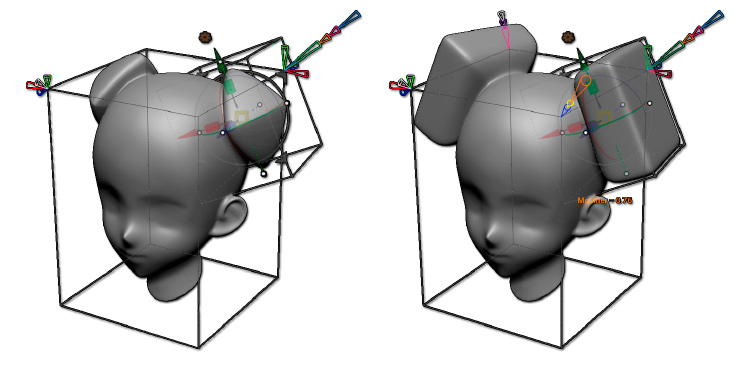
- Now you can play with some cones to adjust some settings: Click and drag the Pink Blend cone to adjust the transition shape between the projected sphere and the head, then why not click and drag the Pink opacity cone to affect the global intensity of the projected head. Just try adjusting cones to see the real time modification on your model.
-
-
-
- If you feel that the spherical shape is not what you are looking for, click and drag the long orange Modifier cone. It will convert your projected primitive sphere shape to a cubic or pyramidal one.
-
-
-
- Now click on the white cone Accept: your current projection will be validated, and a new projected primitive will be ready to be use. This new one is the same as the one you just validated.
-
-
-
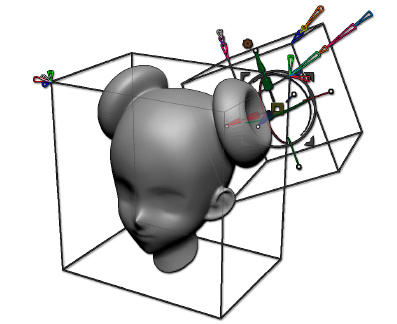
- Manipulate this new projected primitive by pushing it outside of the mesh: it will push the polygons inside the bun hair shape you previously created.
-
-
- When you are done with your model, click on the orange Gear icon on top of the gizmo and in the popup, click on Accept to completely validate your modifications and quitting the modifier.
You can continue to manipulate your current projected primitive or apply it to create new ones and then continue to apply some deformations to change the shape of your model or simply creating new models. You only need to keep in mind that you are deforming on existing model with simple shapes and like this, creating some deformations which could be difficult to do otherwise.
Project Primitive Settings
The Project Primitive deformer includes a large amount of settings, including dynamic ones: they are visible or not depending of some other settings.
The Settings are groups by positions located on the bounding box.
-
- Primitive type yellow cone: Selects the type of primitive to project:
- From a Cube to a Sphere through a Diamond shape, based on the associated Modifier cone values.
- From a Sphere to a Cylinder through a double side Cone, including more or less sharp angles, based on the two associated Modifiers cone values.
- From a Cylinder to a Pyramid through Cones, including Cube or sliced Cones based on the two associated Modifiers cone values.
- From a Torus to a Washer type shape with square or diamond type section based on the two associated Modifiers cone values.
- Primitive axis blue cone: Sets the orientation of the primitive, along the selected axis (X, Y or Z).
Note: The axis swap may not be visible with primitives like sphere or when some cones settings affect the primitive to make it look like a sphere. - Modifier 1 & 2 orange cones: these two cones affect the shape of the primitives to make it more rounded or angular by changing its internal mathematical descriptions. As an example, you will be able to change the cylinder to a prism shape by changing both these cones values.By pressing the Shift key while click and dragging the modifier cone, you will constrain the values to decimals (0.1, 0.2, 0,3, etc.). It’s an easy way to bring back the modifier to it’s default values of 0.5.
Note: The Sphere primitive only has one Modifier cone. - Accept white cone: the manipulation of the Accept white cone will bake the current projection into the model and will generate a new projection ready to be used. It is very similar to a “validate and go next” action. This cone’s values don’t have an impact on the operation, you only need to click it to do the baking of the current projection.
- New surface purple cone: when enabled, with a value different than zero, this cone will prevent the fusion of the primitive into the existing model.It can be helpful in multiple ways. The first one is to let you see what your primitive looks like when applying the settings, which is not always easy when your model is set to a negative projection and then invisible to you. Another great usage is to create a new object, like it could be another SubTool and start new projections on top of it.
- Blend pink cone: this cone is only available when the New surface cone is enabled. The blend cone produces, when enabled, a soft transition between the shape and the projected primitive. Setting its value to zero will produce a shape transition.
- Opacity pink cone: applies a global opacity on the projection, similar to making the projecting more or less transparent compared to the model original shape. By default, the value at 1 means that the projection is fully opaque, making the shape of the projected primitive the full priority in the deformation. If set to 0.5, the shape will be a 50% mix of the projected primitive shape and 50% of the original shape.
- X, Y and Z opacity: applies opacity similar to the global one explained above, except that it is applied only along the axis of your choice.
- Tesselate: increases or decreases the local topology added by ZBrush to increase or decrease the quality of the projection. Increasing the topology value will produce better results, but it can drastically increase the global polygon count having a negative impact on performances.
- Maximum Displacement orange cone: defines the intensity of the displacement created by the projected primitive.
- Apply Grouping blue cone: adds or not a new PolyGroup to the projected surface.
- X, Y and Z Symmetry: sets the symmetry plane for the deformation. This symmetry, like that found in the Transform palette, can be parallel or mirror type (regular symmetry).
- Radial Symmetry: applies a radial symmetry around the active symmetry axis or the modifier, where the numbers set by the Radial Symmetry cone defines the number of copies. It is advised to only work with a single symmetry axis, except when working on a perfect sphere.
- Primitive type yellow cone: Selects the type of primitive to project:
Remesh by DynaMesh
The Remesh by DynaMesh lets you convert or update the current model as a DynaMesh model, without the need to enable this mode in the Tool >> Geometry palette. You can change all the settings and values while still in this modifier without affecting the original model, but once you accept the modification of this deformer, the current state of the model with its DynaMesh settings will be applied.
If you modify some settings in the Tool >> Geometry >> DynaMesh section, they will be used by the modifier, like the Polish mode.
ZBrush will keep in memory the original model until you validate the modifier or alter the original model. It allows you to change the modifier settings and try other values without the need to undo your previous modifications.
Settings:
-
- Target Polygon Count: defines the number of polygons for the DynaMesh, in thousands of polygons. By click and dragging this cone, you will set the desired number of polygons and when released, the DynaMesh will be created (or updated) by using or not the options explained below.
- Reproject: enables the projection of the original model on top of the result of the DynaMesh. Enabling this mode will increase the quality of the DynaMesh, but it will increase the computation time on complex and high polygon meshes.
- Smoothness: applies a pre-smoothing to avoid sharp edges on the resulting DynaMesh. Mainly visible with a low resolution.
Remesh by Union
The Remesh by DynaMesh lets you create a union Boolean operation between all the models of the current SubTool, without the need to go through the SubTool manipulation and the associated Boolean selectors.
All the models which have intersection will be combined as a single model which is perfect if you want to merge insert meshes together with the support model.
ZBrush will keep in memory the original model until you validate the modifier or alter the original model. It allows you to change the modifier settings and try other values without the need to undo your previous modifications.
This modifier doesn’t have any settings. The Union is done as soon as you enter in the modifier.
Remesh by ZRemesher
The Remesh by ZRemesher allows you to create a retopology of your current model by using ZRemesher. It is very convenient as you can only work on a non-masked part like an Insert Mesh without having the need to split your parts as SubTools.
If you modify some settings in the Tool >> Geometry >> ZRemesher section, they will be used by the modifier, like the grouping options or the Adaptive Size value.
ZBrush will keep in memory the original model until you validate the modifier or alter the original model. It allows you to change the modifier settings and try other values without the need to undo your previous modifications.
Settings:
-
- Target polygon count: set the target polygon count for ZRemesher. The resulting retopology polygon count can have a very different value depending of the Adaptive Size value found in the Tool >> Geometry >> ZRemesher section.
- X, Y and Z Symmetry: Sets the symmetry plane for the retopology along the axis of choice.
Remesh by Decimation
The Remesh by Decimation can reduce the polygon count of the current model by using the Decimation Master plugin. It will more or less reduce the un-necessary vertices of the model by trying to keep a much as possible the original model shape.
Settings:
-
- Target Polygon count: sets the target polygon count of the decimation in thousands of triangles
- Use PolyPainting: if the model has PolyPainting, Decimation Master will use it to optimize the model according to the contrast of the color.
- PolyPainting weight: the PolyPainting weight defines how much Decimation Master will use the PolyPainting information to produce the decimation.
- Protect borders: when enabled, this cone will tell Decimation Master to keep all the points undecimated on the boundaries of the opening.
- Keep UVs: keeps the current UVs of the model and decimate them according to the topology. Note: this function increases the processing time and memory usage.
- X, Y and Z Symmetry: sets the symmetry plane for the retopology along the axis of choice.
Rotate
The Rotate deformer is very similar to the rotation transformation of the Gizmo3D as stretching a cone from the model bounding box will rotate the model along this cone.
The benefit of this deformer is to allow you to precisely orient the bounding of your model box based on the Gizmo3D orientation that you can set before selecting this deformer. Then you can use this new orientation within your deformer.
Setting:
-
- Rotate: rotates the model along the axis of the selected cone.
Scale
The Scale deformer is very similar to the scaling transformation of the Gizmo3D as stretching a cone from the model bounding box will scale the model along this cone.
The benefit of this deformer is to allow you to precisely orient the bounding of your model box based on the Gizmo3D orientation that you can set before selecting this deformer. Then you can use this new orientation within your deformer.
Both opposite cones of the bounding box are doing the same operation.
Setting:
-
- Scale: scales the model along the axis of the selected cone.
Skew
The Skew deformer is creating a deformation of the same name by scaling along one or two axes the manipulated face of the model bounding box.
You are able to manipulate each axis cone of each face of the bounding box individually. For a better control of your deformation.
Setting:
-
- Skew: deforms the model along the manipulated cone axis.
Slice
The Slice deformer is a simplified version of the MultiSlice one. It adds an edge slice all around the model which can be converted as a polygon strip based on the Slice Width cone value.
This modifier is very convenient when working on hard surfaces models to add ring-based extrusion shapes.
Don’t forget that changing the orientation of the Gizmo3D before entering in the modifier will let you change the orientation of the slice.
Settings:
-
- Slice position: the blue dot allows you to set the position of the slice dynamically by drag and dropping it.
- Slice width: changes the width of the slice, from a simple slice to a polygon strip.
- Inflate: adds a positive or negative extrusion to the slice, only when the Slice with value is different than zero.
- Apply creasing: adds a crease around the slice.
- X, Y and Z Symmetry: sets the symmetry plane for the deformation. This symmetry, like the one found in the Transform palette, can be parallel or mirror type (regular symmetry).
Smooth
The Smooth modifier applies a smoothing to the current object or its unmasked part in a similar way to the Smooth function found in Tool >> Deformation >> Smooth but based on a bounding box side direction. The smooth effect will be go gradually from the side of the stretched cone to the opposite side, from 100% of the value to 0% of the value of the smooth set by the cone.
Because this operation is done on real time, performances can be affected by the number of polygons of the current model.
Setting:
-
- Smooth: defines the strength of the Smooth, from 0 to 500 where 0 applies no smooth at all.
Smooth All
The Smooth All modifier applies a smooth to the current object or its unmasked part in a similar way to the Smooth function found in Tool >> Deformation >> Smooth.
Because this operation is done on real time, performances can be affected by the number of polygons of the current model.
Setting:
-
- Smooth: defines the strength of the Smooth, from 0 to 500 where 0 applies no smooth at all.
Stretch
The Stretch modifier is very similar to the Scale modifier and then to a non-uniform scaling done with the Gizmo 3D. In opposition to the Scale modifier which will stretch the model on both size of the modifier bounding box, the Stretch modifier will only deform the model based on the selected cone without affecting the other side of the model.
Setting:
-
- Stretch: stretch the model along the axis of the selected cone.
Subdivide
The Subdivide modifiers allows you to subdivide the current model in a similar way to the Tool >> Geometry >> Divide function.
Setting:
-
- Smooth Divide: subdivides the model the same was as the Tool >> Geometry >> Divide option when the Smt (Smooth) mode is on.
- Faceted divide: subdivides the model but without applying a smoothing on the result. It will add more polygons to the model without affecting its visual aspect.
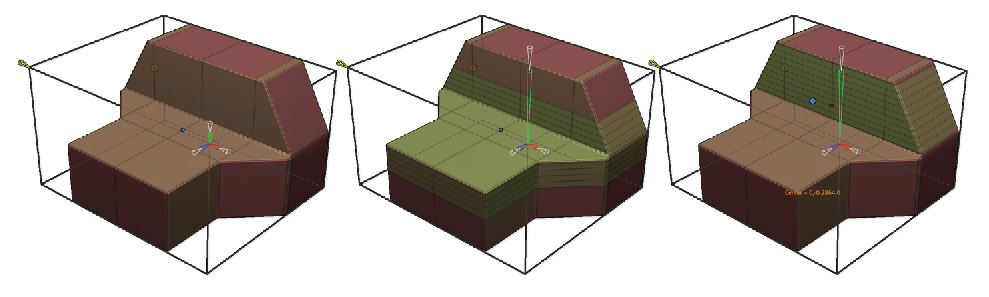
Taper
The Taper deformer applies the corresponding deformation to the mesh.
On the left, the original mesh. On the right, the model was transformed with the Taper modifier.
Settings:
-
- Taper: Defines the strength of the deformation as well as its direction, from start to end or vice versa.
- Exponent: Allows the Taper effect to be more rounded at either the start or end of the deformation.
Twist
The Twist modifier applies a twisting effect around the selected axis.
On the left, the original mesh. On the right, a two axis twist has been applied on the model.
Settings:
-
- Twist: Defines the rotation angle of the twisting effect along the selected axis.