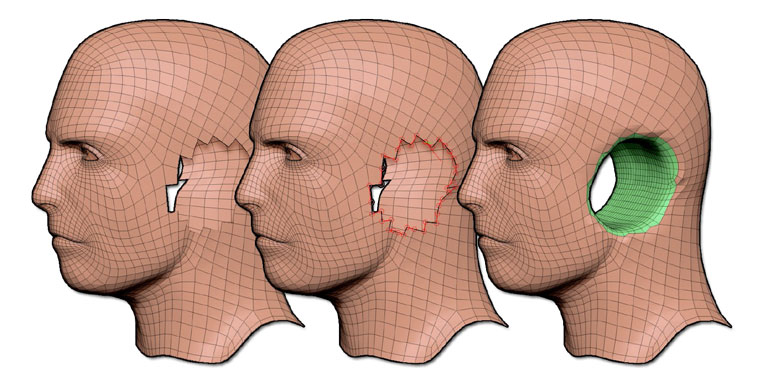
The Curve Bridge Brush creates a polygon bridge between two drawn curves and automatically welds this bridge’s edge points to the original surface.
The new polygons that form the bridge receive their own PolyGroup. They can be directly manipulated without affecting the support mesh due to an automatically assigned mask that is applied to the support mesh. This is similar to how a mesh insert automatically masks the support mesh.
The Curve Bridge uses the new Curve Frame capability to detect the support mesh’s openings, PolyGroups and/or creased edges. As soon as two distinct curves have been created, ZBrush will generate a polygon bridge between the two surfaces.
Creating a bridge

A hole inside the head!
Follow these steps to demonstrate how to create a bridge:
- Load the LightBox >> Tool >> Demo Head.
- In Tool >> Geometry, click Delete Lower to remove all subdivision levels.
- Disable Perspective (Hotkey P) then snap the view to the side of the head by holding the Shift key while rotating the model.
- Select the Slice Circle Curve brush.
- Press CTRL+Shift to call the Slice Circle Curve brush and draw an ellipse around the location of the ear. You should now have a PolyGroup at the ear location.
- Press CTRL+Shift and click once on the original PolyGroup (not the ear group). The ears PolyGroup should disappear.
- In Tool >> Geometry >> Modify Topology, click Delete Hidden to remove the ears entirely.
- Turn symmetry off by pressing the X key. Since the holes are already symmetrical, it is unnecessary and disabling it will avoid unexpected results.
- Select the Curve Bridge brush.
- Start to draw a stroke close to the hole. Press the Shift key and continue holding it until your stroke crosses the first ear hole. ZBrush will detect the opening and create a curve around the hole.
- Rotate your model until you see the other hole and use the same technique to create a curve around this second hole.
- As soon as you release the cursor, ZBrush will create the bridge between both holes.
- Click once on the surface to remove the curves.
- Clear the mask if needed.
Bridge Constraints
It is important to consider that the Bridge function depends on the model’s existing topology at the points where the bridge connects to the support mesh. As a result, it can be easy to create topology irregularities if you don’t respect some simple rules:
- Always do a bridge between two open curves or two closed curves. A bridge between a closed and an open curve is not supported by the Bridge brush and will result a flat circle of polygons at the location of the open curve. You will be left with overlapping polygons and — more important — a non-manifold surface.
- Curve detection can be restricted via the detection options: PolyGroups, Creases and Border openings. Depending on your topology and/or structure, you may need to perform the curve detection in multiple steps by using the Shift key each time. Or you might be able to simply disable or enable one or more Framing options in the Stroke >> Curve Functions sub-palette.
- The Bridge is always created along the shortest (straight line) path between the two curves. This means that if you are connecting two curves on the same plane, the bridge will only create flat polygons. Of course this isn’t a problem with open surfaces, but on a closed surface the far and near polygons of the tube will overlap.