The Topology brush offers your two major possibilities:
- Creating accessories with a surface thickness.
- Creating new topology to replace a patch of existing topology.
- Creating a surface for retopologizing your models.
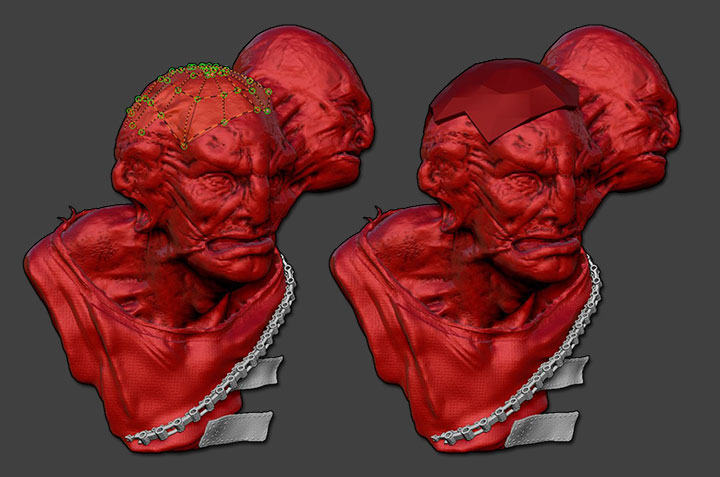
On the left, the drawn curves with the polygons in preview mode. On the right, the new polygons with a predefined thickness, ready to be sculpted. Model courtesy of Mariano Steiner.
Topology Brush Process
It is important that the model doesn’t have subdivision levels.
This new brush basically draws curves on the model and snaps them to the surface. Unlike with the other Curve brushes, curves created with the Topology brush can’t be edited on the surface of the model. They can only be deleted, extended by starting at the end of an existing point, of closed by connecting both extremities with a new curve. They can also be deleted by holding Alt while drawing a new curve to intersect the one you wish to remove.
Note:
It is possible to edit a curve created by the Topology brush by picking any other Curve brush, making sure that Bend is on and completing your edits. Switch back to the Topology brush when done.
While adding curves, if ZBrush detects an intersection it will display a green circle to indicate this.
When any curve crosses over another, ZBrush will detect this intersection as a vertex. When there are three or four green dots connected ZBrush will display a triangle (red) or a quadrangle (orange) indicator. Once the triangle or quad has been completed you can simply click on the mesh to create the new topology.
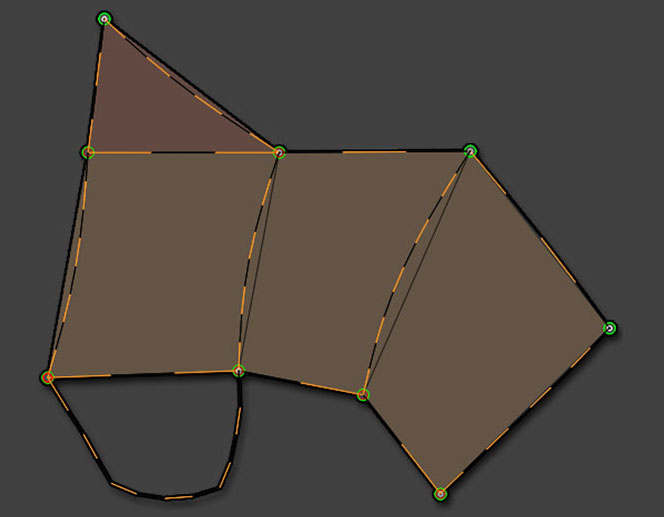
A green circle indicates the connection between two curves. Notice that ZBrush detects triangles (at the top) and quadrangles. In the bottom example a polygon is missing because the intersecting curves have only two connections and need one or two additional connecting curves.
When doing this, the Draw Size will control the thickness of the generated geometry. A Draw Size of 1 will generate a mesh with no thickness. Anything higher than 1 will create a mesh with thickness and three PolyGroups (outer surface, edges, inner surface).
Using the Curve Actions
Some actions will help you with the retopology process:
- At any time you may to clean up unused curves (or their unused extremities). Simply hold the Alt key while drawing a new curve over what you wish to remove. This operation will only work if the removal curve begins on the model surface. Otherwise you will rotate the model instead.
- To delete a curve between existing points or portions of a curve, do this same Alt+drag to draw a small curve over the portion to delete. ZBrush will remove the segment. If more than 4 edges are detected between the curves, the corresponding polygons in preview mode will be deleted as well.
- The Topology brush uses the Stroke >> Curves settings and default actions. This means that when drawing a curve, you can press the Shift key to draw a straight line. Also, Draw Size impacts the curve smoothness of your curve. The other settings also operate as explained under the Curves section of this documentation.
Generating the New Mesh
While working, the polygons you see will be a preview. To finalize your new topology as an actual 3D mesh, simply do a single click on the support mesh. This click must be on the support model itself; clicking on empty canvas will have no effect.
Thickness of the new model is set by changing the Brush Draw Size value before clicking on the support mesh. This is identical to the Tube style or Curve Fill brushes. If you set the Draw Size to 1, the created polygons won’t have a thickness, which will be perfect for when retopologizing a model.
In a manner similar to the Insert brushes, ZBrush will create a Mask on the support mesh while keeping the new topologized mesh unmasked. This allows you to easily manipulate your new model’s polygons. If you don’t wish to have ZBrush auto-mask the support mesh, simply disable the Auto Mask Mesh Insert option, located in the Brush >> Auto masking sub-palette.
As when doing an Extract operation, the new model will have separate PolyGroups for the inner, outer and edge surfaces. The edges of these groups are automatically creased.
Tips
- When creating low polygon models for accessories or props, you can use the Clip brushes combined with masks to align vertices quickly create straight lines.
- The new model is a part of the support mesh and not a SubTool. If you wish to create a SubTool, you only have to hide it with the Tool >> Visibility >> Hide pt function, then go to the Tool >> SubTool menu and use the Split Hidden function.
Note: Because of the AutoMasking (see above), you only need to do the Hide pt then Split Hidden functions, making this a very quick operation.