Areas for Customization
Now that we’ve looked at how to change the appearance of your interface, it’s time to examine changing the layout. This is how you move interface elements from one place to another, and even create new menus.
The interface as a whole is divided into several overall sections. Some of these sections are specifically for the purpose of holding interface elements, as shown below:
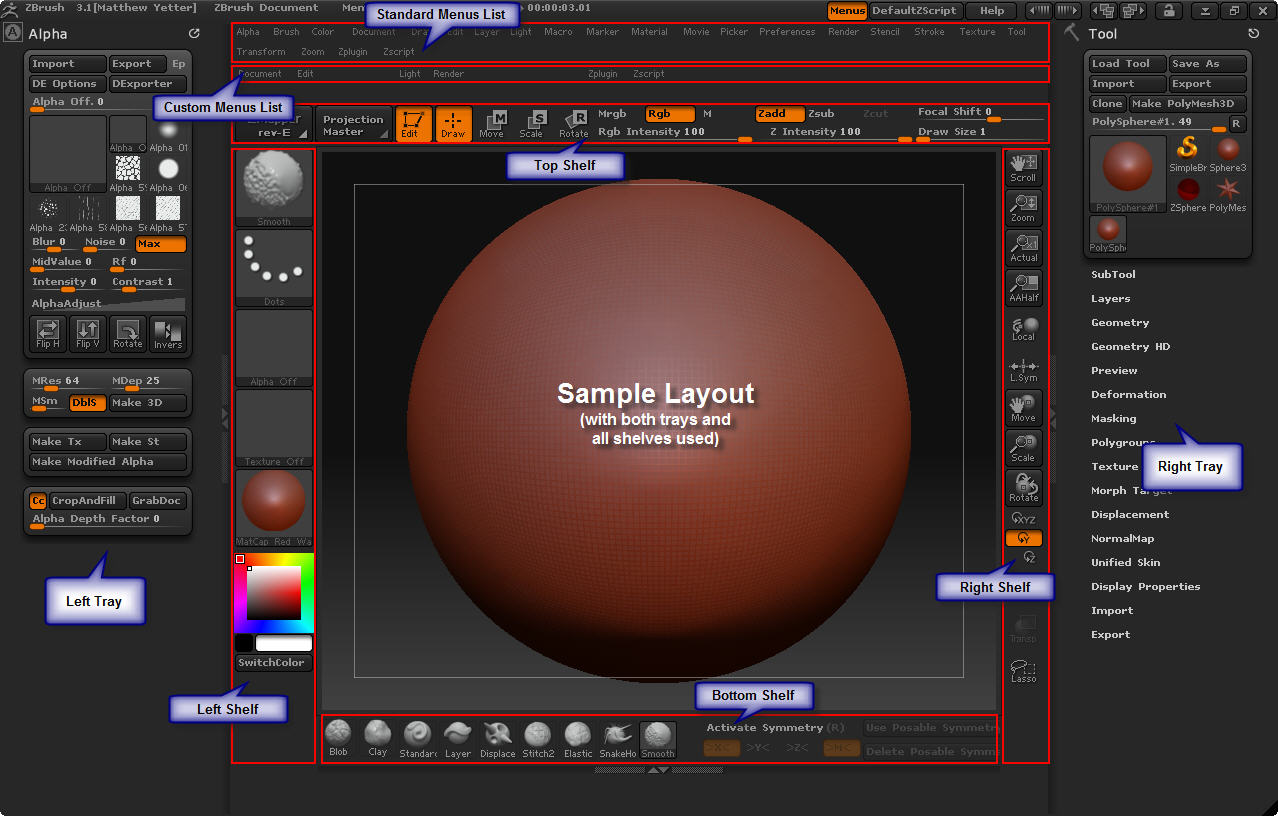
The various places where interface elements may be placed
The trays are on the extreme left and right sides of the interface.
- Trays can only hold complete menus. You can move a menu to a tray in one of two ways. The fastest is to simply click on its handle as shown in Figure 2. The menu will automatically move to the top of whichever tray is currently open. If both trays are open, the menu will move to the top of its “preferred” tray. (This preference is programmed into ZBrush and can’t be changed.) To move a menu to a specific tray – or even a specific place within a tray – click and drag on the handle. When you release the handle, the menu will be placed in the tray just above whatever other menu it had been over.
Separator bars divide trays from the rest of the interface, as well as being used to expand and collapse the trays. Each tray can be opened and closed independently of the other. - Shelves are expandable areas that completely surround the canvas. They are usually prefaced with a side of the canvas, such as stating that, “The AAHalf button is located on the right shelf.” All four sides together are often referred to collectively, so it would also be accurate to say that, “The AAHalf button is located on the shelf.” Each part of the shelf will automatically expand to accommodate the largest item currently placed on that side of the canvas. You can even stack items side by side (in the case of left and right shelves), or one above the other (in the case of the top and bottom shelves). Menus and submenus may not be placed on a shelf. Only individual interface elements may go here.
- The custom menu list is located immediately above the status bar. The only thing that can go in this area are menus, which will always appear in the collapsed state until clicked on. With the Menus button turned off in the title bar, the only menus that are visible are those that have been placed in the custom menu list.
How to Move Elements Around
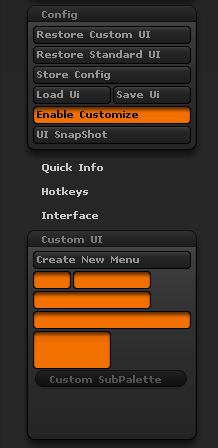
The Config sub-palette, with Enable Customize turned on, and the Custom UI sub-palette
By default, all interface elements except menus are locked in place. This makes it impossible to accidentally move anything around or delete it from the tray. To enable layout customization, you must turn on Preference>Config:Enable Customize as shown in Figure 3.
Once that has been turned on, you hold down the Ctrl + Alt keys to tell ZBrush that you want to move items around. With Ctrl + Alt held down, you simply click and drag an item to move it to its new home. There are several rules that apply here:
- The master menus (those that are built into the default ZBrush UI) may not be modified except through ZScripts or plugins. You may not drag items to move them around within/between these menus or to remove items from them.
- Moving an item from a master menu to an invalid location will have no effect.
- Moving an item from a custom location to an invalid location removes it. For example, dragging the SwitchColor button from the left shelf onto the canvas will remove it from the shelf completely.
- Menus are moved to the custom menu list or rearranged within it by dragging on the menu’s name rather than its handle.
- ZBrush tells you that you’ve found a valid location for an item by drawing a bounding box around the location as you get close to it.
- Most valid locations will expand to accommodate items that are too large to fit the current size. This is especially true for the shelf areas. The custom menu list, however, can only have menu items placed side by side (as opposed to one above another).
- Moving an item over another item already on the shelf or custom menu list will cause an overlap. This is not something that you want to do. You should always place items adjacent to each other, or remove the previous item prior to placing the new one.
These rules will quickly become second nature as you work with them. It’s a very straight-forward and logical system.
Building User Menus
An amazingly powerful feature of ZBrush is the ability to create your own menus, and even place submenus within them. With this feature, you could conceivably rebuild the entire ZBrush interface!
The first step to using this feature is to turn on Preferences:Config:Enable Customize. Doing so activates the options in the Custom UI menu.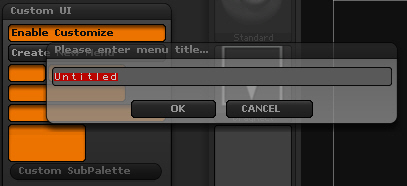
To create your own menu, click Create New Menu. A popup box immediately appears, asking you to name the new menu. Click in the text entry field, type the desired name, then click the OK button. This is shown in Figure 4.
Once a menu has been created, it appears at the far right of the master menu list. This is only temporary. Placing the menu into a tray and then removing it from the tray will cause it to be ordered alphabetically relative to the other menus. The exception to this is if the menu shares the same name as one of the default menus, in which case it will be treated as if it’s named “User”. For example, creating a custom menu named “Material” would result in two such menus being shown in the master list. The original Material menu will be ordered alphabetically, while the new one will be placed between the Transform and Zoom menus. As a general rule, it really isn’t a good idea to give a new menu the same name as an existing one.
(Don’t go creating menus willy-nilly, without need. Once created, the only way to remove a menu is to restart ZBrush without saving the configuration.)
After a menu has been created, it must be moved to a tray before you can place items within it. Click on the name of the user menu to expose its handle, then use that handle to drag the menu to either shelf. Once placed in a tray, you can also rename it at any time by Ctrl+Alt+clicking on its title.
Placing items within user menus is as simple as Ctrl+Alt+dragging them from another menu. When the item approaches the user menu, a bounding box will appear. Drop the item any place within the box to place it there.
Menus are filled according to normal reading order. In other words, from left to right, then from top to bottom. The first item placed in a menu will automatically go into the upper left corner. The next item will go to its immediate right, and so forth. The exception to this rule is if you place one item on top of an existing item. The new item will take the first one’s place, and the first will be pushed to the right or down depending upon available space. Figure 5 shows this at work.

Filling a menu with interface elements
One thing that will help is to understand that the size of all interface elements is calculated in fractions of one. Elements can be full size, meaning that they take the full width of the menu. Alternatively, they also come in 3/4, 1/2 and 1/4 widths with occasional exceptions that are 1/3 width or some other value. The default interface element (such as a button) is 1/8 in height. All combinations are possible, all the way up to a maximum size of 1×1 (such as the preview found in the Draw menu).
Sometimes for aesthetic or organizational regions you may find it desirable to place a separator into your custom menu. The Preferences:Custom UI menu provides several of these in various sizes, which become available whenever Enable Customize is active. To place one of these separators, simply drag it out of the Custom UI menu like any other interface element. 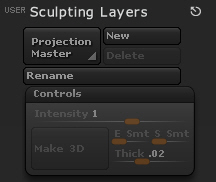
Another item that can be placed in your menu is a submenu. Drag the item called Preferences:Custom UI:Custom SubPalette and place it into the menu that you’re building. Additional items may then be dragged into this submenu. Initially, the submenu will be named “Untitled”. After you have placed an item into it, you can rename the submenu by Ctrl+Alt+clicking on its name. Figure 6 shows a submenu placed within a custom menu.
With these tools together, you can build complete menus with all the functionality of the default ZBrush interface. Custom menus may even be built using buttons that are created via plugins.
The only remaining thought is what to do with these custom menus once you’ve created them. The first option is to leave them in the master menus list. They’ll always be available to you here. Alternatively, you can drag select menus into the custom menu list. This is a convenient way to hide all but the menus that you want to be available in your interface. They can be placed anywhere within the available space, and in any order. Once you have arranged the list to your satisfaction, turn off the Menus button in the title bar to hide everything except those menus that you’ve specifically placed in the custom menu bar. Figure 7 shows how this can be done.

A custom interface that hides the master menus list, and only shows some custom menus
Once satisfied with your interface, press Ctrl+Shift+I to set it as your custom user interface, which will be loaded every time you launch ZBrush. If you simply want it to be available as an alternate layout, use Alt+Ctrl+Shift+I instead. You will then be able to load it manually using Preferences:Config:Load UI or through the Ctrl+L shortcut.