ZPlugin Interfaces
By making your zscript into a ZPlugin you can add buttons to nearly all the default palettes of the ZBrush Interface. This has many advantages; for example, it is possible to use zplugin buttons in any custom interface arrangement. And as part of the ZBrush interface, your plugin buttons are always available, and don’t disappear when another plugin or zscript is loaded in the way ZScript Tutorial Window interfaces do.
However, zplugin interfaces are somewhat limited from a design point of view. It is possible to specify the size of buttons, and give them icons, but exact placement is difficult to achieve and you can’t use background images.
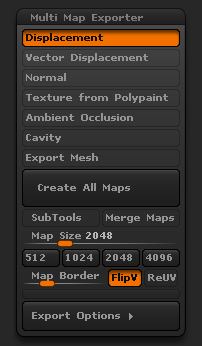
Here is an example of a ZPlugin interface:

Example ZPlugin interface
Creating a ZPlugin interface
Before making a zplugin, first create a working zscript that you can test out in the ZScript Tutorial Window. The main reason for this is that in general you can only load zplugin code once in a ZBrush session. If you need to alter your code, the zplugin simply won’t update without restarting ZBrush. This can get rather tedious if you have to make a lot of changes. On the other hand, the Tutorial Window display can be updated simply by reloading the zscript. Any code changes will take immediate effect, making testing a whole lot easier. So get your zscript working there and convert to a zplugin when all is working as you wish.
There’s really very little to making a zscript into a zplugin. The main consideration is which palette you wish to use, and whether or not to create a new subpalette. Bear in mind that the ZBrush interface is already crowded and the users of your plugin may not welcome a hundred extra buttons in the Tool palette. Zplugin buttons or sliders should be used sparingly; if your zplugin has a lot of buttons consider using a Note interface to cut down on interface clutter.
The ZPlugin Code
The ISubPalette command is used to create a new subpalette. In general there is no need to specify any values for the options as the defaults work well:
[ISubPalette,"Document:Holiday Snaps"]//creates a new Holiday Snaps subpalette in the Document palette
Note that it is important to use double quotes when specifying a subpalette name which contains spaces:
[ISubPalette,Document:Holiday Snaps]//creates a new HolidaySnaps subpalette in the Document palette
Once the subpalette has been created, the zplugin buttons, switches and sliders use a special form for their names:
[IButton,"Document:Holiday Snaps:Beach Scenes",//creates a new Beach Scenes button in the Holiday Snaps subpalette
The only remaining thing to worry about is the button widths and heights, otherwise the zplugin code is exactly the same as any other zscript. When specifying widths it is best to use proportional values (for which 1 is full palette-width, .5 half palette-width and so on), rather than pixels. Not only does this simplify the arrangement of the buttons but with ZBrush 3.0 variable button widths have been introduced; using proportional widths ensures that your interface will look good whatever button width setting is used. Button heights can be left blank for the default.
When deciding on width values try to fill up a palette-width line with buttons so that there are no gaps. If you don’t, and then lower down have a button which is narrow enough for the gap, it will be placed in the gap instead of where you want it!
ZPlugin Tips & Tricks
- Unless each Switch is enabled in the code it will become disabled after being used once. To ensure switches work as expected, use the IEnable command at the end of your code:
[IEnable,"Document:Holiday Snaps:Sun Light"]//enables a Sun Light switch in the Holiday Snaps subpalette
- Button width/height values can be in pixels or proportional values relative to the palette size (for example, 0.5 = half palette, 1 = whole palette). For zplugins it is best to use of proportional values as this means that the plugin interface scales appropriately for different settings of the Preferences>Interface>Buttons Size slider.
[IButton,"ZPlugin:SubTool Master:SubToolMaster","Pop-up info",/*commands*/,,.5,,,.25]//button is half palette width, quarter high
ZPlugin Sample Code
Download sample code for creating a ZPlugin interface here.