LightCap® is a new way to create both Materials or Matcap® in real-time by manipulating directly the lights they simulate.
Using the LightCap Designer is simple and really powerful, even it is important to take in consideration that some difference exists between a Material and a Matcap, which have an impact on how you are using both with the LightCap:
A Matcap is a Material with light information backed in as an image, as soon as it is created, you can’t change the light information in Matcap, while a Standard Material can be affected by the scene light. The LightCap Designer lets you manipulate light information at creation time, but as soon as you change to another ZBrush project or restart ZBrush, you will not be able to change the Matcap light information. You can however individually save your LightCap in its own file format.
Also, another difference is the settings available for both Materials and Matcaps: Materials let you tweak and modify a large amount of settings and mix difference shaders together through the Shader Mixer, while a Matcap can be more globally manipulated through the textures in which it was composed of. Matcaps interact with the model geometry, mainly through the cavity information.
It’s important to consider these points when creating a new Material or Matcap through the LightCap Designer.
- If you would like a material with advanced settings and abilities of tweaking, start with a standard Material like the Skin Shade 4 material.
- If you want a material with a great management of cavities and which will look similar depending of your scene, start with a Matcap.
Note: It is possible to use the Matcap information as a shader for the Standard Materials. Keep also in mind that using the LightCap Designer means modifying the current active Material or Matcap, then it means that the new lighting information will be mixed with the current material settings and you may need to alter them in order to achieve the result you are looking for.
LightCap workflow
This is an example of workflow using the LightCap designer and may vary from your needs. LightCap with a Matcap or a Material:
- Load a ZBrush model or a Project.
- Select a Matcap, the default Red Wax one or a material like the SkinShade4. Both are great examples to use.
Note: This Matcap or Material will be definitely modified by the next steps and until restarting ZBrush. If you wish to save your Matcap/Material editing with the LightCap Designer, you must save the Matcap/Material under a different file name or just save the LightCap information and load it if needed at a later stage.
- Change the default color to a white one if you have another selected, through the color selector located in the Color palette.
- In the Light palette, turn off any scene lights at the top of the palette. This will ensure that they do not affect your scene while you are creating a LightCap. (Although this depends on the type of material you use as a starting point – MatCaps are not affected by scene lighting.)
- In the Light palette, open the LightCap sub-palette.
- Click on the New Light button: it will add a new light in the preview window, creating a soft low light visible on a sphere. By clicking and dragging in this preview you will see a red dot appearing on the top of a sphere, this is the new light you just created. . Each time you add a light or move a light upon release of your cursor, your 3D model Matcap/Material will be updated.
- Now, change some light settings: increase the Aperture value to create a spread light. At the value of 180, it creates a light which is similar to the ambient light and fills the LightCap window with light. At times this is a good base light to start with for your material. Change the lights color by clicking in the color selector in the LightCap Designer. To finish with this step you can change the light Strength to create a stronger base light.
- It’s time to add an extra light, by clicking on the New light button: a new red dot appears as a new light projections onto the sphere. Like the two steps above, you can manipulate your lights and its setting as you go.
- When you are happy with the new light position, Color, Aperture or Falloff, click on the Specular button on the top right of the LightCap designer interface: now, you will be able to change the specular information of your Matcap/Material, mainly the opacity. The opacity setting is the only slider that is separate per channel for both Diffuse and Specular while others settings are connected between these two editing modes. It means that if you want to make a light invisible but keeping only its specular, you have to define the Diffuse opacity at 0 and the Specular opacity to a value higher than 0. If you change the Strength setting, both Diffuse and Specular will be affected.
Note: If your specular seems to be not affected by your color change and that you are using a standard Material like the SkinShade4, check the Material > Modifiers settings and in your Shader(s), that the Colorize Specular is at 0 and not another value.
- Continue the previous steps to create more lights and make your Material/Matcap visually richer.
- If your base material is a Matcap, go in the Material > Modifier sub-palette. You will notice at the bottom a little window with the image preview of both images created by the LightCap Designer if you used a Matcap at the beginning of this process. If you started with the RedWax Matcap you will have an image with two spheres. The sphere on the left (A) corresponds to the diffuse of the LightCap Designer and the one on the right (B), correspond to the specular of the LightCap Designer. Any modifier in the Matcap setting with A will affect the siffuse of the Matcap and any modeifier with B will affect the specular of the Matcap.
- If your base material is a Standard Material, in the Material > Modifier sub-palette. Try to modify the Ambient, Diffuse and Specular sliders: as you may have noticed, they are connected to the LightCap information, which means that if you want to see 100% of the LightCap Diffuse and Specular, you have to push the corresponding sliders to 100%. To conclude about the Standard Materials, remember that they are also connected to the default ZBrush lights, located in the Light palette: changing the light Intensity and position will have an impact to your scene preview and render. The default scene lights are simply added to the LightCap lights. The LightCap Designer system is an advance lighting system so if you wish to completely turn off the standard ZBrush light you can do so. Once the standard light is off only LightCap lights will affect the material.
LightCap and Matcap quality
When creating with LightCaps for a Matcap, ZBrush is internally using one or two images, for the channel A and B unless your start Matcap only has one sphere then only A channel is created. In this case the Diffuse and Specular of LightCaps is baked together into the one sphere. The quality of these image is based on the Render > Render Properties > Details slider. A value of 1 means a 512×512 internal map, a value of 2 means a 1024×1024 internal map and a value of 3 means a 2048×2048 internal map.
By having a higher render quality, you will increase the details of these internal maps, which can be visible when using a texture or an alpha for your LightCap lights. Depending on your needs, use this setting to increase or decrease the quality of the internal maps. When this detail slider is changed the internal maps will automatically update when a light is clicked in the LightCap Designer.
Note: It is important to consider the memory aspect of the Render Details, setting a larger map size will require more memory and more computing. If your LightCap doesn’t include details with Alpha and texture maps, we recommend using the lowest quality.
LightCap with Environments
A LightCap can be creating directly from the background texture that is loaded into the Background sub-palette. By analyzing the background’s high and low intensity values and their colors, lights will automatically be created at correct positions and accurate intensity of lights with shadows turn on for lights above the horizon line. This one click operation can create most if not all of your lights ready to be edited in the LightCap Designer system. Please read the Background section for more information about creating a LightCap from a background image.
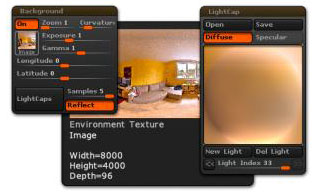
An example of a Background image used to create a LightCap.
The opposite is also possible with LightCaps: ZBrush can generate a background image from all lights and color that are on in the LightCap Designer. LightCap will store all the lighting information based on a sphere, it is easy to project this information as a background image, which then, will fit the look and feel of your model with its Matcap or Material assigned to it from that was created from the LightCap Designer system. To create an environment from the LigthCaps, simply click on the Light > LightCap > Create Environment button. After a few seconds, your background image will be replaced by a new image based on the LightCap information.
This background image can only be saved within a Project and can’t be exported as a separate image.
For a full explanation of all LightCap controls see the Reference Guide > Light palette.