PolyGroupIt
Complex PolyGroups in no time!
PolyGroupIt is a plugin for ZBrush that allows for easy creation of your model’s PolyGroups. These are used in organizing the mesh with visual grouping information and are also integral to many of the advanced features available in ZBrush. PolyGroupIt will analyze you model’s topology and — based on the settings you choose — detect boundaries of potential PolyGroups. This makes their creation fast and easy.
PolyGroupIt works mainly on the concept of “seed” points: You click on a part of the model to define the creation of a new seed. PolyGroupIt will then create a PolyGroup around this seed until it detects changes in the model’s topology or structure.
The beauty of PolyGroupIt is its ability to detect these boundaries not only on most hard surfaces, but also for shapes which are more organic. This is accomplished due to the threshold control for each seed. If you prefer having full control over the PolyGroup process, you can first paint boundaries for your PolyGroups as PolyPaint on the model. PolyGroupIt can then generate PolyGroups from the PolyPaint.
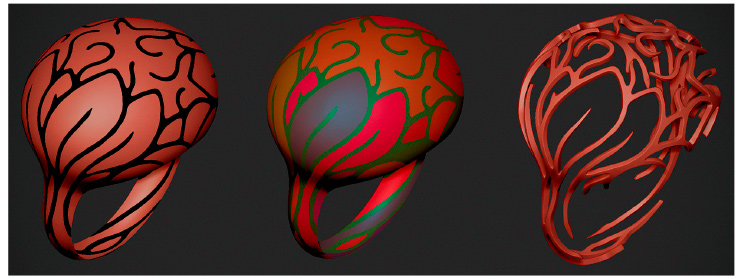
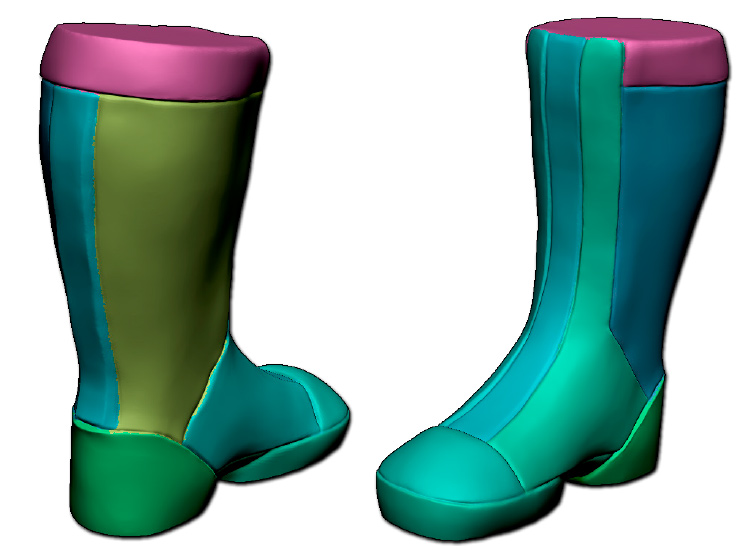
An example of using PolyGroupIt by first drawing PolyPaint boundaries to define the PolyGroups. Mesh Extract was then used to convert the PolyGrouped areas to a final mesh. Model courtesy of Nacho Riesco
Using PolyGroupIt
To start working with PolyGroupIt, you need to load a PolyMesh3D model. This model can have multiple subdivision levels, in which case PolyGroupIt will work at the lowest Subdivision level.

The PolyGroupIt commands, found in the ZPlugin palette.
In the ZPlugin palette you will find the PolyGroupIt sub-palette. Open this and click the PolyGroupIt button. After few seconds, a floating window will appear. PolyGroupIt is a stand-alone application. You should see your model and be able to manipulate it using the usual ZBrush “right click” 3D navigation controls:
-
- Right click to rotate
- Right click + Alt to pan
- Right click + Ctrl to zoom in and out.
- Click on the Frame button or press the F key to re-center the view.
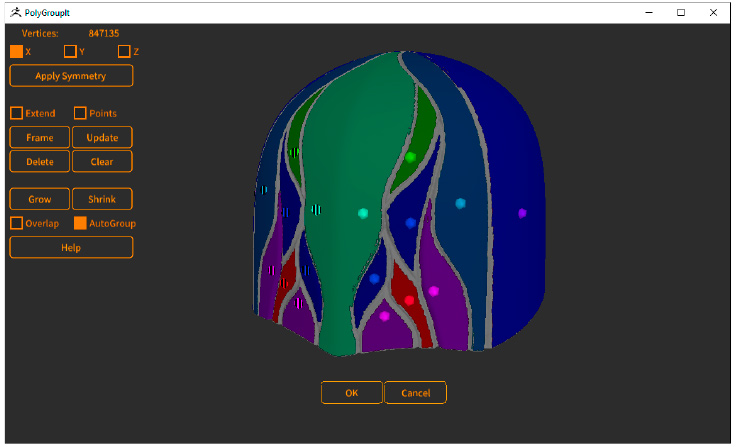
The PolyGroupIt UI. Model courtesy of James Cain.
If your model had any PolyGroups to begin with, they will be removed at the beginning of the PolyGroup operation. PolyGroupIt is a tool for PolyGroup creation rather than for modifying existing groups. Clicking on any part of the model will create a new seed, represented by a sphere. Around this sphere you will see a very small colored area matching that of the seed itself.
The workflow process is to select the seed by clicking on it, then set its influence zone by moving the associated slider. A low value will give a low tolerance to surface angle while a high value will increase this tolerance. You can also counterbalance the tolerance by adding extra seeds with unique tolerance settings for each.
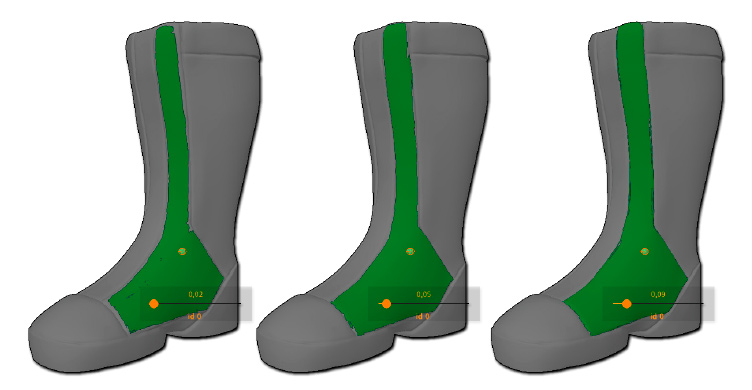
These are three different values for a single seed. From left to right, the value is progressively increased. As you can see, the value on the left isn’t high enough to properly detect the boundaries. Detection is better in the center and optimal on the right.
You can click on a previously created seed at any time to edit its tolerance value. You can also click and drag to move it to another location.
An important factor to consider beyond simply the threshold value for each seed is their creation order. Each seed created has less overall influence than those that came before it.
When you are happy with the result you can turn on Extend mode to fill the gaps between each seed area.
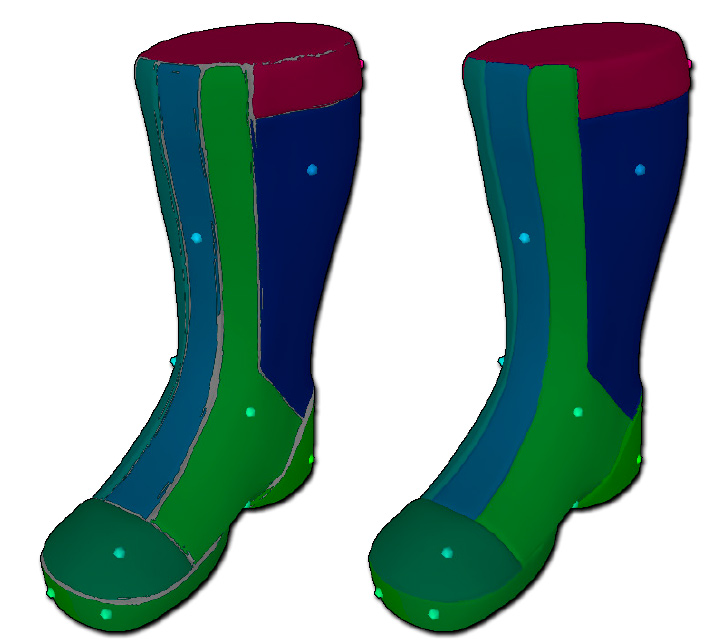
On the left, the PolyGroups before using Extend and on the right, the result: as you can see, the model no longer has unpainted areas.
If you wish to send back the model to ZBrush, click the OK button at the bottom of the window. PolyGroupIt will close and your PolyGroup modifications will be applied to your ZBrush model. Don’t forget to turn PolyFrame mode on (found in the Draw palette) to see your PolyGroups.
The resulting PolyGroups shown in ZBrush. (Lines from the PolyFrame have been hidden.)
If you need to edit your model’s PolyGroups again (so long as you are in the same ZBrush session), simply relaunch PolyGroupIt. You will see all the seeds applied on the model, ready to remodified.
Working with Symmetry
So long as the model’s shape is symmetrical, PolyGroupIt also supports symmetry for the creation and manipulation of seeds. The algorithm looks at the surface rather than the underlying topology. This means that PolyGoupIt symmetry can support things like a DynaMesh model or scan data. Meanwhile, it is important to keep in mind that because PolyGroupIt works on the surface itself it may produce a variation in the PolyGroup creation even if the model is topologically symmetrical.
To enable Symmetry, click one of the X, Y and Z buttons in the PolyGroupIt UI. Remember that since PolyGroupIt is a stand-alone application, these settings are independent from ZBrush symmetry settings.
If you need to work with partially symmetrical models, you can start creating seeds with symmetry enabled. When you need to disable symmetry can click the Apply Symmetry button. This will convert all the symmetrical seeds to individual seeds. Any new seeds will be created without considering the model’s symmetry.
Back and Forth with ZBrush and PolyGroupIt
When sending a model that has previously been edited by PolyGroupIt back to the plugin, you will normally find all your previous seeds and settings ready to be edited or modified anew. However, if you have restarted ZBrush or changed the model’s topology in ZBrush, all previous seeds will be lost and the PolyGroup state will be reset.
Conversion of PolyPaint to PolyGroups
PolyGroupIt provides a very useful utility which allows you to PolyPaint boundaries in ZBrush and convert those to PolyGroups. The process is simple. Using a black color, paint your model to draw the boundaries around the PolyGroups you want to create.
There are two options for how PolyGroupIt will use these boundaries. Zplugin >> PolyGroupIt >> PolyGroupIt from Paint will create only the PolyGroups described by the boundaries (in other words, the filled areas between the lines). Zplugin >> PolyGroupIt >> Border creates these same PolyGroups but also converts the drawn lines themselves to be an additional PolyGroup.
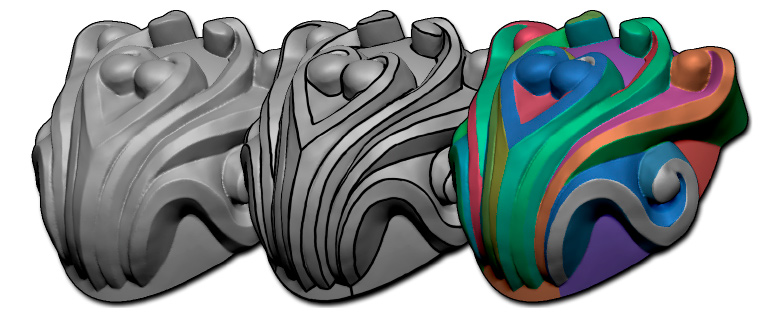
On the left, the original model. In the center, the model with the PolyPainted boundaries. On the right, the resulting PolyGroups after using the borderless option.
PolyGroupIt Functions
-
- Creating Seeds and Seed Threshold
To create a new seed, simply click on the 3D model. A new sphere representing the seed will appear on the model, which the PolyGroup will grow out from. A slider just below the seed allows you to change the seed threshold, modifying how strongly PolyGroupIt will detect changes in the surface to set the PolyGroup borders. - Deleting Seeds
To delete a seed, first select it and then click the Delete button. Alternatively, ALT+click on the seed you want to remove. - Clear All Seeds
To clear all your seeds and start over, click the Clear button. Pressing the Delete key will perform the same action. - Moving Seeds
Click a seed to select it, then click+drag to move it across the surface. The generated PolyGroups will update according to the new seed location. - Reusing Seed Color
By default, each new seed is assigned its own new PolyGroup color. During the process of seed placement and modification, it can be useful to create a new seed with its own control but still the same color as another seed. This allows you to improve the first seed’s PolyGroup propagation.
To use an existing seed color for the new seed, first CTRL+click to select the seed that you want to pick the color from. While still holding down the CTRL key, click where you wish to create new seeds. All of them will have the same color as the original one. - Growing and Shrinking PolyGroups
The following actions will be helpful to improve the PolyGroups result. - Overlap
This function allows the PolyGroups to overwrite other PolyGroups when using Grow or Shrink functions. - AutoGroups
This tells PolyGroupIt not to automatically adjust PolyGroups when moving the seeds’ sliders. This is necessary when you want to manually grow PolyGroups with the Grow and Shrink functions. Turn AutoGroups off before selecting the seed that you wish to manually adjust. - Grow and Shrink
These two functions will gradually increase or decrease the coverage of a selected seed. If Overlap mode is enabled, it will affect all seeds. - Points
This mode displays the points that make up your model. This can be useful to see the topology of the model to understand why a seed color is spreading a certain way. - Update
The Update function will force PolyGroupIt to recompute the propagation of all the model’s seed colors. This is similar to a “Refresh” action.
- Creating Seeds and Seed Threshold