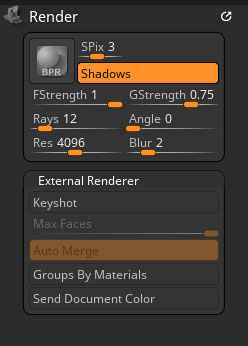
BPR
The Best Preview Render button will create a high-quality render of your model. If the floor is showing and the Shadows option turned on then shadows will be rendered onto the floor. To save an image file from your render, press the Export button in the Document palette when the BPR render has finished.
SPix
SubPixel Anti-aliasing Render Quality. The SPix slider controls the quality of the anti-aliasing: The higher the value the better the quality but the longer the image will take to render. Set the slider to 0 for no anti-aliasing and quickest render time – this is useful when trying out other effects.
FStrength
The Floor Shadow Strength slider sets the strength for shadows cast on the floor; higher values give a stronger shadow. For shadows to appear on the floor the Floor Grid must be activated.
GStrength
The Global shadow Strength slider allows you to adjust the amount of shadow being applied to your entire model. A higher value gives a stronger shadow.
Rays
The Rays slider will set the number of rays used in the shadows calculation. A higher number will give softer shadows, depending on the Angle setting. Increasing ray number will increase render time.
Angle
The Angle slider will set the maximum angle through which the rays are generated: Higher values give softer, less focused shadows. A setting of 360 with a high number of rays will give an effect close to ambient occlusion.
Res
The Res slider will set the shadow resolution in pixels: This figure is effectively the image size (independent of document size) that ZBrushCore uses internally to calculate the shadows. Lower settings will render more quickly, higher settings will give greater accuracy. Sometimes a lower value can give the desired result with less processing overhead – for example, when soft shadows are required.
Blur
The Blur slider will set – shadow blur radius in pixels: Higher values give softer, more blurred shadows. This is related to the Res slider and should be adjusted in tandem for the same effect. For example, if the Res slider value is changed from 500 to 1000, a Blur value of 4 should also be doubled to 8.
External Renderer
ZBrushCore will work with KeyShot if you have a suitable version of KeyShot installed, and the ZBrush to KeyShot Bridge.
ZBrush to KeyShot Bridge Options
The ZBrush to KeyShot Bridge is simple and easy to use but there are a few options can have great impact on the way you work. This is particularly true of the Auto Merge mode.
To learn more see the ZBrush to KeyShot pages.
KeyShot
KeyShot enables the Bridge between ZBrushCore and KeyShot. When enabled, any time you tell ZBrushCore to do a BPR render it will automatically send your model to KeyShot.
If disabled, ZBrushCore will use its own BPR renderer.
Max Faces
The Max Faces mode splits the current model into smaller parts. The size of each part will be no larger (in millions of polygons) than what has been set by this slider. Increasing the slider’s value sends your work to KeyShot in larger chunks. Depending upon your computer configuration, this may produce slowdowns or cause the Bridge to hang entirely.
Imagine crossing a foot bridge. If you tried to drive a tank across, it would most likely collapse. But if you disassemble the tank and carry it across one piece at a time you’ll be able to reassemble it on the other side. The actual capacity of your bridge depends upon your system specs. But even with a powerful computer, keeping a low value will produce smaller chunks of data when sending to KeyShot and usually speed up the process.
If the Auto Merge option is active, these smaller chucks will be merged together inside of KeyShot.
Auto Merge Mode
Because ZBrushCore can send large amounts of data to KeyShot, the information usually needs to be split into smaller chunks to speed up the Bridge process. (See the Max Faces section above.) The Auto Merge mode then tells KeyShot to weld all these parts to rebuild the models as they originally were in ZBrushCore.
Of course, you can increase the Max Faces Slider value to send the data in larger chunks, thus avoiding splitting of the model. However, since the maximum value is 10 million polygons you will most likely need to merge parts of your model sooner or later.
If you don’t enable Auto Merge mode, your KeyShot scene may contain hundreds of parts. For this reason, it is strongly advised to leave Auto Merge enabled.
So why would you ever want to turn Auto Merge off? There may be times when you want to do quick renders of your models while working and are not going to be applying KeyShot-specific materials through the Scene tree. In that case, turning Auto Merge off will make the Bridge operation much faster because KeyShot won’t need to spend time welding the model back together again.
Group By Materials
The Group by Material mode creates a separate group for each ZBrushCore material applied to the model’s SubTools. This means that having multiple materials applied to your model in ZBrushCore will produce the same number of material groups in KeyShot.
These groups are simply defined by the materials in ZBrushCore; no other visual representation exist.
When the model is sent to KeyShot, dragging a material from the KeyShot library onto any part of the model which is part of a material group will apply that material to parts that share this material group.
When this Group by Materials options is disabled, each model is independent and dragging a material from the KeyShot library onto the model will affect only that model.
Send Document Color
When enabled, the Send Document Color mode instructs KeyShot to set its own document background color to match your ZBrushCore document background.