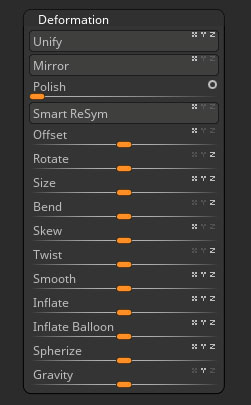
Deformation sub-palette
Unify
The Unify button changes the dimensions of the current 3D tool. The object’s height, width, and/or depth are changed to a unit size which fits neatly inside the Object Preview window.
As with most items in the Deformation sub-palette, you can constrain this button’s effect along the X, Y and/or Z axes by first pressing the corresponding letter within this button.
Mirror
The Mirror button flips the current 3D tool so it becomes a mirror-image reflection of itself. As with most items in the Deformation sub-palette, you can constrain this button’s effect along the X, Y and/or Z axes by first pressing the corresponding letter within this button.
Polish
The Polish slider will control the strength of Polish being applied. The icon on the right will determine the polish mode that will be calculated. To change the polish mode click on the circle.
Open Circle will apply a polish that will maintain the overall form of the tool.
Closed Circle will apply a polish that will smooth out the tool without maintaining the volume.
SmartReSym
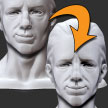
The Smart Realign Symmetry button restores symmetry to the object by examining all points in the mesh from beginning to end and determining which were originally intended to lie in mirror-symmetrical positions.
This button can be used on a mesh which was originally created with mirror symmetry, whether created in ZBrush or imported from another source, even if large-scale distortion has occurred.
You can ‘lock’ one side of an object by masking it before pressing this button; the opposite side then becomes adjusted to mirror the masked side. This is a good way to perform sculpting actions on one side of a mesh (which don’t change the polygon count), as with Projection Master, then reflect them on the opposite side.
Select one or more axes for this action by clicking the small X, Y and Z modifers to turn them on (light) or off (dark).
Offset
The Offset slider moves the object in the direction of the selected axis or axes. After offsetting, each time you place a new instance of this tool on the canvas, it will be displaced by this amount.
The value of this slider is a percentage of this tool’s default unit radius. For example, an Offset amount of 100 along the Y axis moves the tool downward so its new center lies on its top edge.
Select one or more axes for this action by clicking the small X, Y and Z modifers to turn them on (light) or off (dark).
Rotate
The Rotate slider rotates the object around the selected axis or axes. Each time you place a new instance of this tool on the canvas, it will first be rotated by this amount.
Rotating also changes the effective axes for this object. Therefore, all deformations constrained along the X, Y or Z axes act upon the tool in its new orientation.
Select one or more axes for this action by clicking the small X, Y and Z modifers to turn them on (light) or off (dark).
Size
The Size slider changes the shape of this tool by stretching or condensing it along the selected axis or axes.
A value of 100 in this slider expands the object to twice its size; a value of -100 shrinks it to zero.
Select one or more axes for this action by clicking the small X, Y and Z modifers to turn them on (light) or off (dark).
Bend
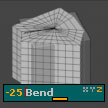
The Bend slider causes the object to be bent in the direction of the selected axis or axes. Polygons on one side of the object, near the centerline, are expanded; polygons on the opposite side are compressed. This type of bending produces a visible seam or crease.
Select one or more axes for this action by clicking the small X, Y and Z modifers to turn them on (light) or off (dark).
Skew
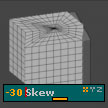
The Skew slider displaces polygons in the direction of the selected axis or axes. Polygons on either side of the centerline are skewed uniformly. This type of skewing produces a visible seam or crease.
Select one or more axes for this action by clicking the small X, Y and Z modifers to turn them on (light) or off (dark).
Twist
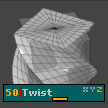
The Twist slider produces a twisting effect around the selected axis or axes.
Select one or more axes for this action by clicking the small X, Y and Z modifers to turn them on (light) or off (dark).
Smooth
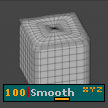
The Smooth slider reduces corners and abrupt changes in the object’s mesh, by comparing each polygon to those surrounding it and making adjustments in its position.
Alternately, the mesh can be roughened by setting this slider to a negative value.
Select one or more axes for this action by clicking the small X, Y and Z modifers to turn them on (light) or off (dark).
Inflate
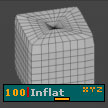
The Inflate slider moves all polygons in the object’s mesh outward, as if filling the mesh with air. The reverse effect can be produced by setting this slider to a negative value.
Select one or more axes for this action by clicking the small X, Y and Z modifers to turn them on (light) or off (dark).
Inflate Balloon
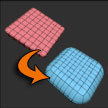
The Inflate Balloon slider will inflate the mesh polygons along the XYZ axis to state that will add volume to the mesh.
Select one or more axes for this action by clicking the small X, Y and Z modifers to turn them on (light) or off (dark).
Spherize
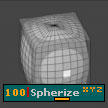
The Spherize slider deforms the object into a spherical shape, in the direction of the selected axis or axes. The value of this slider determines the amount of distortion; negative values cause the object to be distorted away from a spherical shape.
Select one or more axes for this action by clicking the small X, Y and Z modifers to turn them on (light) or off (dark).
Gravity
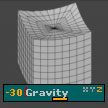
The Gravity slider skews the object in the direction of the selected axis or axes. The effect is similar to that of the Smooth Skew slider, producing a more spherical curve.
Select one or more axes for this action by clicking the small X, Y and Z modifers to turn them on (light) or off (dark).