Linking and Sharing
Connecting Parameters
As described in the Generators and Modifiers section, all parameters of any kind, always have two slots:
- One to add and connect a Generator
- One to add Modifiers to the parameter
Autograph gives you the ability to connect parameters together without using any expressions, representing this connection on the first slot.
We distinguish two methods:
- linking parameters
- sharing parameters.
Linking
Let's focus on the Generator slot:
- If the slot is not connected to anything, you will see a grayed-out icon representing a disconnected plug and socket
- If the slot is connected to a Generator or a Reader, its borders will be blue and the Generator icon will be displayed
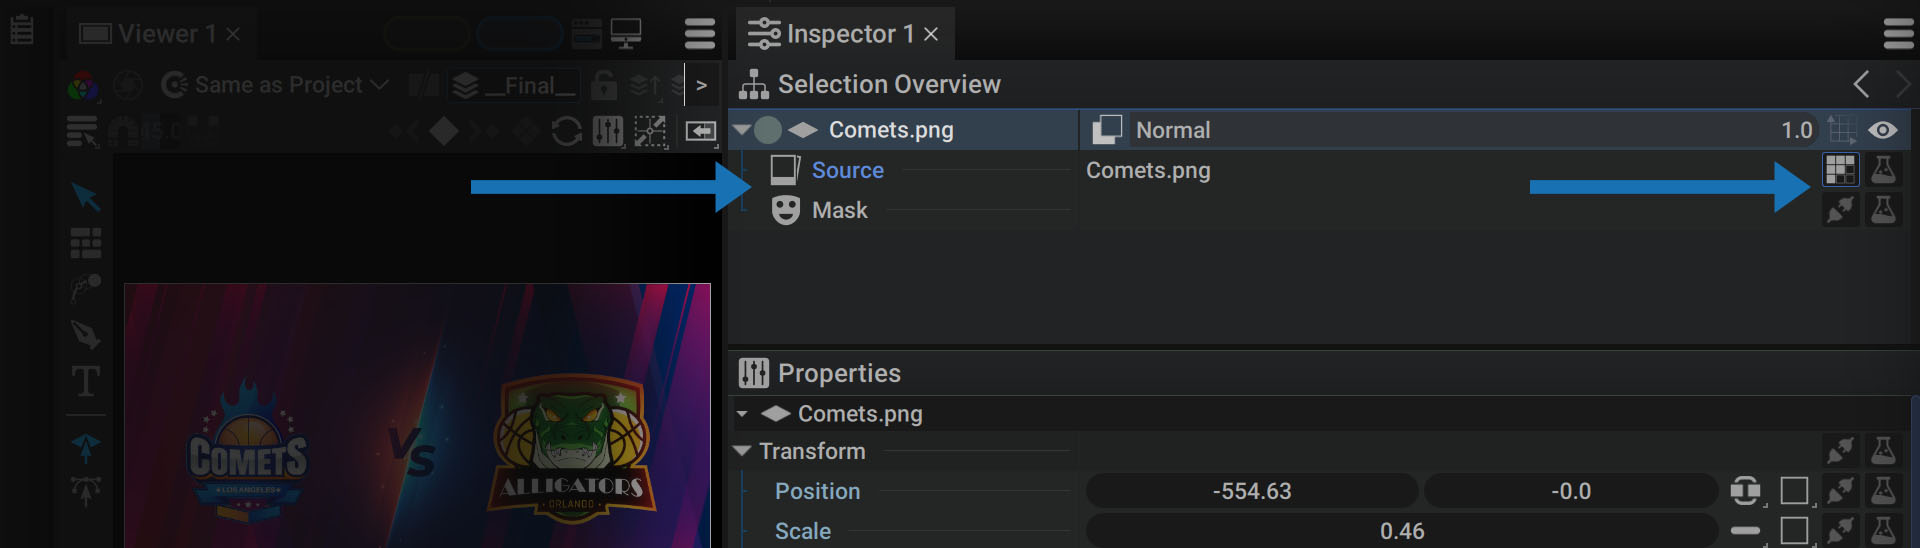
In the following example, the layer Source is connected to a Reader, while its Mask is not connected to anything.
Creating a link between two parameters:
A link is a one-way relationship between two parameters:
- One parameter will be the Driver, enforcing its value or state on other parameters
- One or more parameters will be Driven, replicating the value or state of the Driver
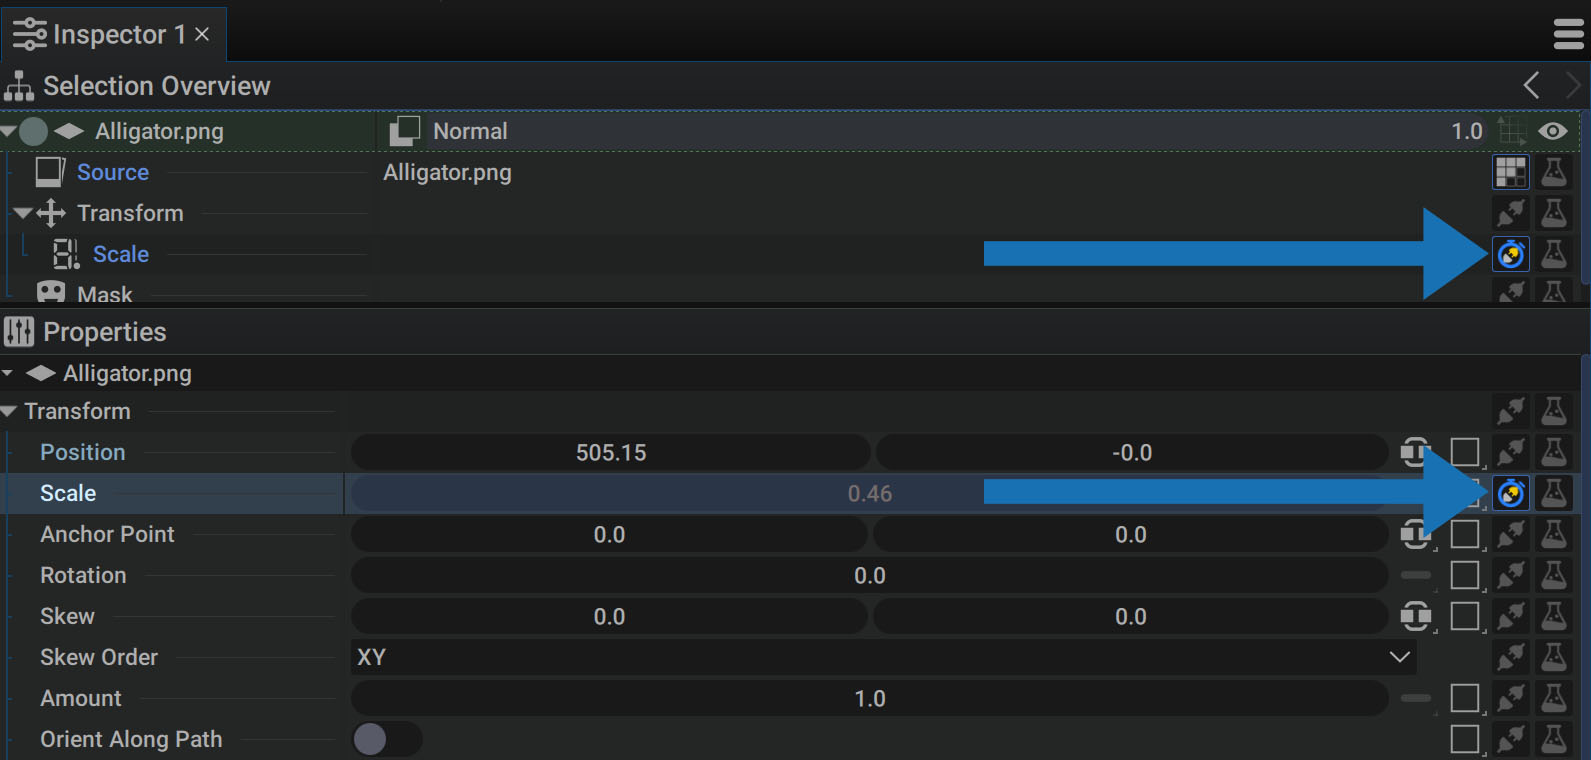
Right-click on a parameter to display the options for creating a link:
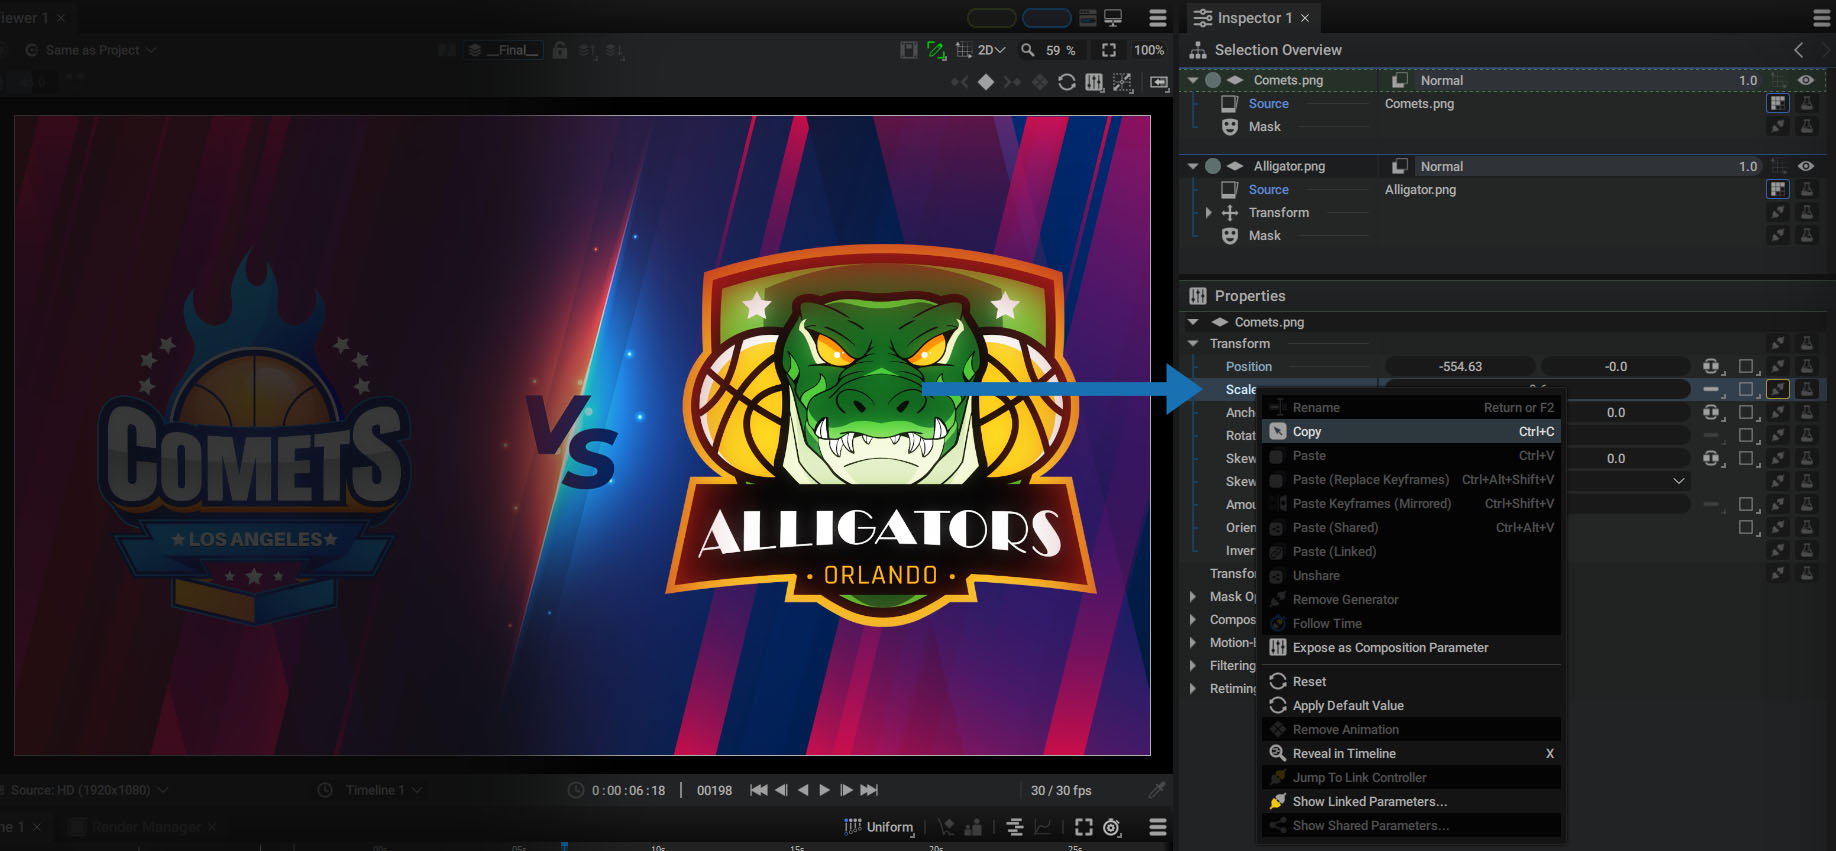
In the example below, two layers are selected to display their respective trees in the Selection Overview. This allows you to quickly switch transformation parameters from one layer to another, without changing the selection in the Timeline.
- Right-click on the Driver parameter, and select Copy.
- Then do the same on the Driven parameter, and select Paste(Linked).
- The Driver parameter (Comets.Scale) has its slot outline highlighted in yellow
- The slot of the Driven parameter (Alligator.Scale) now contains an icon of a yellow plug being connected to a socket
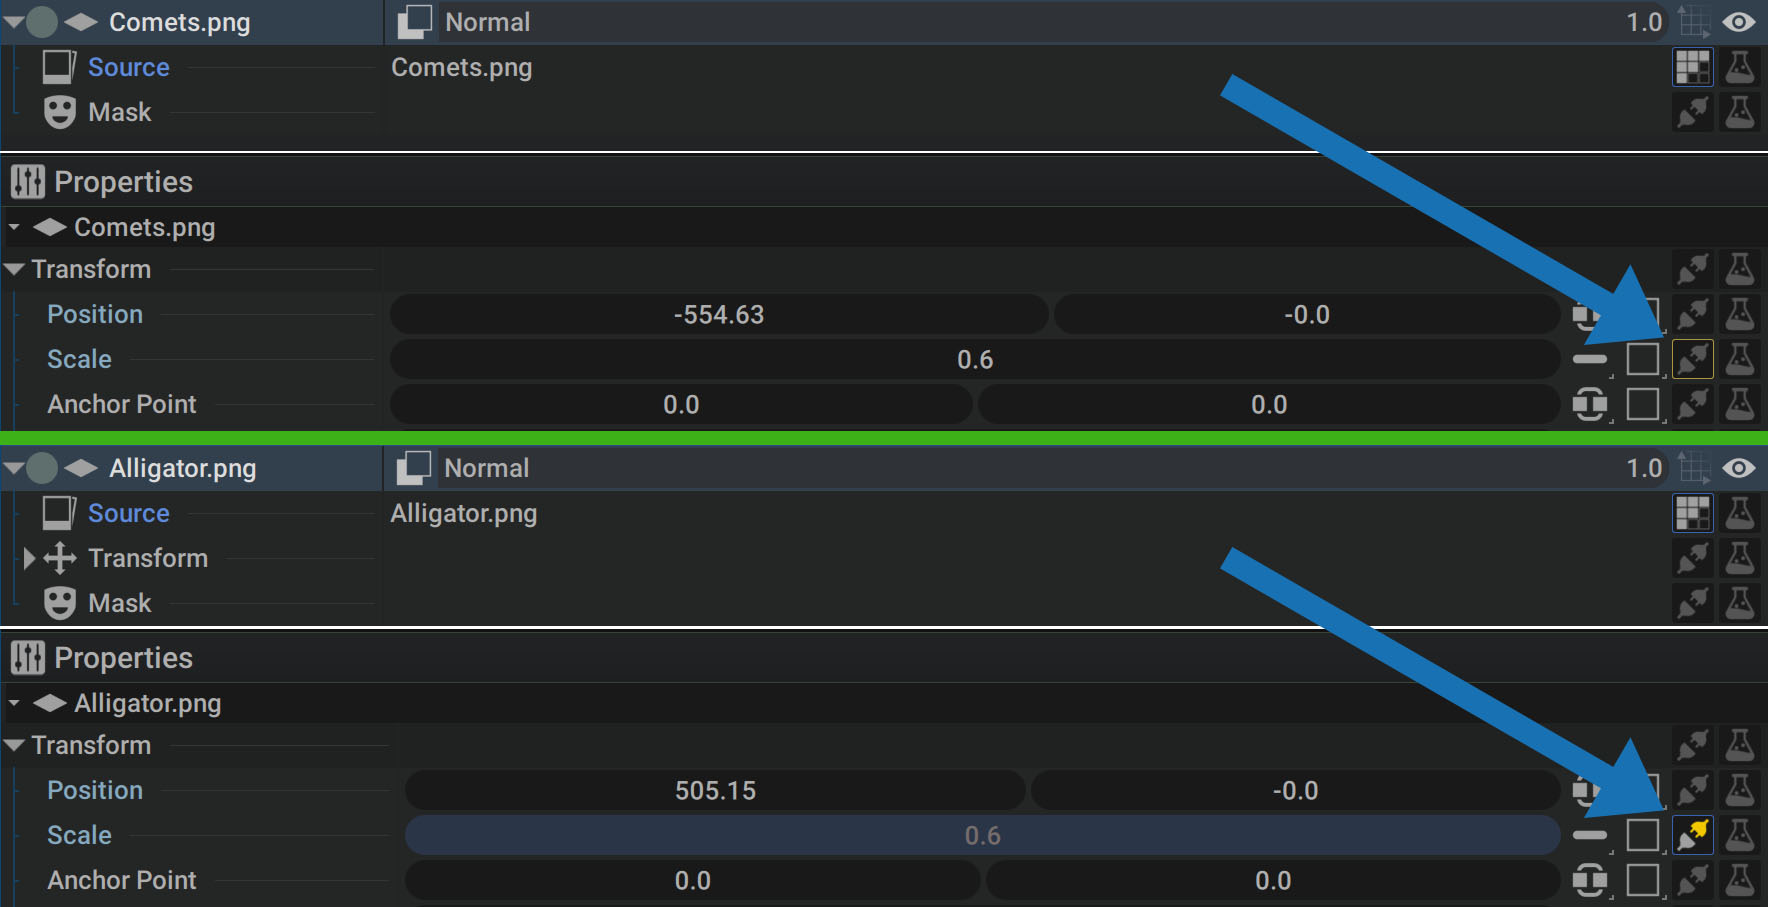
Once this link between these two Scale parameters has been established:
- Only Comets.Scale can be modified, as it is the Driver
- The value of Alligator.Scale is grayed out and cannot be manipulated
Driver and Driven at the same time
A parameter can be both controlled by another parameter as well as act as a Driver, taking control of a third parameter.
So we have a multi-level dependency:
Param_01 -> Param_02 -> Param_03: Param_01 is the Driver for Param_02, which is itself the Driver for Param_03.
The color surrounding the slot and the icons allow you to see these two states at a glance:
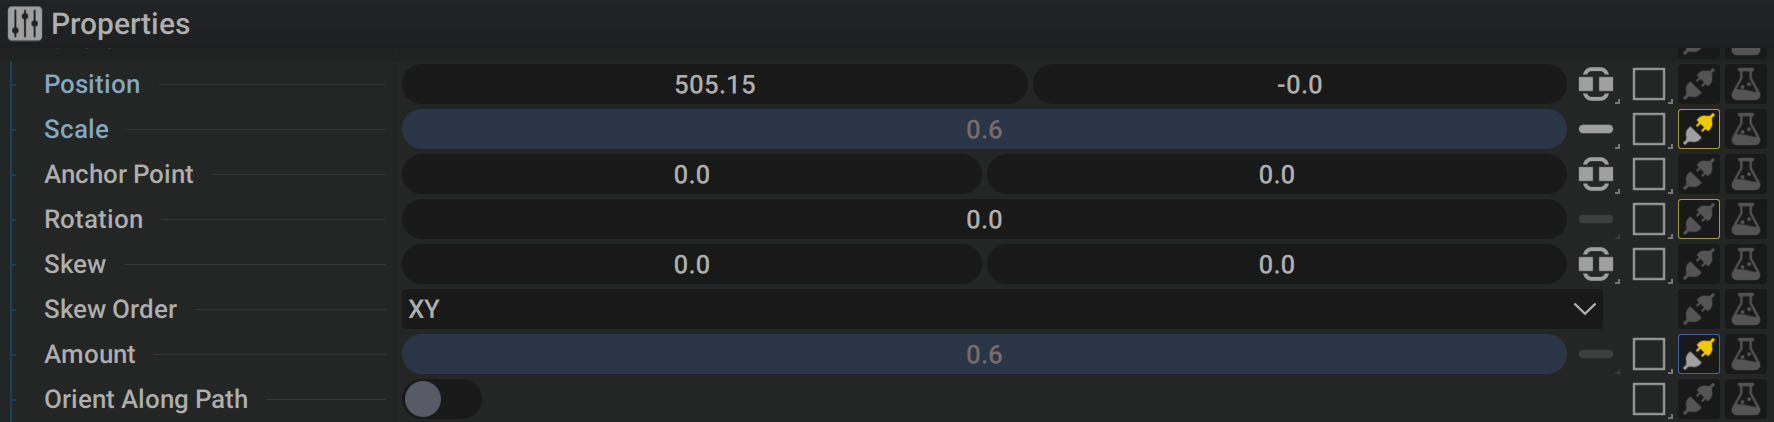
- The Rotation parameter controls another one, as its slot is outlined in yellow
- The Amount parameter is controlled by another parameter, as shown by the logo with the yellow plug
- The Scale parameter is both controlled by another parameter, and acts as a Driver, as shown by these two visual clues present at the same time
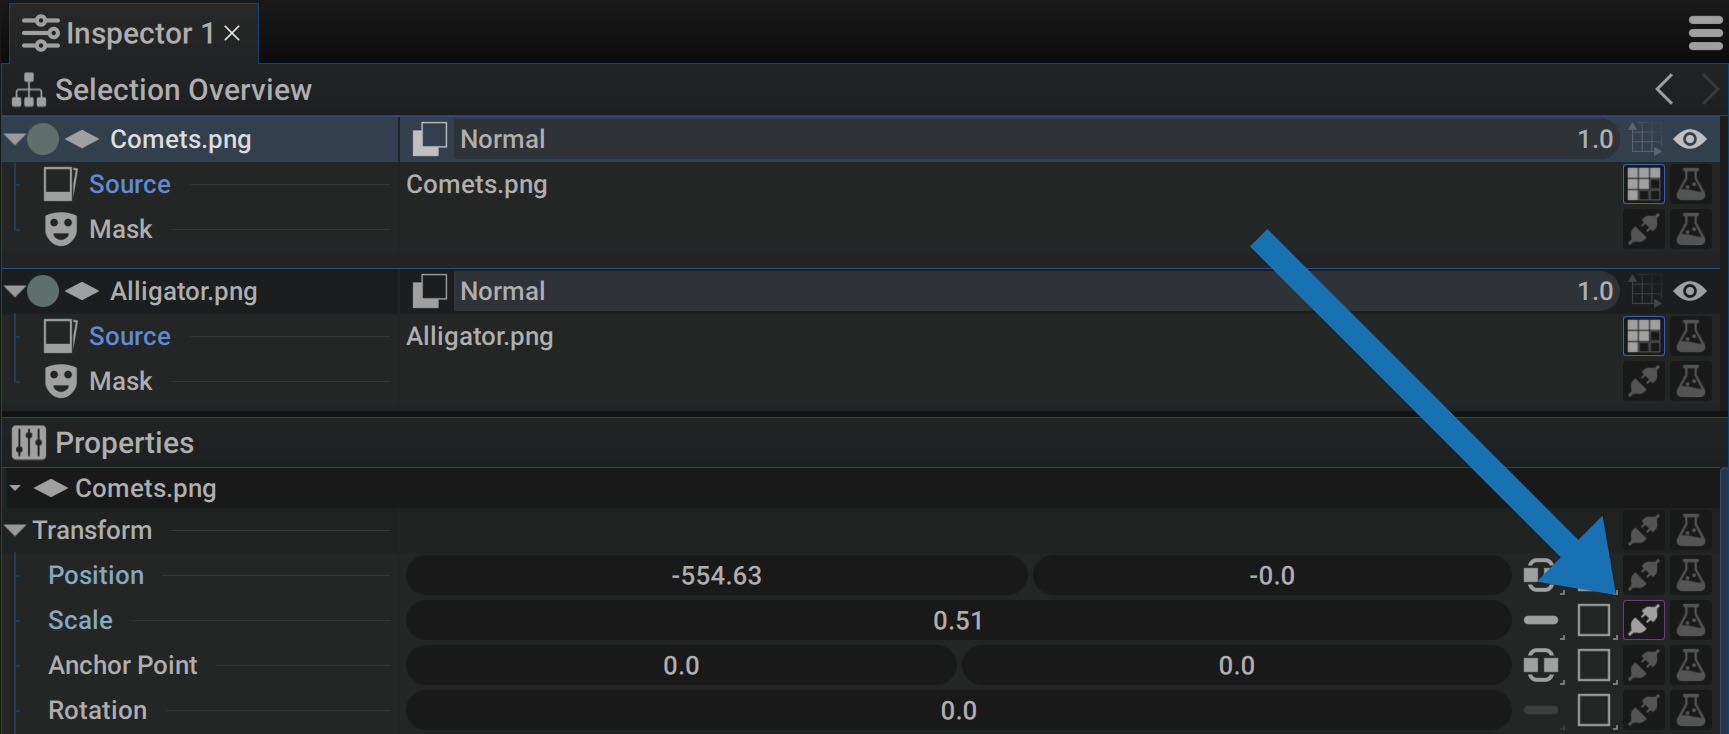
Breaking links between parameters
Right-click on a Driven parameter to remove the link with the Driver:

The parameter value prior to creating the Link is shown again and can be manipulated, having been stored.
Inspecting Linking Dependencies
While visual clues make it easy to see which parameters are Drivers/Driven, it's not clear which ones specifically control which.
Right-click on a parameter to find out about these dependencies.
Jump to Link Controller:
This option is only available on Driven parameters, which can only be connected to a single Driver.
It allows you to directly select the Driver, which also:
- Selects the layer indirectly
- Displays it in the Inspector
- Selects the Driver parameter in the Properties section
Show Linked Parameters:
This option is only available on the Driver, which can be connected to several Driven parameters. By selecting this function, a list of connected Driven parameters is displayed in a floating window.
Hover the mouse over each line:
- The parameter and layer to which it belongs are temporarily displayed in the Timeline and Inspector
- This virtual selection is only temporary and allows you to inspect the Driven parameter
- Click on the layer name from the list to really select the layer and the parameter
Follow Time Option
When two parameters are linked, the Driven one is a copy of the Driver and reflects any modifications applied to it.
If the left logo's Scale (the Driver) is animated with two keyframes:
- The Scale parameter of the right logo (the Driven one) will produce exactly the same animation
- If the left logo is time offset, the right logo's animation will be time-shifted in the same way
- If the right logo undergoes a Time Offset, this will not be taken into account, as the Driver determines its animation
But there is an option that allows you to take into account Time Offset differences between Driver and Driven parameters.
To enable it, right-click on a Driven Parameter and select the Follow Time option.
- You can now apply a Time Offset to one of the layers to replicate the animation while adding a delay
- Modifying the keyframes of the original animation will affect both parameters while retaining this delay
Once this option has been enabled, the logo representing the yellow plug is outlined in blue with a blue stopwatch, quickly making it obvious that this option is active.
Sharing
Difference between Linking and Sharing
The Link section describes how to connect one parameter to another, which can be done if they are the same type and dimension. With linking you have the concept of the driver and driven parameters, since one parameter controls the other and prevents it from being modified. The driver value or state overrides the driven one.
In order to dive deeper into the interaction between parameters, Autograph also offers the concept of sharing instead of linking, where parameters are both drivers and driven:
- Linking establishes a unidirectional connection between the driver and the driven parameters
- Sharing sets the parameters to refer to a common intermediate value
Note that in the case of linking, the connection goes in only one direction. In the case of sharing, it goes in both directions.
In the video below, the Scale values, initially independent as seen at the beginning, are then shared between the two layers.
To show that a parameter is shared with one or more other parameters, its Generator slot (the icon representing a plug and socket) will light up and be outlined in purple.
In a nutshell
- When linking: you can only modify the driver value as the driven one is being controlled and therefore blocked
- When sharing: whether you change the value of one parameter or the other, it will be updated on both sides
Remember, the only constraint is that in order to share parameters they must be the same type and the same dimension. You can't share Source Text with Position. It would not make sense. You can’t share a Position parameter that has 2 dimensions with a Rotation that has only one dimension. However, through Separated mode, you can split a 2D parameter into two 1D parameters. Then you can link either the X or Y Position value to the Rotation.
For more detail on splitting dimensions, please refer to the Managing dimensions section.
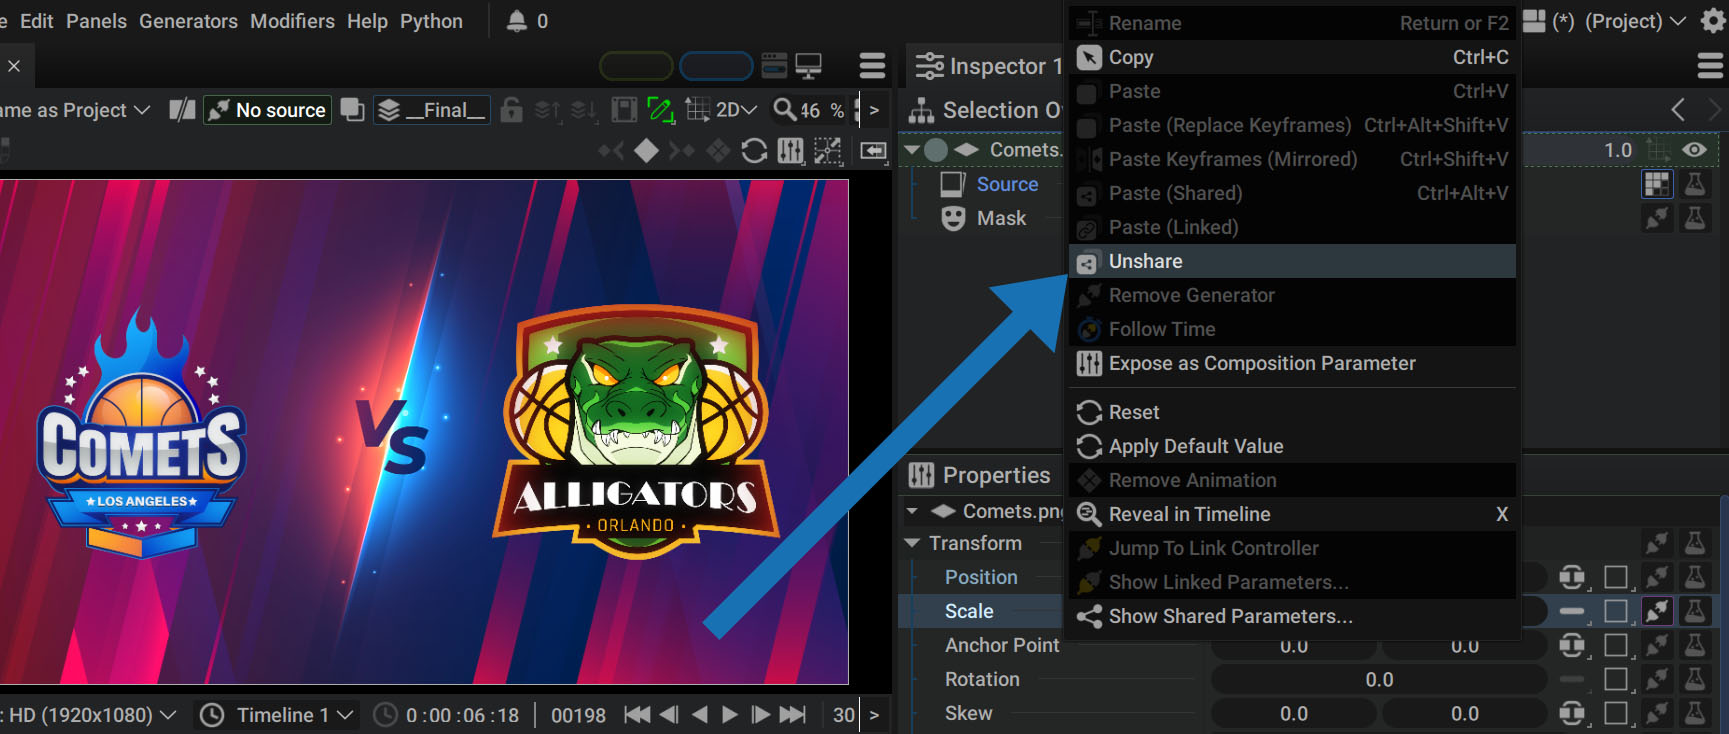
Unsharing Parameters
To remove a parameter from a Share Group and make it independent again, right-click on a Shared parameter and select Unshare.
Automatically Shared Parameters:
Unsharing a parameter is a frequent action in Autograph, and not just for parameters that have been manually shared.
During certain actions, parameters are automatically Shared, like when you drag an image from the Project Panel into the Timeline to create a new layer in a composition. Inspecting this layer, we see the Reader parameters it uses as a Source and all but one of the parameters are Shared.
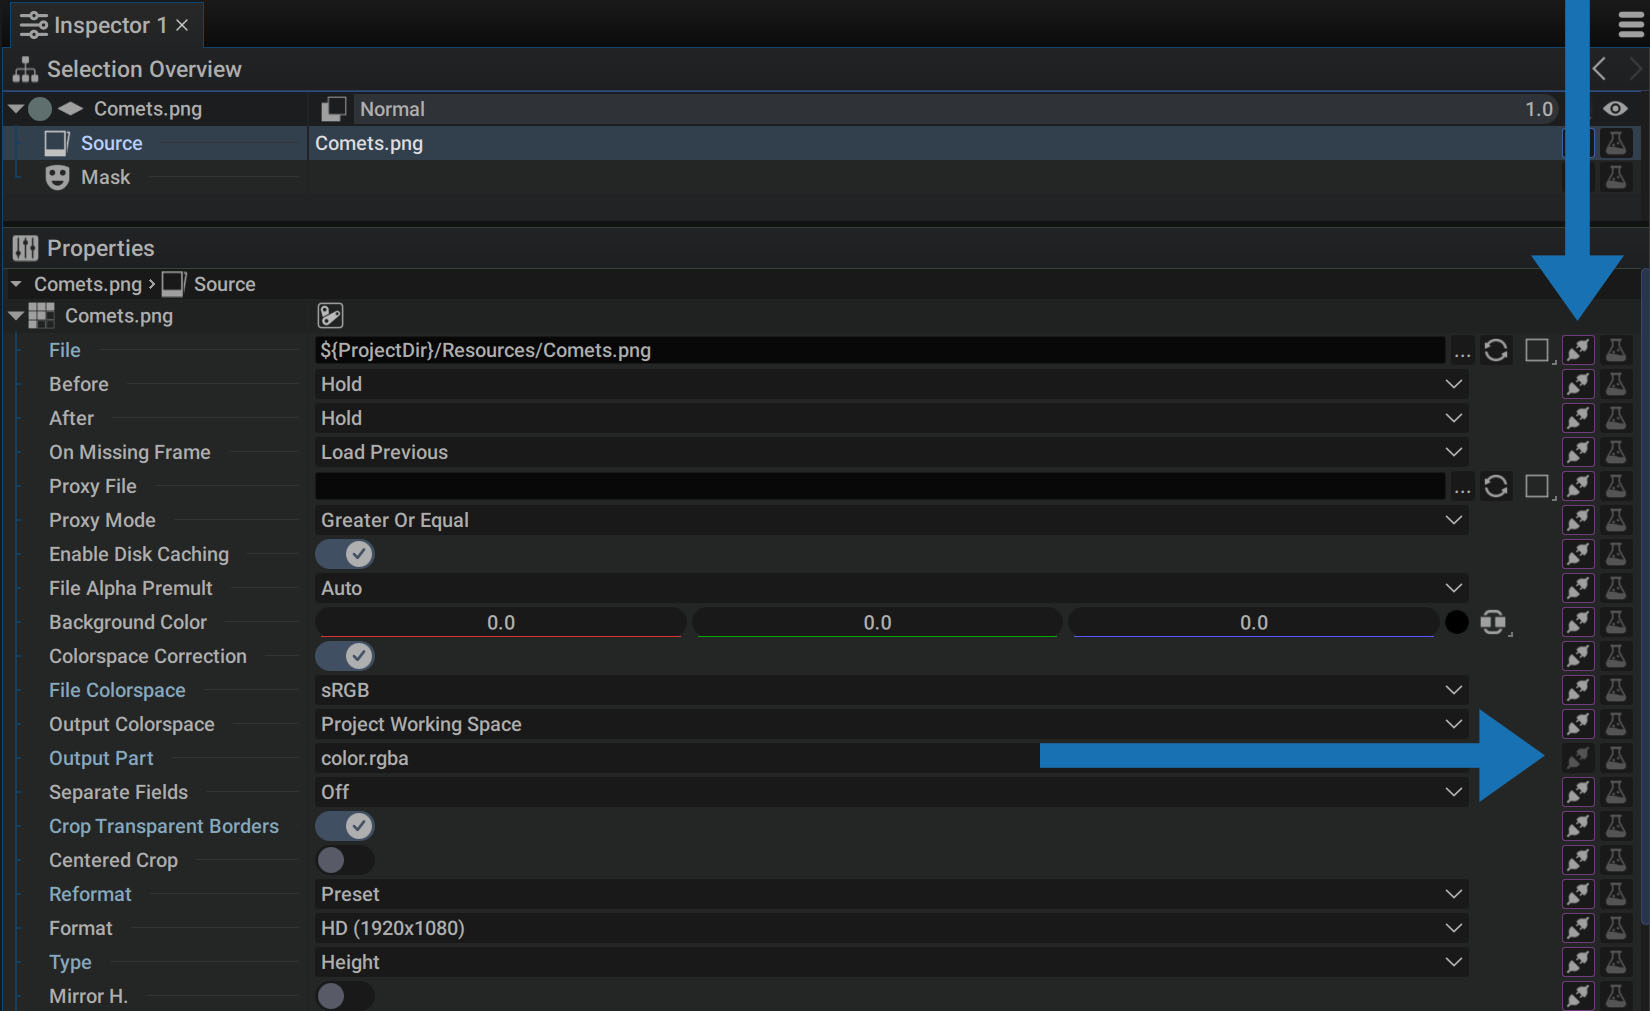
This behavior is very useful when the image/reader is used by several Layers. You can select the Reader in the Project Panel and modify one of its parameters, such as Mirror H, to flip a logo horizontally. As all layers using this Source have their parameters shared with those of the Reader, all logos will undergo this horizontal flip.
In the case of the Reader, the Output Parts parameter is Unshared by default, as its purpose is to select a layer in a PSD file or a pass in an OpenEXR file. This makes it possible to drag the same Reader into a composition several times and then quickly select a layer or pass without having to unshare the parameter manually.
Creating a Local Variant by Unsharing:
Duplicating a layer will also produce two layers sharing the same Reader as sources, with all parameters shared between the three elements.
But it's now possible to Unshare this parameter locally for a single layer and thus create a local variation.
Here's an example after duplicating the same layer 3 times to create smaller versions on the right of the screen:
We've created a local override of the Mirror H parameter for this layer's source.
This method can be applied to any parameter. Imagine several logos sharing the same animation for the Rotation and Scale parameters, but with a different Position. This avoids copying hundreds of keyframes. By animating shared parameters once, they will all be animated at the same time.
Inspecting Sharing Dependencies
Just like with links, simply right-click on a shared parameter and select Show Shared Parameters to see a list of all parameters in the same Share Group.
The video below shows the example of three logos, one of which is no longer shared with the Mirror H parameter.
Starting from a parameter belonging to Comets_Big, we can see that the parameter Comets_Small_02.Mirror.H is not on the list.
As with links, moving the mouse over the list displays a preview of the parameter.
- The parameter and the layer to which it belongs are temporarily displayed in the Timeline and Inspector
- This virtual selection is only temporary and allows you to inspect the Driven parameter
- Click on the layer name in the list to really select the layer and the parameter
Everything can be shared
Sharing is not limited to just two parameters, it is possible to share this value with hundreds of parameters across compositions, 3D scenes - you name it! We've gone over sharing a numerical value between several parameters, but you can share absolutely anything in Autograph.
Here are some examples of what you can share:
- All Modifier parameters: to completely synchronize a blur shared between different layers
- A complete Modifiers Group: to apply the same Modifiers on different layers and keep track of any changes in the group, including adding and removing Modifiers
- A Path or a Paths group: to synchronize curves between different parameters
- Partial or complete Transform: to apply the same perfectly-synchronized movement to several layers, if any change is made
- A complete layer: you can even Copy/Paste(Shared) a layer sharing all parameters, including Generators, the Source, Masks, Modifiers, Visibility... everything!
In this last case, you may wonder why you would want to make a complete copy of a layer that would overlap perfectly with its identical copy, no matter what changes are made.
- First, these two identical layers could be placed at different levels in the Stack to sandwich other layers.
- Second, it's possible to locally unshare one or more parameters to override a value, Generator, Modifier, state, etc., only for a specific layer.
So you can synchronize thousands of parameters, used by hundreds of layers to locally take control of one of them.