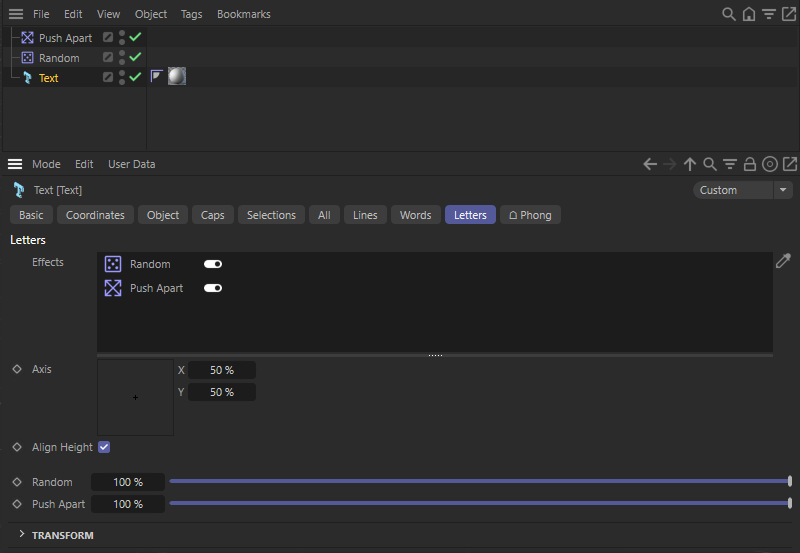
 This configuration randomly moves and rotates all the letters of the text one by one before establishing a minimum distance between them.
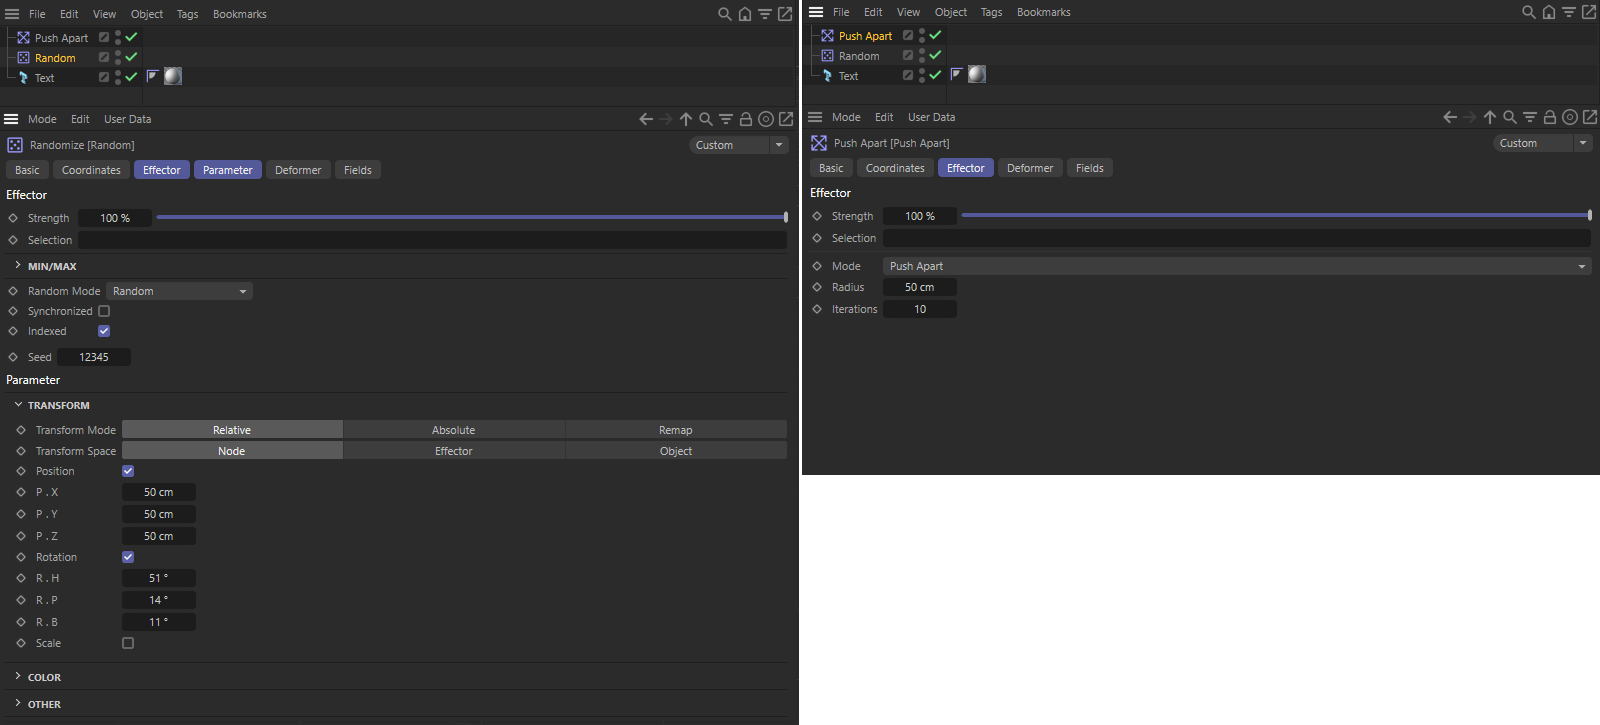 This figure shows the settings used for the two MoGraph effectors.
Overview
User data allows to link own parameters and settings with objects. Via XPresso circuits, these properties can then be used, for example, to control an object size, position or color. This user data can also be operated directly in After Effects when the corresponding object is selected in the object list of the Cineware effects settings.
The creation of user data is possible in Cinema 4D directly via the Attribute Manager, provided that a tag or object is selected. However, only objects are currently supported for use in After Effects as carriers of user data. The example described below shows the typical work steps:
 This configuration randomly moves and rotates all the letters of the text one by one before establishing a minimum distance between them.
 This figure shows the settings used for the two MoGraph effectors.
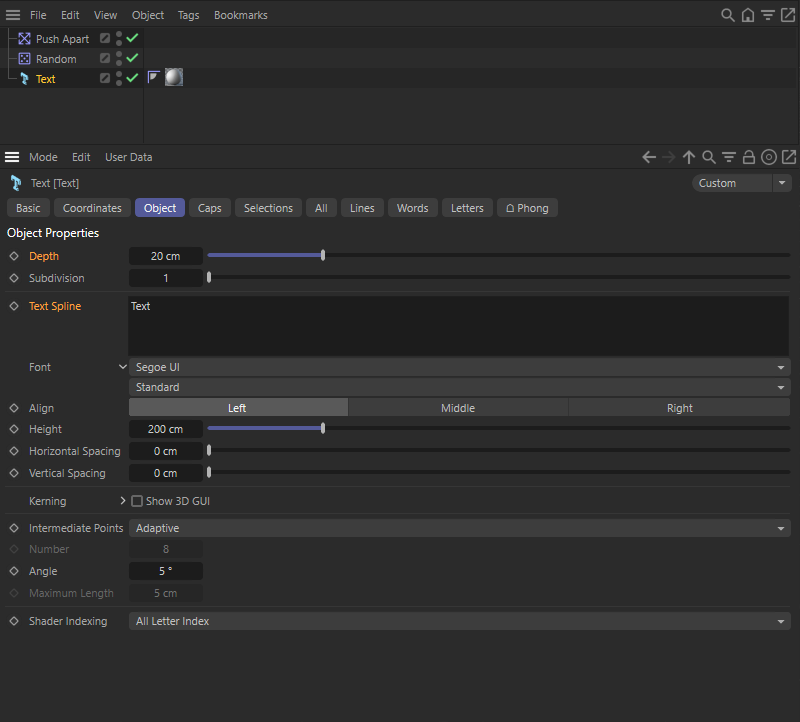 The first thing to do is to identify the settings of interest for passing to After Effects. Here we decide on the depth and text spline settings on the text object.
Consideration of the parameters for which user data is to be created is important, as we need to be sure about their data types. For example, the depth is a floating point value, so it can also have a decimal part. The text spline is a string. Accordingly, user data must also be created for these data types.
To do this, select the text object and open the User menu in the Attribute Manager. Select Manage user data there. This opens a separate administration window in which the creation and administration of multiple user data is very convenient. To do this, you will find an Add button in the upper left corner. After clicking, a new entry appears in the left column. The settings for this user data entry can be found in the column to the right. Enter the term Text depth there, for example, under Name. This is also the term under which the parameter will later appear in After Effects. Therefore, choose names that are as meaningful as possible.
As data type choose floating point value and the unit length unit for the reasons mentioned above, because this is a dimension. Under Preset value you can then store a value that is used by default. This ensures later that meaningful settings are already used, even if you have not yet edited this user data value individually. The left half of the following figure shows these settings.
Then continue by pressing the Add button again. You name this second user data entry Text-String, for example, and assign the data type Text for it. For Preset value you can, for example, enter text. These settings can be seen on the right in the following figure. Finally, close the window by clicking the OK button.
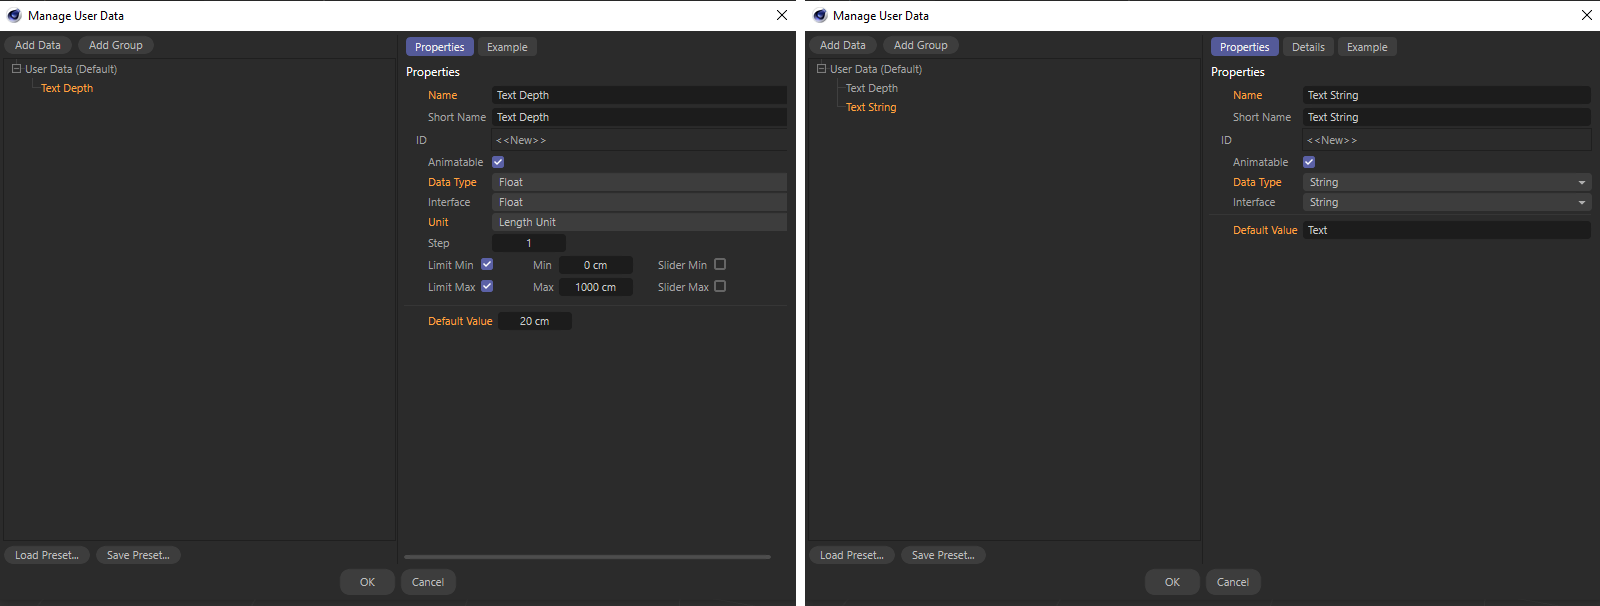 Using the user data management window, we create two user data that will later be used to set the depth and the text.
A new User Data tab will now appear at the Text object in the Attribute Manager, where you can find our user data we just created. Subsequent changes to their names or even to the order in which these settings are displayed can be made by reopening the user data management window.
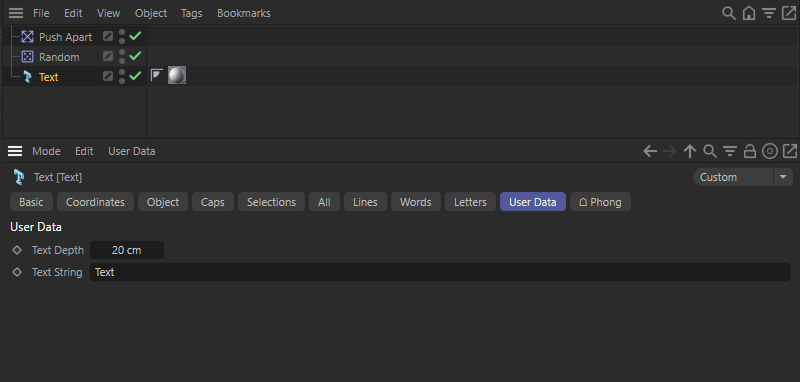 With the text object selected, a user data section appears in the Attribute Manager, where our user data appears.
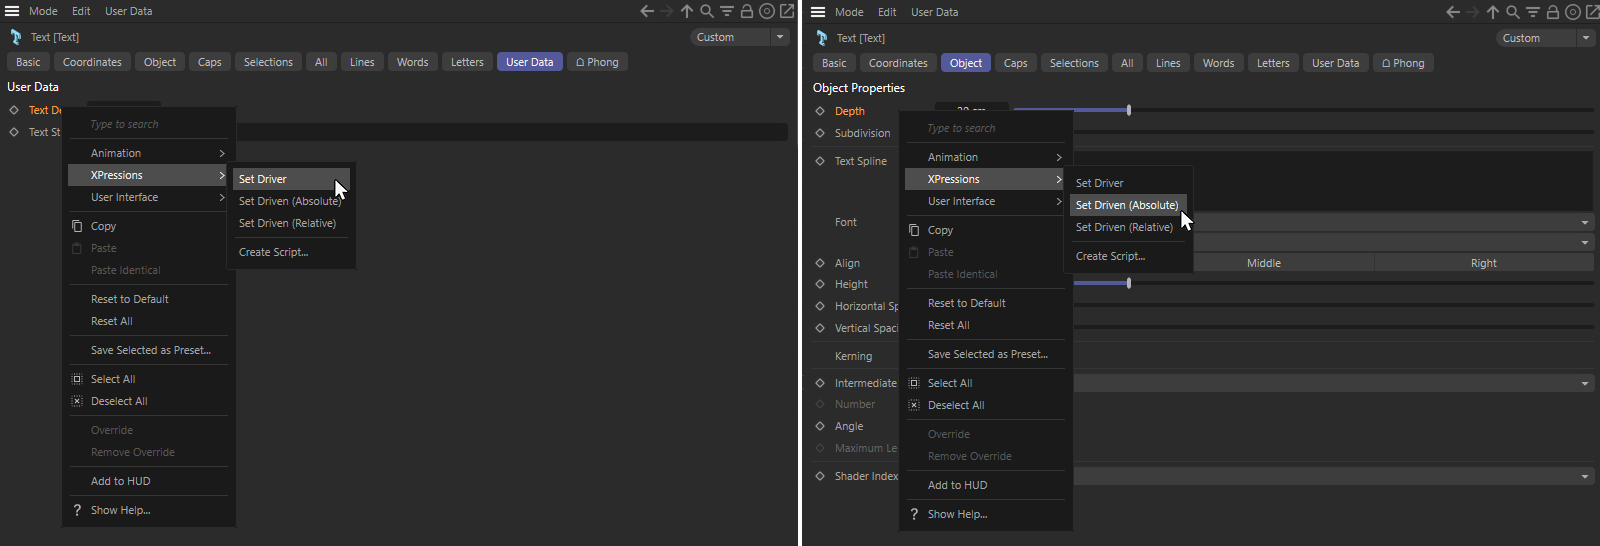 By using the Set Leader/Set Follower commands, a link is established between user data value and parameter on the object.
Now, if you make a change to the Text Depth user data value, you should be able to see how it leads to a change in the actual extrusion depth on the text. Using the Depth parameter on the Text object is no longer possible from this point on. because it gets its value exclusively from our user data value text depth. You can remove this connection at any time by deleting the XPresso tag on the object.
Finally, repeat these steps for the text spline user data value and the parameter of the same name on the text object. The scene is now ready to be passed to After Effects.
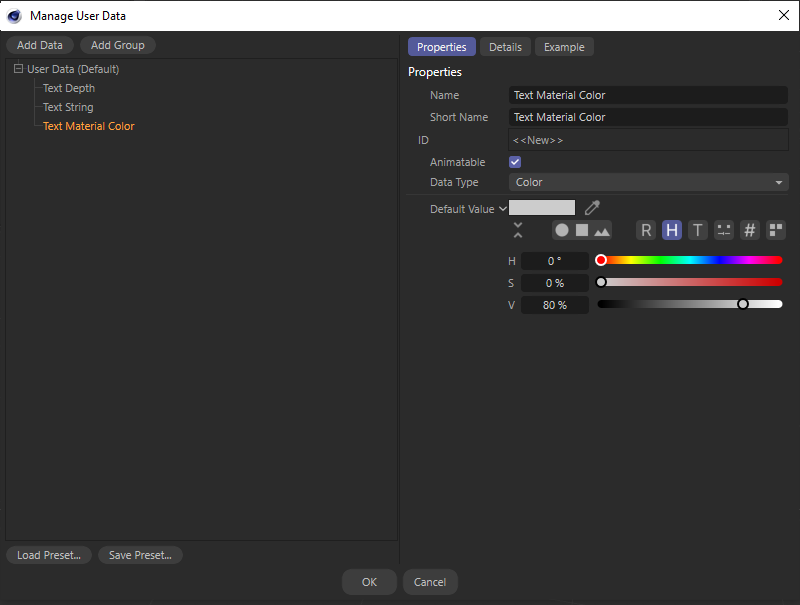 Create a new user data entry on the Text object for entering the material color.
For the following steps we need an XPresso tag. It does not matter at which object in the Object Manager this tag is created. For example, you could select the text object and then have the XPresso tag added via the Tags menu of the Object Manager under Programming Tags/XPresso.
In our specific case, two XPresso tags are already present due to the previous steps to link the two user data. Therefore, we can directly use one of these tags. To do this, double-click one of the XPresso tags on the text object. The XPresso Editor opens and displays the XPresso circuit of this tag, as shown in the figure below.
XPresso circuits consist of nodes that provide inputs and outputs for data. Connections between these inputs and outputs (called ports) are used to exchange values between nodes. Nodes can, for example, perform simple calculations or - as in our case - represent an object and its parameters. In the circuit shown below, the text node represents our text object. The node has two sides, a blue input side and a red output side for data. From this we can already see that the left text node outputs a value, which is then picked up by the right text node, which again represents our text object. Here the user data value for the text string is output and passed to the text spline parameter of the same text object.
Now, to output our color user data value to the left text node as well, click on the red area in the node's header. A context menu opens, in which all available outputs are listed. We are only interested in the user data category here, where you can find our user data color value. Select the entry for Text Material Color there. The outputs labeled .R, .G, and .B would output only the red, green, or blue portion of our color.
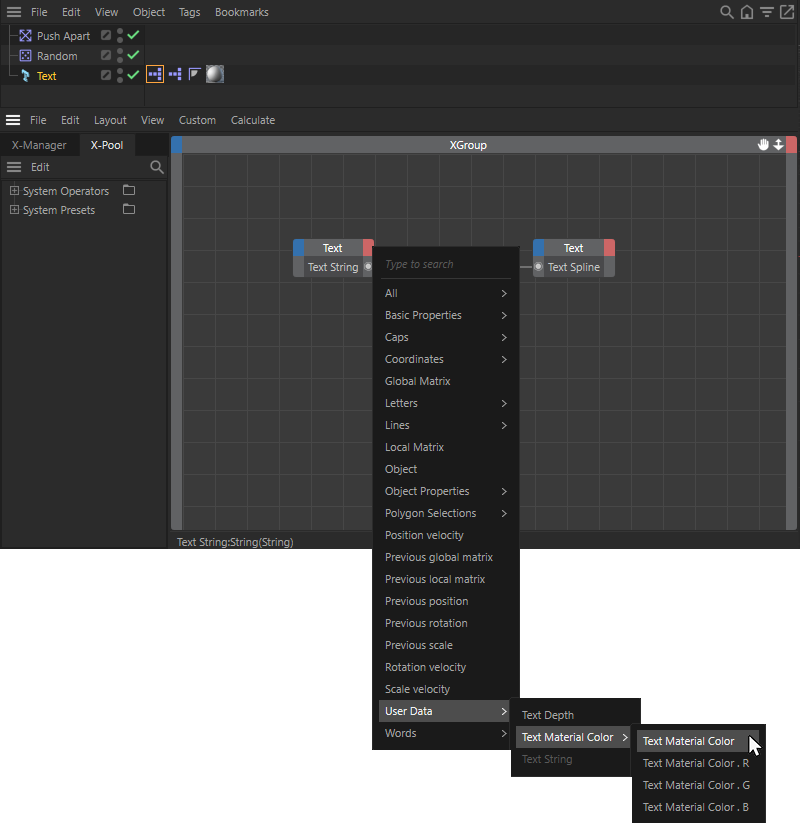 Adding the output of the user data color value at the node of the text object.
This color value is now to be passed to the material assigned to the text object. If you don't have a material in the scene yet, create one via the Material Manager and assign it to the text object. Then drag the material from the Material Manager into the XPresso Editor circuit. A new node is automatically created for this material. If you have already closed your XPresso editor, you can have it reopened at any time by double-clicking the XPresso tag behind the text object.
Since we now want to pass a color value to this material node, we need a new input to it. So this time we click on the blue input side of the node and then select Color/Color/Color from the list of possible parameters. This gives us an input for the complete color value that will be used as a color in the material's color channel.
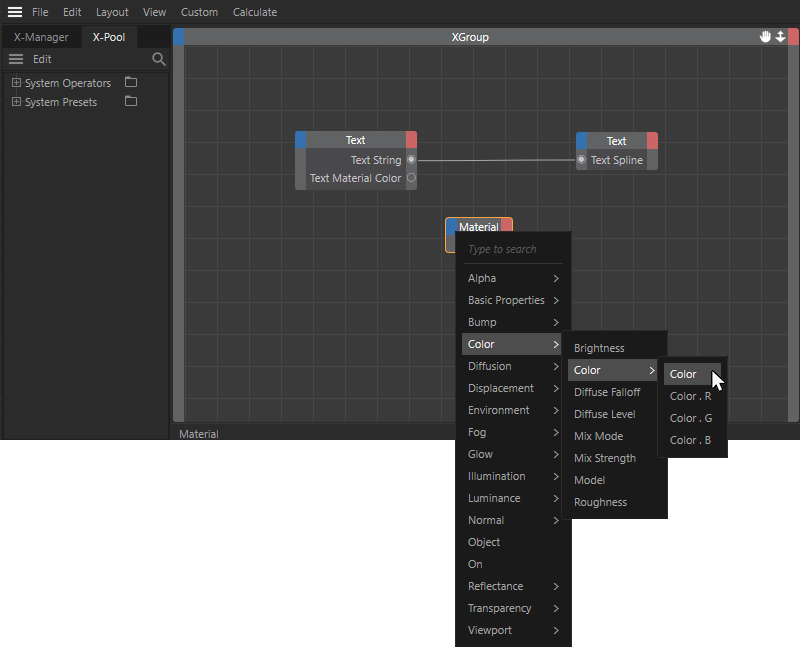 Adding the material node and creating an input for the color in the color channel.
The final step is simple. With the left mouse button held down, we draw a connecting line between the output for text material color at the text node and the input for the color at the material node, as shown by the green line in the following image. If you can't read the names on the inputs and outputs correctly, double-click the header of the nodes. This automatically adjusts their size so that all names can be read completely.
With this, our circuit is already finished and we can close the XPresso editor again. If you now want to test the circuit, select the Text object and edit the user data value for the color in the Attribute Manager. The color in the material should change accordingly. The scene can now be saved and is then ready to be passed to After Effects.
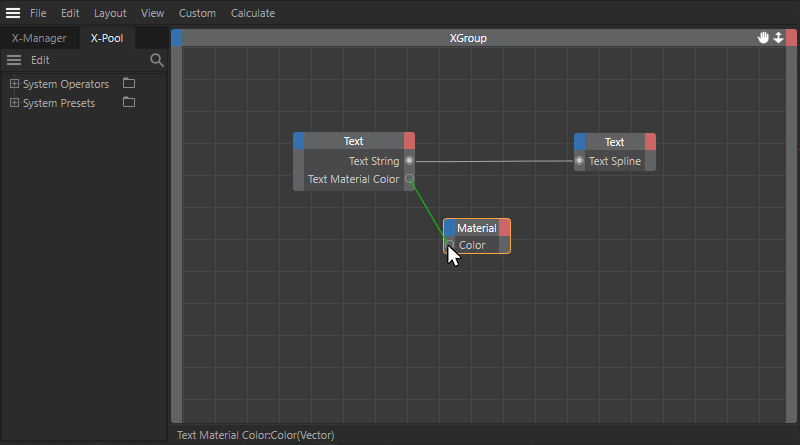 Draw a connection between the output user data value at the text node and the color input at the material node.
After adding our Cinema 4D scene to a composition in After Effects, we gain access to the user data contained there via the Cineware effects settings. To do this, select the text object in the object list. The user data of this object will then appear in a separate area below, separated by data types. The following image will mark it with a red frame. Here we how have the setting for the depth of the text created in the previous section of this documentation, which can be edited here directly in After Effects by entering a number or using a slider.
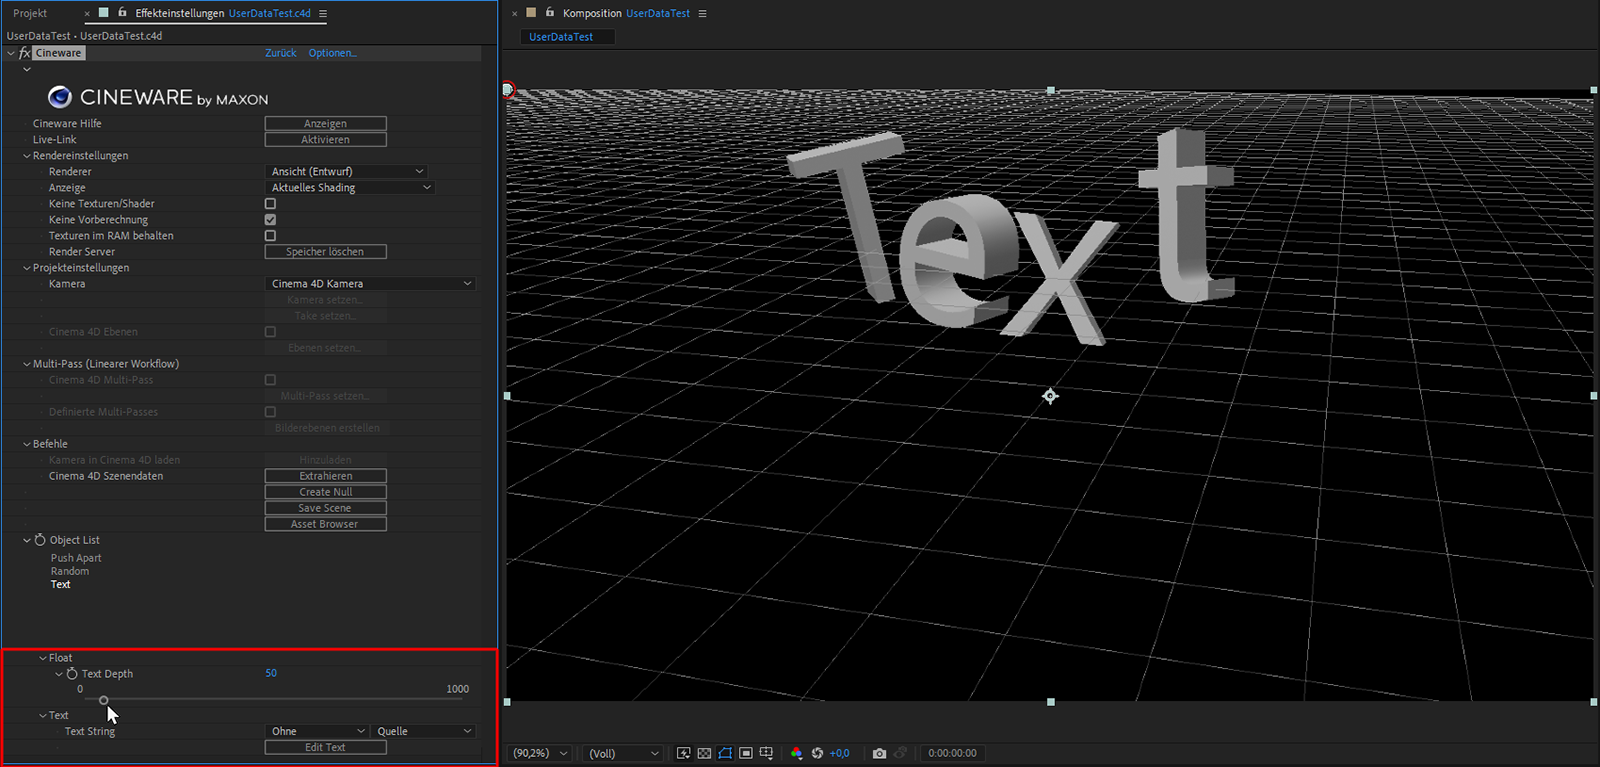 After selecting an entry in the object list, the user data related to this object will appear in a separate area of the effect settings, sorted by data type.
Editing the text user data directly is not possible. To do this, you must first press the Edit Text button. This creates a text layer in your composition. Double-clicking this layer in the Timeline automatically activates the Text tool and a reddish highlight appears in the Composition view. The content of this area can be marked manually using the mouse by pressing and holding the left mouse button to highlight it and simply typing the new text. This is then used as input for the Cinema 4D user data.
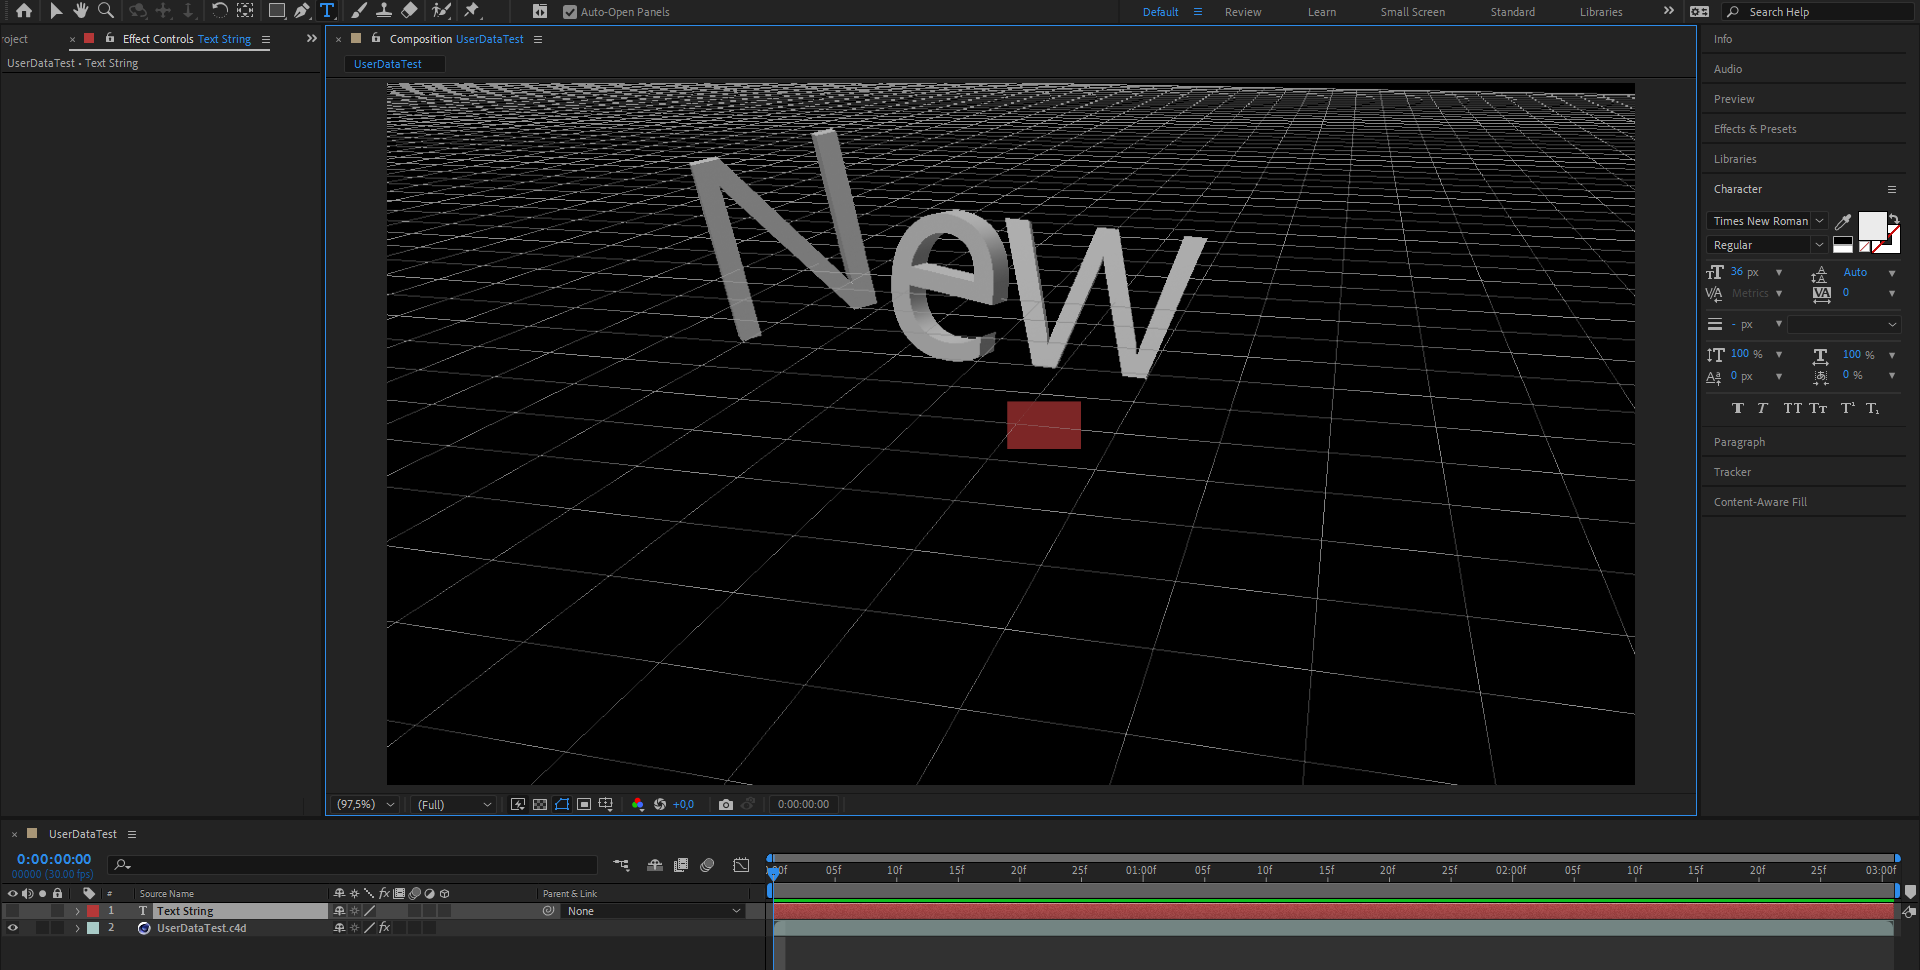 Editing text user data is done via a separate text layer in the composition (red highlighted area in the composition view). The original text was edited in this way directly in After Affects.
Finally, we will use the previously created material color user data to change the material of the text object. Clicking the color swatch opens the standard After Effects color picker, letting you select a new color.
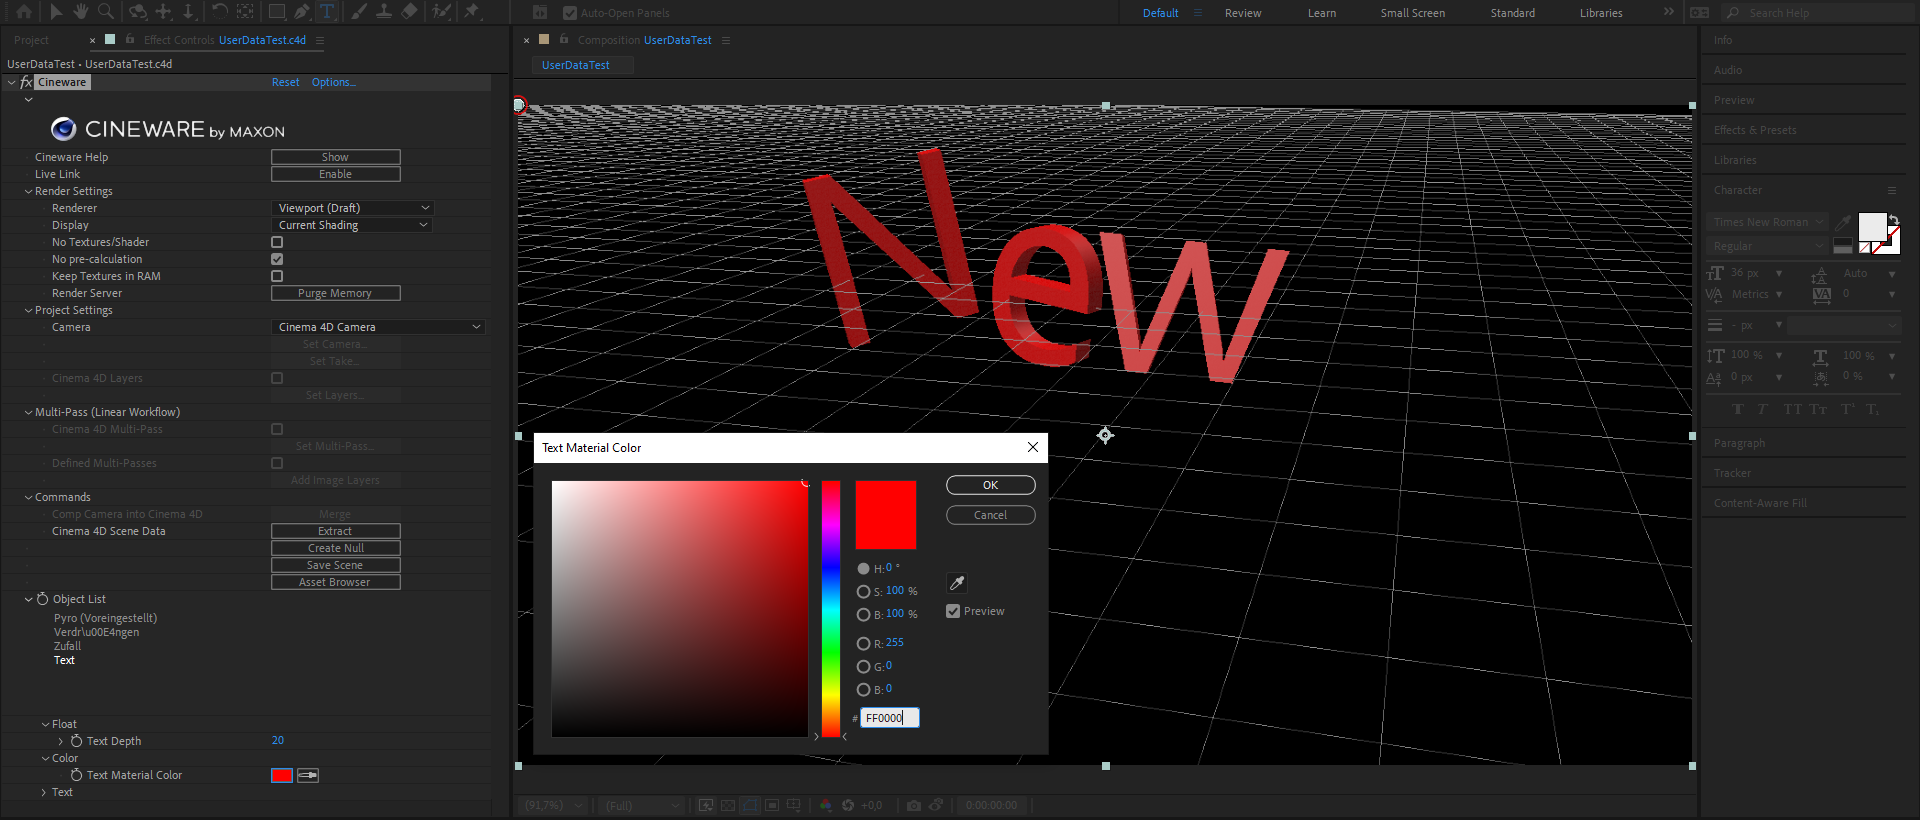 Color user data can be edited directly by clicking the small color box in the Cineware effects settings.