Open topic with navigation
Overview
Import assets from Cinema 4D
After checking the import settings under Global Asset Import Setting, you can load the desired Cinema 4D scene. However, some of these settings can still be adjusted after the import and a new import with updated settings can be triggered.
The actual import of Cinema 4D assets is triggered by right-clicking in the Assets area of the Project window and selecting Import New Asset.... This command is also accessible from Unity's Assets menu. In the file dialog that opens, you then select the desired *.c4d file.
The following limitations exist:
- The Animator Controller does not work with geometry animated by Joint objects and the Skin Deformer.
- There can be problems with the Pose Morph tag if it was first assigned to a parametric primitive object in Cinema 4D that was subsequently converted to a polygon object. Therefore, be sure to assign the Pose Morph functionality to polygon objects only.
- Animations created in Cinema 4D through Expressions, Dynamics and other parametric functions must be baked before export. This affects, for example, Align to Spline expressions, inverse kinematics functions and physical simulations.
After the import is complete, you will find the objects, materials, textures, and animations (if any) in Unity's Project window.
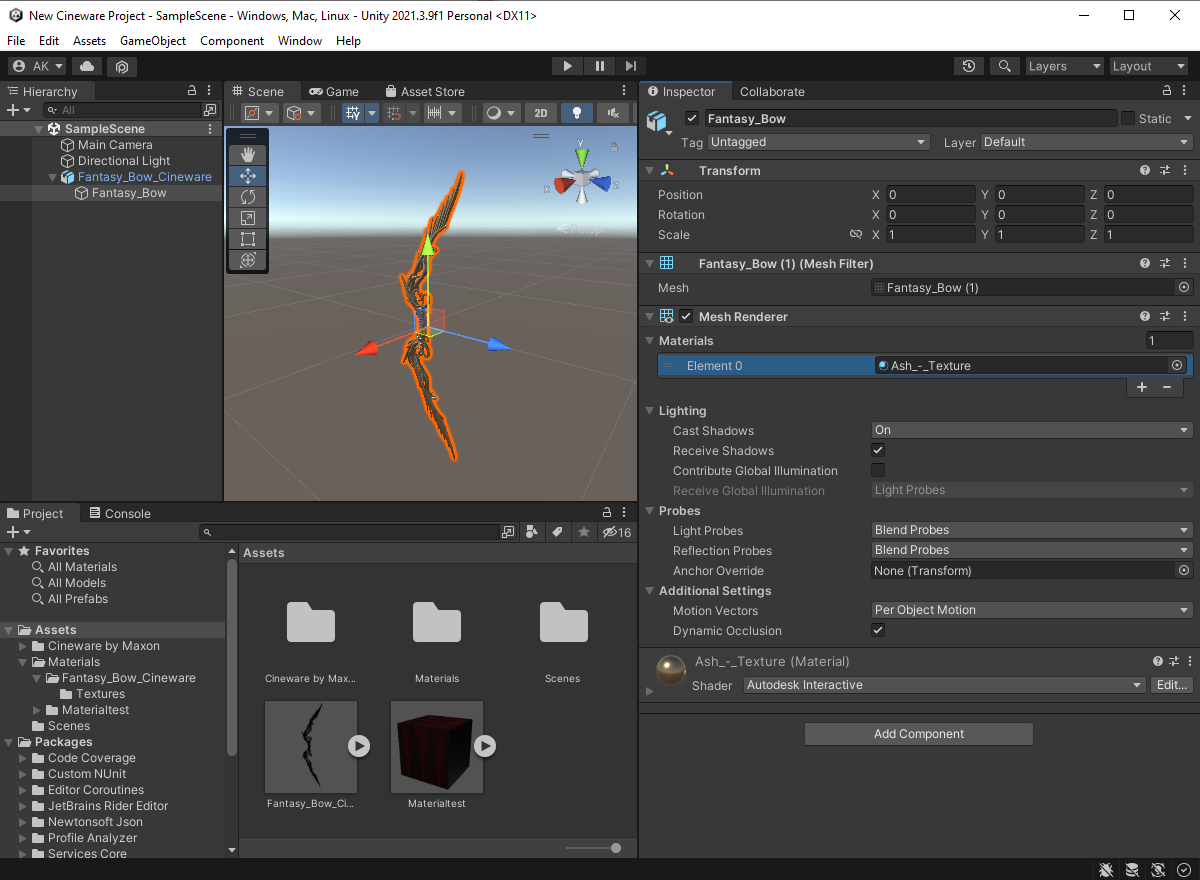
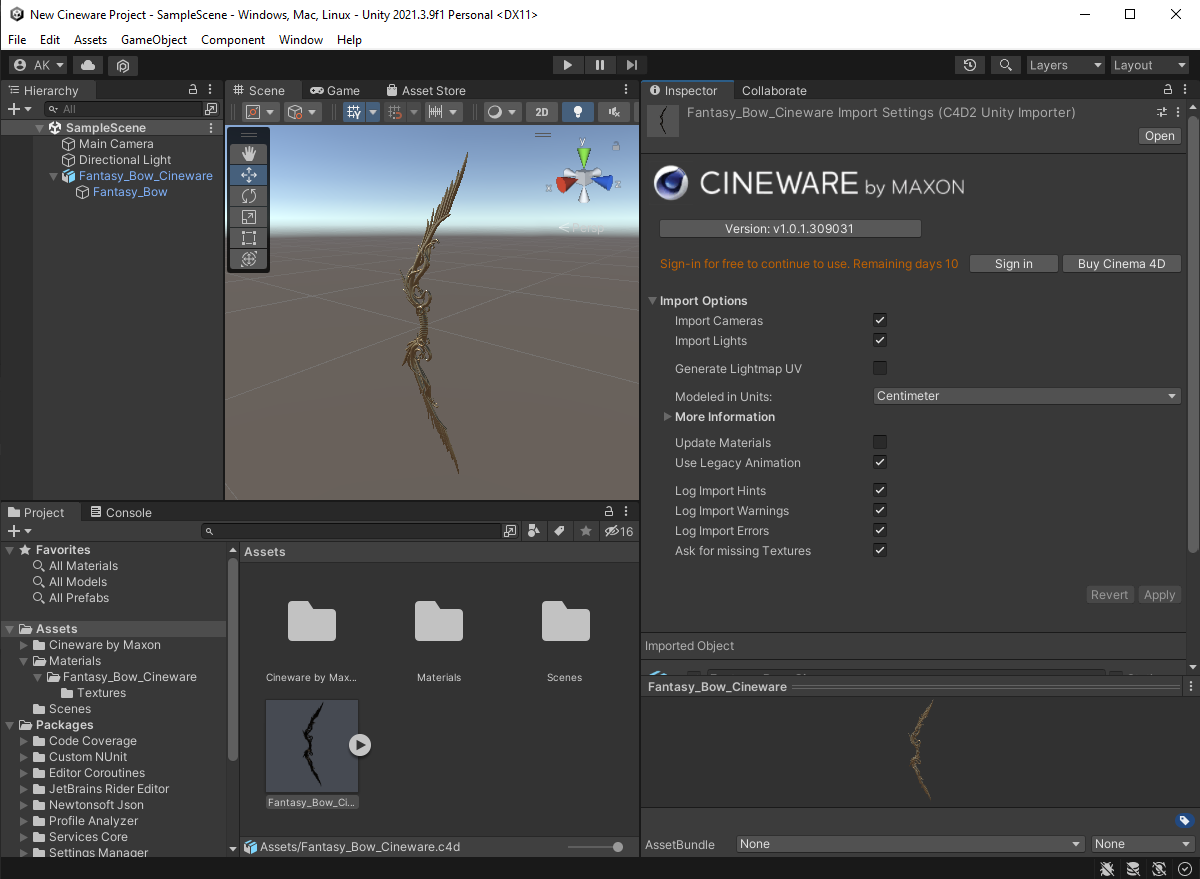 The Project area (shown in the bottom left of the image) lists all imported assets and their components. In this example, for the model of an arc, imported and then dragged from the Assets area directly into the Hierarchy window. This makes the object appear in the scene (see Scene area).
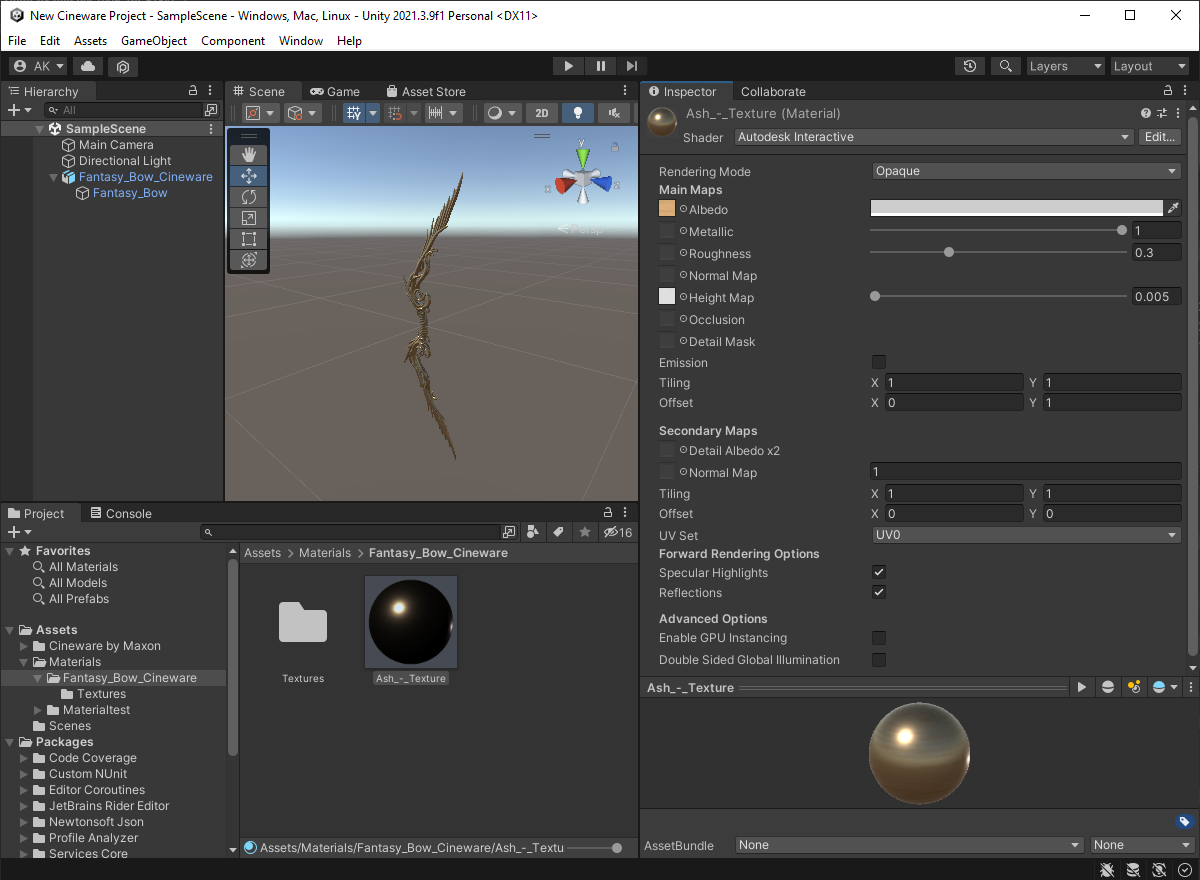
As you can see in the image above, clicking on an imported Cinema 4D asset in the Inspector also opens settings that we already know partially from the Global Import Settings. Here, these settings for already loaded assets can then be corrected, if necessary, and also reapplied by clicking on the Apply button.
In addition, this dialog also provides you with feedback on how long you can continue to use Cineware without registering. Cineware is free of charge, but requires registration for unlimited use, which you can do by clicking the Sign In button. This will take you to a web page where you can create your own Maxon user account via the Register link.
 Website for logging in or registering a Maxon user account for unlimited use of Cineware.
Adjust the scale
In the Asset Settings you will also find an additional option for Modeled in Units, which allows you to adjust the scale of the geometry. The change from Centimeter to Meter then leads, for example, to the geometry then being displayed 100 times larger in Unity.
Supported properties
This section summarizes the object types and their parameters that are supported by the Cineware import in Unity.
Position, size, angle
The basic properties for position, size, and angle, along with their animation, are retained on the imported meshes and are transferred directly to the Transform.Local Position, Transform.Local Scale, and Transform.Local Rotation properties in Unity.
For angle animations, these are automatically baked on import and interpreted as quaternion rotations. This avoids Gimbal Lock problems and rotations interpolated between keyframes always follow the direction of rotation with the smallest angle in terms of magnitude.
Here you can find more information about the interpolation of angles and their animation.
Geometry
All imported objects are triangulated and interpreted as a mesh. N-gons and quadrangular polygons are thus generally subdivided into triangular polygons. Existing polygon selection tags from Cinema 4D result in importing these surfaces as sub-meshes. This also preserves representations of objects where multiple materials are present and these have been placed on different sections of the surface using polygon selection tags. Furthermore, the following properties are adopted:
- The surface normals of a normals tag are stored in the Mesh.Normals property. If there is no Normal tag on the object, the normal directions are calculated using the Phong tag. If this is also missing, Unity calculates the surface normals itself.
- Existing UV coordinates are taken over in the Mesh.UV property.
- Assignments from a Vertex Color tag (Points or Polygon Points mode only) are applied to the Mesh.color property.
- Weights for a joint deformation using Skin Deformator are transferred to Mesh.Bone Weights. A maximum of four weighting values per surface point are possible.
- The poses of a pose morph tag become blend shapes in Unity. To do this, a Skinned Mesh Renderer is added to the imported Game object. The base pose is used as the default shape for the mesh and is assigned directly to the Mesh.vertices property. When naming the poses, note that Unity automatically replaces special characters there with underscores. The strength of each pose is assigned to the Blend Shape influence property in Unity. Animations of Cinema 4D strength values are also supported.
Materials
Within Unity, the properties of Cinema 4D materials are converted to the Autodesk Interactive Shader. This works with a Metalness definition, as it is also used, for example, when exporting to the GLTF format from Cinema 4D. In this case, some properties of the Reflectance channel are interpreted differently than in Cinema 4D. This mainly concerns the Specularity, which is interpreted as Metalness in Unity. This basically controls how metallic a surface should appear. It is therefore important that the materials in Cinema 4D are checked accordingly and adjusted if necessary before saving them for Cineware. You can find a corresponding explanation on how to handle Metalness material definitions in Cinema 4D here.
Basically, the following material properties are adopted:
 Properties of the Mesh Renderer component for the imported arc. The assigned material can also be seen there.
 The settings and assigned textures of the materials can, for example, be displayed by clicking on the material in the Project area.
Color Channel
If a texture is loaded here or a simple color value is set, this property is transferred to the Unity material as Albedo. If the Color channel is disabled, the color and color texture from the Reflectance channel will be used for it instead.
When using a color and a texture at the same time in the Color channel, keep in mind that the texture is multiplied by the color by default. Therefore, use white as the color if you want to pass the texture unchanged.
In addition, the Brightness value is not evaluated when exporting to Unity. Therefore, always set the color itself to the desired brightness, e.g., by using the V value when using the HSV system.
Diffusion channel
The Strength of this property is interpreted as Occlusion Strength and a texture assigned here as Occlusion Texture.
Luminous channel
By multiplying the color by the brightness, Unity calculates an HDR color value that is interpreted as emission.
Transparency channel
Here, the brightness is interpreted as the alpha portion of the Unity material. A Brightness of 100% creates a completely transparent material. At 0% Brightness, the material does not acquire transparent properties. Note that real-time applications are usually not able to calculate refractions in refractive materials. The refractive index of transparency is therefore not evaluated.
Reflectance channel
The roughness is interpreted as a Roughness property and thus controls the scattering at the surface. A texture can also be used here. The specularity is interpreted as Metalness. A Metalness value of 1 (or 100% in Cinema 4D) causes reflections and the gloss to take on the coloration of the metal, and also causes the otherwise typical change in reflection intensity to be less pronounced at different angles of view of the surface. This gives the surface a metallic appearance.
This is different at the other extreme, a Metalness value of 0 (or 0% Specularity in Cinema 4D). Here, the material is interpreted as non-metallic. For non-metallic surfaces (e.g., plastic, water, glass or wood), the gloss usually maintains the color of the light source. In addition, the intensity of the gloss changes with the viewing angle on the surface (Fresnel effect). Areas viewed at a flat angle reflect and shine particularly intensively, while areas viewed frontally show only weak reflections and gloss effects.
This property can also be varied by texture on the surface, e.g., to show the change between rusted and brightly polished sections of a metal part. The color and its texture from the reflectance can be adopted as the Albedo color if the material's Color channel has been disabled. Again, a loaded texture is multiplied by the color for export. If the Reflectance channel is off, Unity automatically assumes Metalness and Roughness values of 0.5 each.
Bump channel
Bump Strength is interpreted as Height Map Strength in Unity. An assigned texture becomes a Height Map in Unity accordingly. Alternatively, you can use the Normal property of the Cinema 4D material.
Normal channel
A texture loaded here is automatically interpreted as a Normal Map in Unity.
General information about textures
Textures used in Cinema 4D materials are automatically loaded by Unity's texture importer. If textures cannot be found in the specified directory, a warning message will automatically appear, which can also be used to specify a new search directory. This is automatically applied to other textures not found. This warning appears only if the Ask for missing Textures option is enabled in the Global Import Settings.
In general, it makes sense to create textures for Unity in a square format, since they can then be compressed more easily and thus use fewer resources.
Cameras
To import Cinema 4D cameras into Unity, the option for Import Cameras must be enabled in Unity's Global Import Settings. The position and orientation of the cameras will be assumed. Likewise, the vertical aperture angle of the camera is evaluated(Field of View(vertical)) and used to calculate the Field of View property in Unity (in conjunction with FOV Axis Vertical).
Light sources
Light sources from Cinema 4D are imported if the Import Lights option is enabled in Unity's Global Import Settings.
As with polygon objects or camera objects, the positions and orientations of the light sources will also be adopted. In addition, the color and intensity, as well as the type of shadow calculation of the light sources are generally adopted. The following applies:
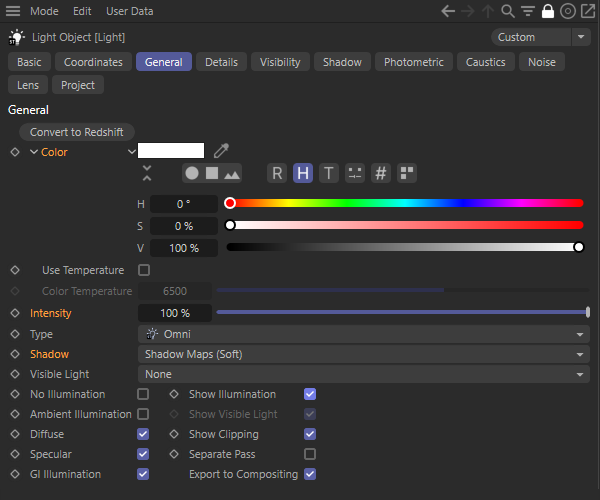
- The light color (see Color in the General settings of the light source) is applied to the Color property of the Unity light source along with an animation created for it.
- The intensity of the light source (see Intensity in the General settings of the light source) is also transferred to the Intensity property of the Unity light source, including any animations. Here, 100% in Cinema 4D corresponds to a value of 1.0 in Unity.
- The shadow setting from Cinema 4D is transferred to Unity light sources accordingly. The following applies:
- None Shadows corresponds to the No Shadows mode in Unity.
- Raytraced (Hard) in Cinema 4D corresponds to Hard Shadows mode in Unity.
- Shadow Maps (soft) and area shadows from Cinema 4D become soft shadows in Unity.
The additional parameters considered during import are listed below for each of the different light source types.
 The markers indicate the settings supported for all light source types in Cinema 4D.
Point light sources
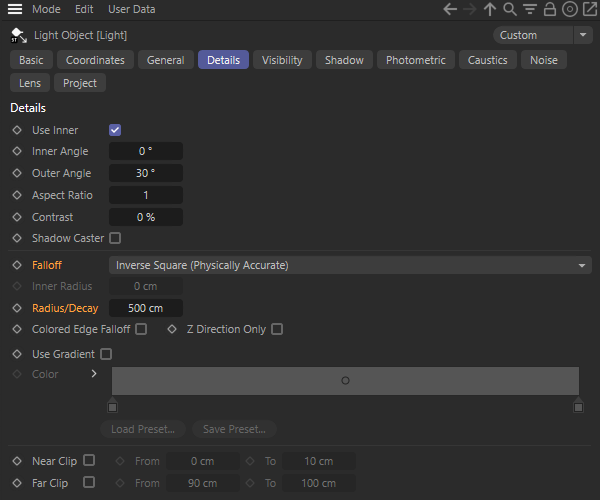
In the Details settings of the Cinema 4D light source, you will find the Falloff setting, which adjusts the range and intensity loss of the emitted light. If None is activated there, Unity works with the default radius 10 for the range of the light source. For all other acceptance modes, the value for Outer Distance is used as the Range in Unity. Keyframes are also supported by this parameter.
 The relevant settings in the Details settings of the light sources, through which the range of the light is passed to Unity.
Spot light sources
The Falloff from the Detail settings is also evaluated for this type of light source. The principle corresponds to the evaluation of point light sources.
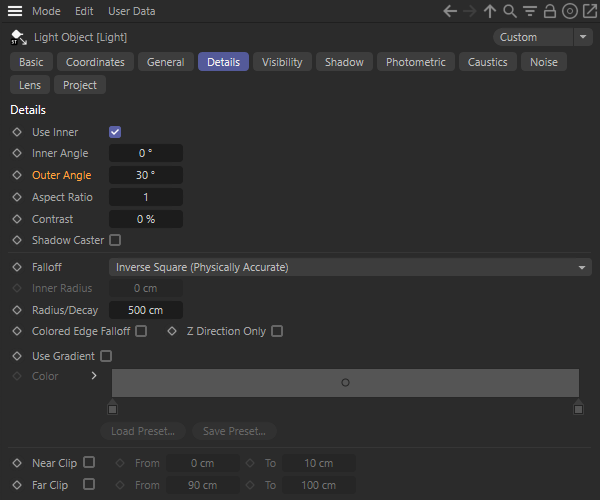
In addition, the setting for Outer Angle from the Details settings is evaluated and transferred to the spot angle(Spot Angle) of the Unity light source. Animations are also supported here.
 The outer angle of a spot is transmitted to Unity.
Infinity light sources
Here, besides the basic properties of color, intensity and shadow type, there are no other settings that are supported.
Area light sources
For area light sources, the following shapes are supported, which you can find in Cinema 4D in the Area Light Source Details settings:
- The disk, cylinder, and hemisphere become a disk-shaped light source in Unity.
- Rectangle, cube, object/spline, line, and cylinder (vertical) are interpreted as rectangular area in Unity.
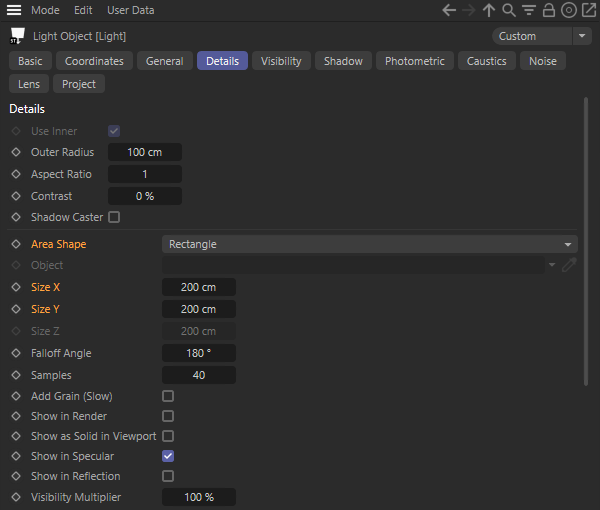
Here, the dimensions from the Size X and Size Y parameters are used directly for the rectangular Unity lights. For the disk-shaped light sources, the larger in magnitude of these two parameters is used as the radius in Unity.
 For Area light sources, their shape and size are exported and interpreted accordingly in Unity.
Otherwise, the Falloff settings can also be adopted for Area lights. If None is enabled for Falloff in Cinema 4D, Unity works with the default radius of 10 for the range of the light source. For all other Falloff modes, the value for Outer Distance is used as the Range in Unity. Unlike the previously mentioned light sources, however, no animation of the Outer Radius parameter is supported here. This is because the effect of Area lights in Unity are generally baked. Therefore, animation of the Area shape or size is also not possible.
LOD object
The LOD object in Cinema 4D can manage objects with different levels of detail and, for example, display a corresponding version of the object to match the viewer distance. This property is assigned to the LOD group component in Unity. Polygon objects linked to this automatically receive the corresponding mesh render properties in Unity.
For this to work, the LOD mode Sub-objects must be combined with the Vertical Screen Size criteria on the LOD object in Cinema 4D. The displayed height of the object bounding box is set in relation to the vertical screen size. The resulting value controls the switching between the child objects according to the configuration of the LOD bar. For other modes, Unity cannot accept the individual LOD bar values and they are assumed to be evenly distributed.
Here you can find more information about using the LOD object in Cinema 4D.
 The Project area (shown in the bottom left of the image) lists all imported assets and their components. In this example, for the model of an arc, imported and then dragged from the Assets area directly into the Hierarchy window. This makes the object appear in the scene (see Scene area).

