Collider
Friction is a measure of the braking force that an object experiences when it slides over another object or the force that is required before a stationary object starts to slide. In physics, a distinction is made between static and dynamic friction. Cinema 4D does not make this distinction, but combines them in the single parameter Friction.
Friction only takes place when the collision occurs.
Note that friction always involves 2 objects as collision partners, each of which can have defined its own friction values. If one object has a friction value of 0, the friction between the two cannot be increased even with high values for the other object.
Generally, the higher the value (this can be much greater than 100%), the less likely one object will slide across another and the more likely it will roll or tumble if the velocities are high enough.
If you need the rolling friction that also exists in physics: this is simulated to a certain extent by the Damping setting in the Simulate settings (however, Damping also slows linear movements accordingly).
In the event of collisions, this setting defines the force with which the Rigid Body rebounds. This value should only be increased carefully, otherwise the simulation will tend to explode if values that are too high are defined here (energy is brought into the simulation system analogously to a perpetual motion machine, which tends to be unstable).
Low values cause Rigid Bodies to collide like a sandbag, while increasing values cause them to increasingly bounce away from each other until they explode away at very high values.
To bring a simulation to rest as quickly as possible, you should only use very small values here.
The characteristics of stickiness are similar to those of wet sand. When many small Rigid Bodies come together, they form clumps
For example, when a sticky cylinder rolls over such a Rigid Body pile, the effect shown occurs.
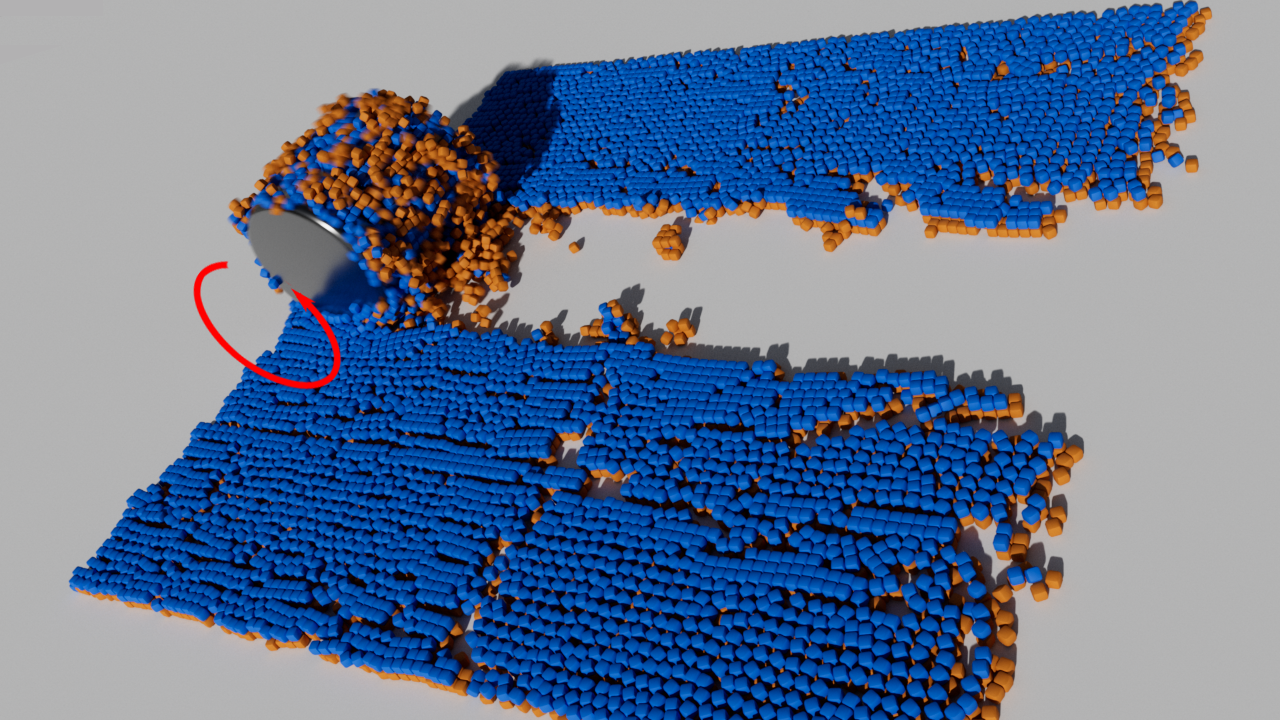
Stickiness is not as well-suited for large objects that you want to glue together; although, to a degree, that also works: However, they then tend to stick together only at their corners.
Parameters such as Search Radius are always used in simulations to avoid intersections as far as possible. This is a kind of safety distance around the simulation object from which a collision is detected and the algorithm attempts to keep the colliding elements apart.
Therefore, if there are visible penetrations, you should carefully increase the value.
It is in the nature of things that there are no absolutely perfect collisions. You should always be prepared for the fact that there will be minor penetrations and gaps. However, you can optimize. For example, with Collision ShapesConvex Hulls, relatively accurate collisions can be achieved at reasonable computing speeds.
If you want to set the above parameters individually for each Rigid Body, you can use the small arrow next to most of the parameters described here to make a weighting link field visible. MoGraph weighting tags are stored here - these can be created interactively with ![]() MoGraph Selection or
MoGraph Selection or ![]() MoGraph Weight Paintbrush by painting on the connectors. Alternatively, these can, of course, also be set using fields.
MoGraph Weight Paintbrush by painting on the connectors. Alternatively, these can, of course, also be set using fields.
These weightings are always assigned to a parameter value. This parameter value defines a maximum value that is set specifically for the individual Rigid Body by weighting. For example, if the parameter value is set to 200 and a weighting of 0.5 or 50% is defined, the value 100 is applied to this Rigid Body.
Example
In the following scene, the tires are placed using a clone object and connected to the "chassis" using a Connect object ( Type Wheel Suspension ). If you look closely, the pair of tires on the middle axle - the sixth - is blocked. For this purpose, a Cube Field was created that sets the two Rigid Bodies to friction = 0.

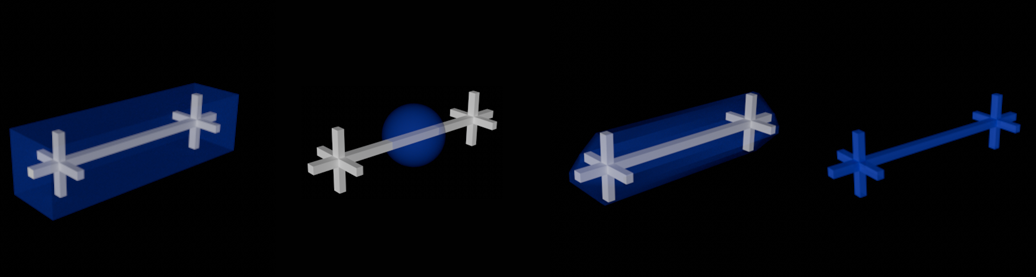 From left to right: Collision Shapes in blue: Box, Sphere, Convex Hulls (geometry accuracy = 0, but can be greatly improved with higher values), Triangle Mesh.
Collision detection calculations are generally computationally intense. However, only they lead to convincing object movements: Bodies can collide with others, come to rest due to friction, etc.
The more complex the body in its shape, the more complex its collision calculation. Therefore, there are some quick-to-calculate substitute shapes in this drop-down menu that can be placed over the actual object. In the simulation, it is often not possible to tell from a distance whether the actual object shape was used for the collision calculation or, for example, only a box that was automatically adjusted to the object size.
The order in terms of computational speed and collision precision is roughly this (from fastest/most imprecise to slowest/most precise): Box, Sphere, Convex Hulls, Triangle Mesh. In detail:
Auto
If Cinema 4D detects that the primitives Cube and Sphere have been used, they will be automatically calculated internally with the options Box and Sphere. Otherwise, Convex Hulls will be used (the default geometry accuracy 5 will be sufficient for most cases and will still check for collision very quickly).
Attention, Auto is only available for Rigid Bodies, not for Collision objects.
Triangle Mesh
The object to which the tag is assigned is defined with its complete shape as the collision shape, which makes this option the slowest, but regarding collision the best, because the exact object shape is used for collision calculation.
However, Convex Hulls with higher Geometry Accuracy can often compute similarly good collisions, but much faster.
Here, one or more enveloping hulls are placed around the object or its parts, which behave similarly to a rubber skin. The Geometry Accuracy parameter is displayed, which defines the number of "rubber skins".
By the way, this equivalent shape creation works exactly as already described for the placement tool at Accuracy.
If you want to display the collision shape, activate the Rigid Body Shapes option in the Simulation tab of the Preferences menu. To do this, you must start the simulation, or jump one frame forward from the start frame.
Sphere
A sphere fitted into the object bounding box is used as the collision shape.
Box
The smallest box that includes all object points will be used as the collision shape.
This setting only applies to rigid bodies that have Triangle Mesh set for Collision Shapes, otherwise it is hidden.
In older Cinema 4D versions (before 2025.1), there was always a small, visible gap when these special Rigid Bodies came into contact with other simulation objects, which did not occur with the other forms of collision.
This behavior has now been optimized and the visible gap has been significantly reduced - it still exists, but is now only Search Radius * Margin, which in most cases is so small that it is no longer visible.
Margin should not really be changed, as smaller values than the default will quickly lead to intersections. You could carefully increase this value if you are colliding very small objects, but it is recommended that you use the new
Use Restrict Movement On Contacts and Collision Priority functions.
Here you can set from which polygon side to check for collisions. You have the choice between:
- Front: Collisions will only occur when collision components approach from the outside (with respect to the Normals).
- Back: Collisions will only occur when collision components approach from behind (with respect to the Normals).
- Both: Collisions will take place on both sides.
This setting is always of interest when there are intersections during collisions. Intersections are rarely desired. Once objects are stuck together, it is difficult to separate them again with the Both setting. If, on the other hand, you have activated Front, there is no resistance to separating the two objects - on the contrary, where it makes sense, a small impulse is even applied internally from the surface to keep the objects as far apart as possible.
This parameter is displayed if Auto (Rigid Bodies only) or Convex envelope is selected under Collision Shapes (see also Convex Hulls).
With increasing values, the collision shape will approach the actual object shape without reaching it exactly: However, the calculation is much faster than with Triangle Mesh.
If set to 0, recessed indentations or recesses or holes will not be included in the collision calculation, but only a single "rubber skin" will be placed around the object, as shown on the left:

Hierarchy Merge Level[0..2147483647]
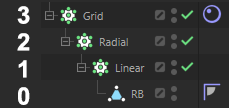
Clone-generating generators such as Cloner or Array objects can be further multiplied by nesting (this setting only works if the tag is on such an object). If, for example, a Cloner first clones a cube linearly and then a second Cloner multiplies the entire clone conglomerate again radially to then clone it in a grid, use the numbers here to specify the hierarchy levels that should each function as a separate rigid body. It is counted from the bottom: 0 makes every single clone a rigid body, 1 only the first clone hierarchy (in the example the linear cloner), etc. In the example shown, 3 would then consider the entire clone conglomerate as a single rigid body.
Normal hierarchies that lie below the tag-bearing object (i.e. no further cloners as in the example above) work in the same way. Please note that otherwise only editable objects currently work as described (e.g. no basic objects, make these editable by pressing the "C" key).
In Cinema 4D there are many ways to modify objects using a deformer. If this deformation is to be used as a Collision Shape, activate this option.
Liquid Collisions
Liquids can interact with Rigid Bodies, i.e. liquid particles collide with Rigid Bodies and exert reciprocal forces on each other. You will therefore find below some settings with which you can regulate collision detection with liquid particles. The same settings can also be found in the Collider Tag, where they function identically. They are therefore only described there and linked from here.
In the following mill wheel simulation, you can see how liquid particles collide and interact with the Rigid Body water wheel:
The Mode for Rigid Bodies differs slightly from that of the Collider Tag: there is no Surface Mode, so please ignore the information on the Surface here at Mode.
See Collision Side.
See Voxelization.
See Voxel Size.
Interior/Exterior Voxel Range
Exterior Voxel Range[0..2147483647]
Interior Voxel Range[0..2147483647]
See Interior Voxel Range.