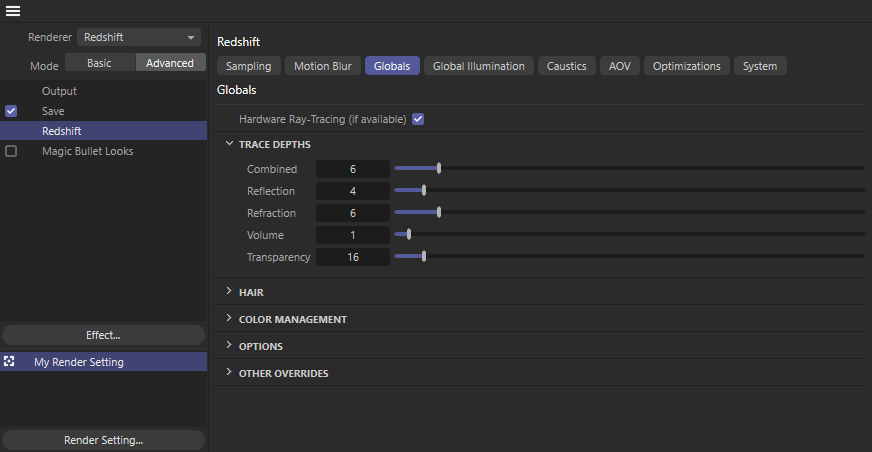
Globals - Production
Table Of Contents
Overview
|
Globals

|
Enables or disables the rendering of any default lights in the respective digital content creation tool.
If your render appears brighter or differently lit than you expect this is a good option to check and disable.
When enabled this will utilize any available hardware accelerated ray tracing as long as you are rendering with compatible video cards like the Nvidia RTX series graphics cards or Apple M3 chips.
The impact of hardware accelerated ray-tracing varies from scene to scene, with scenes that spend more of their time specifically on ray tracing generally seeing more of an improvement with hardware RT enabled. Non-ray-traced effects like irradiance point cloud and irradiance cache GI are not accelerated by hardware RT.
GPUs that support hardware RT can be mixed with GPUs that do not support hardware RT.
|
|
|
| Hardware Ray-Tracing: Disabled Render Time (Min:Sec) : 4:11 |
Enabled 3:31 |


When enabled, Redshift moves the scene around the camera to maintain high numerical precision, disabled by default.
When a scene has large extents (for example a space battle scene), precision problems might appear far away from the scene origin, i.e. the (0, 0, 0) coordinate. These precision problems might look like triangles being warped, lighting leaking through geometry or gaps appearing between polygons. Enabling the "Camera Space Render" option eliminates this type of issue.
When enabled Redshift uses 8-bit quantization and dithering to help reduce "banding" artifacts on slow changing gradients for 8-bit images (non-HDR images).
Most computer displays are able to show up to 256 shades of gray even if you are viewing an HDR image. Depending on the monitor capabilities and calibration, there's the possibility of "banding" artifacts on slow-changing gradients. Dithering can help with that!
In Redshift, dithering only works on 8-bit images, i.e. non-HDR images. So, assuming you don't care about HDR output, you can enable the "quantize to 8-bit and dither" option and get rid of any banding artifacts.
Because this option quantizes to 8-bits per color channel, the final image will lose color precision in the dark tones. Additionally, any pixel that's overbright will have its intensity clamped to a value of 1.0. For these reasons, if you do care about HDR you should keep this option disabled and, instead, apply dithering or other kinds of processing on an external image editing program.
The left image shows the banding near the bottom. Please note that, depending on your monitor calibration, the effect might not be very noticeable.
|
|
|
|
No Dithering |
Quantization and dithering enabled |

If you're using tessellation in your scene then freezing tessellation can greatly improve your Interactive Rendering responsiveness. When freeze tessellation is enabled Redshift will do its best to avoid re-translating the geometry each time a change is made like moving the camera or objects. Depending on how much you are tessellating in your scene, freeze tessellation can mean the difference between near-real time IPR responsiveness or a slideshow due to updating the tessellation on each new frame or scene change.
Please note:
- If you manually change any of your scene tessellation settings Redshift will re-translate the scene so that the new tessellation settings can be used even if freeze tessellation is enabled.
- Frozen tessellation does not persist after stopping and starting interactive rendering.
If you are using adaptive tessellation in your scene freeze tessellation might cause your IPR renders to look wrong due to the tessellation not being allowed to update each time a change is made like moving the object or camera closer to one another as depicted in the animation below. Batch rendering will still render out fine but freeze tessellation should be handled with care when trying to determine the final settings to use for an animation.
|
|
| Freeze Tessellation demonstration Notice how the tessellation on the toast does not update until after Freeze Tessellation is disabled. |
Scales the relative thickness of all contours in the scene.
Connect a Material with a Contour node here to add a contour to all objects in the scene that don't already have their own contour.
When using the Default Contour feature but you want a material to have no contours at all, connect a contour to that material and disable Internal and External contours manually.
Connect a global environment shader like a physical sky or environment shader.
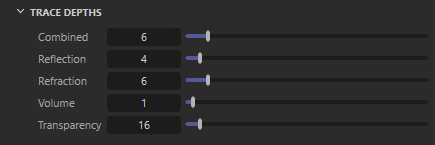
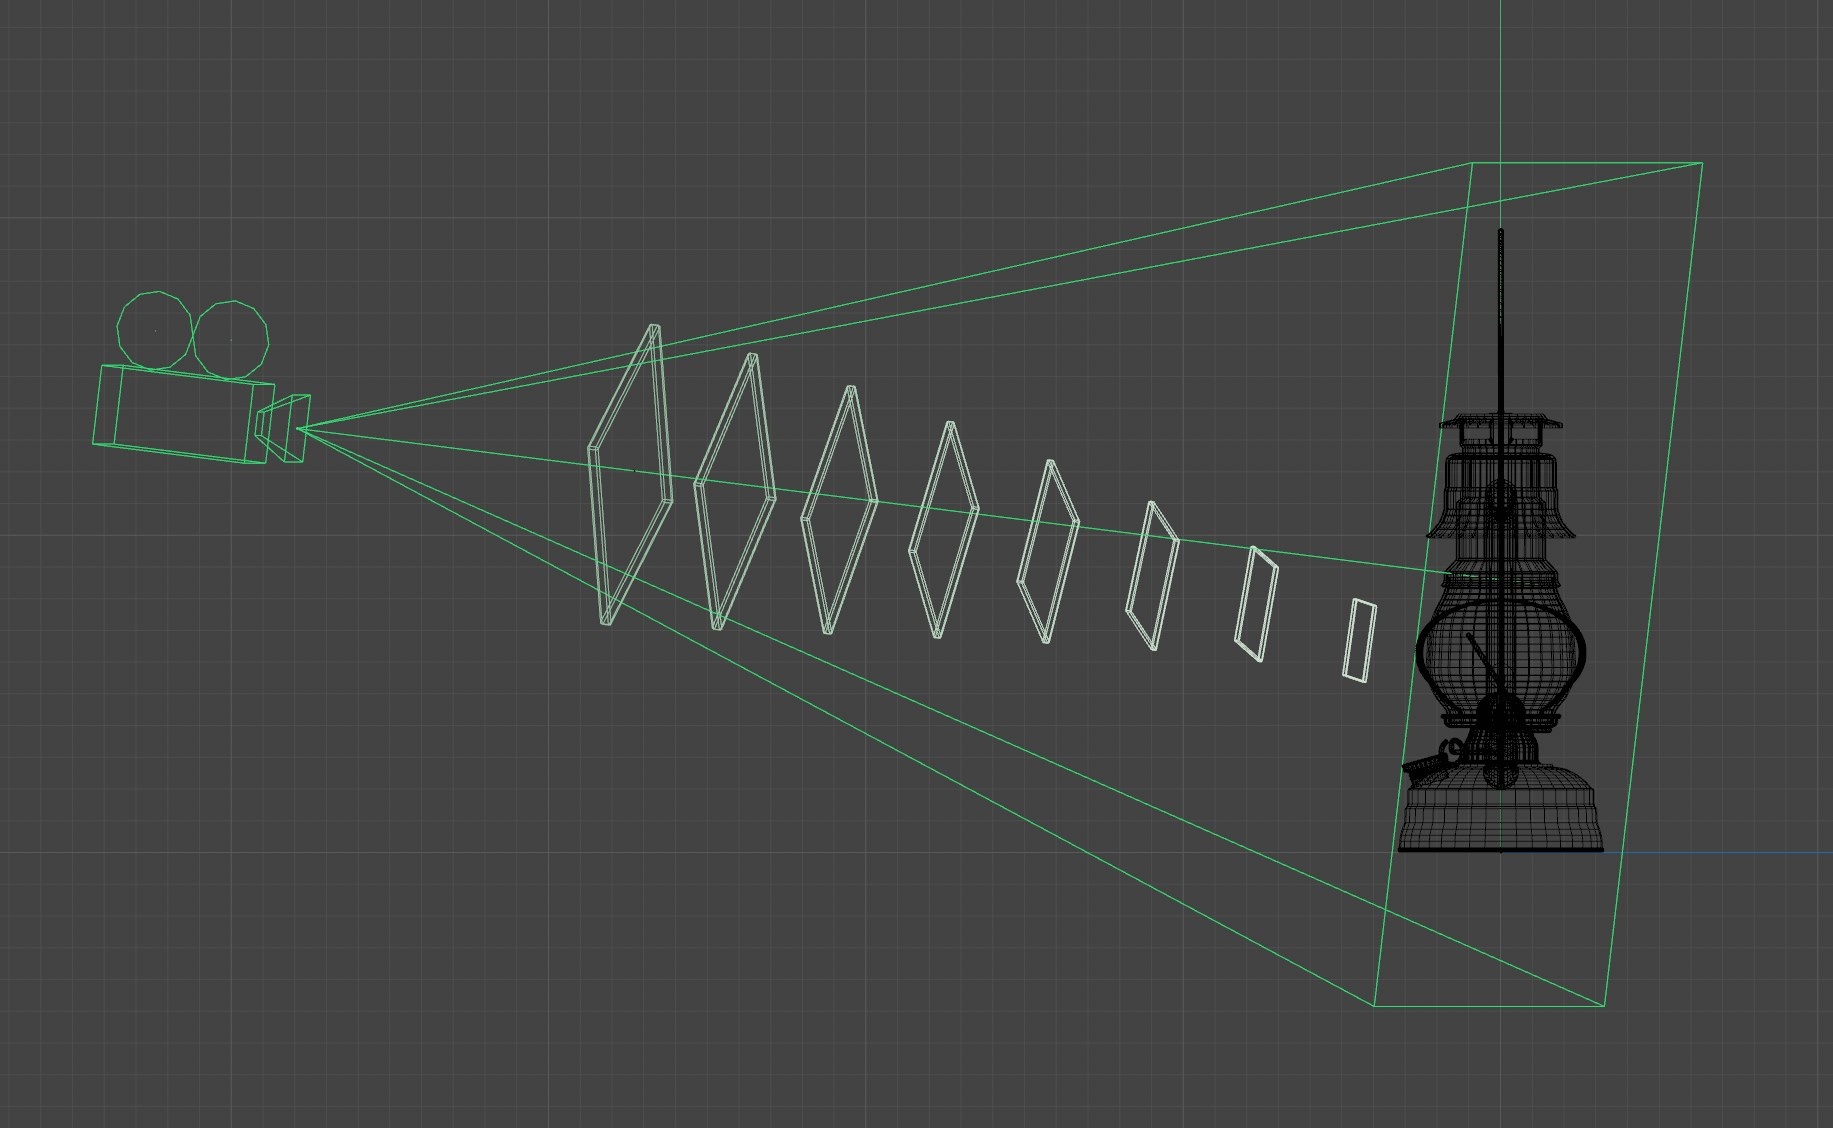
Trace Depths
|
The Trace Depths section is used to impose maximum limits for different ray types across your entire scene.
Increasing Trace Depth values can quickly and greatly increase render times in scenes with many bounces. In general it is a best practice to use as few as you need to achieve the result that you desire.
Overriding Trace Depths at the Material Level
Trace Depth values can be overridden on a per-material basis under the Optimizations section of materials like the Redshift Standard Material, this includes overriding above or below the global trace depth values.
The Combined depth parameter specifies the maximum limit for global illumination, reflection, volume, and transmission / refraction rays combined.
This means that if the individual depth value for global illumination, reflections or refractions is higher than the Combined Depth the resulting render will still be capped at the Combined Depth value.
For example, let's say that reflection and refraction are both set to a value of 4 and combined is set to 6. If a ray had already been reflected 4 times, then it could only be refracted 2 more times because the combined trace depth is 6.
The Reflection depth parameter puts an individual cap on how many times a reflection ray can bounce.
The Refraction depth parameter puts an individual cap on how many times a refraction ray can bounce or pass through objects.
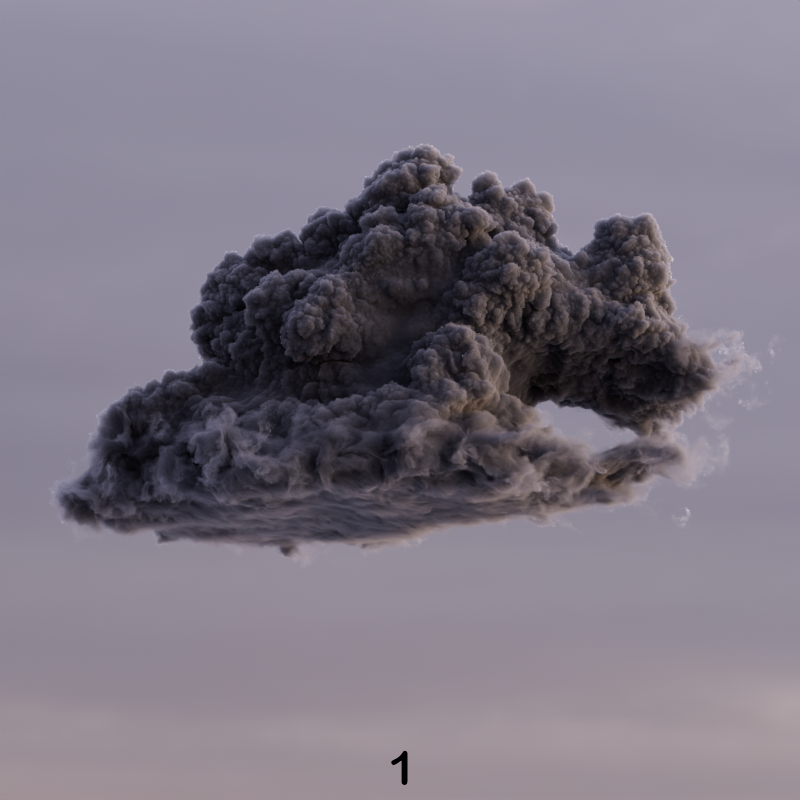
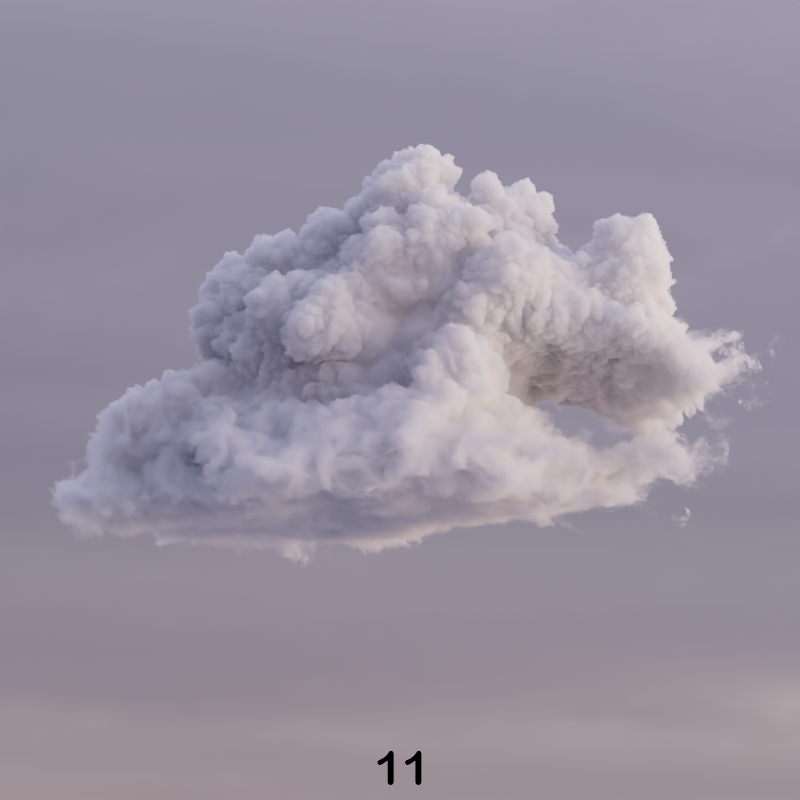
The Volume depth parameter puts an individual cap on how many times a ray can scatter around inside a volume. This is commonly referred to as volumetric multiple scattering.
Volume multiple scattering requires Global Illumination to be enabled.
Volume multiple scattering is only compatible with Brute Force global illumination. If point based global illumination methods (Irradiance Cache or Irradiance Point Cloud) are used for the primary or secondary GI engine, ray traced global illumination (Brute Force) is automatically used for all volumes in the scene — the remaining objects will use the point based GI methods.
|
|
|
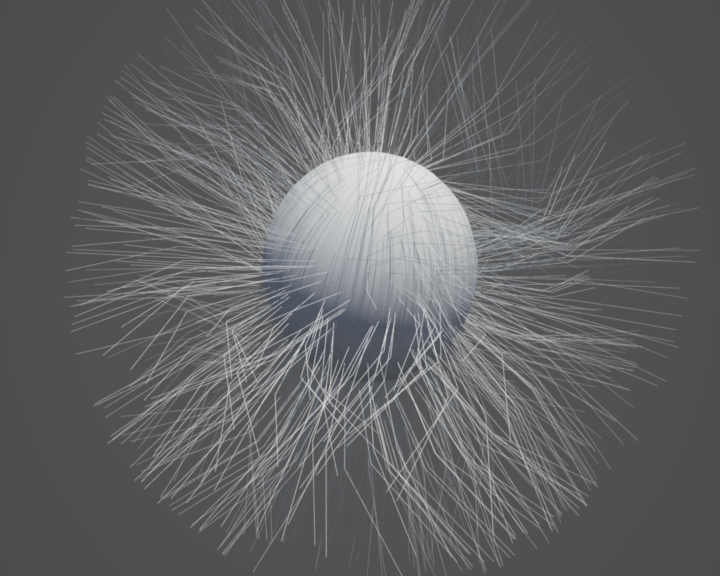
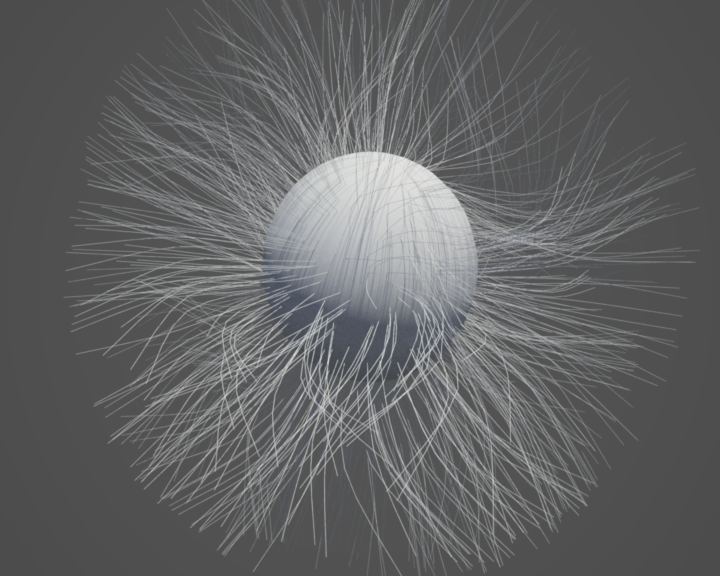
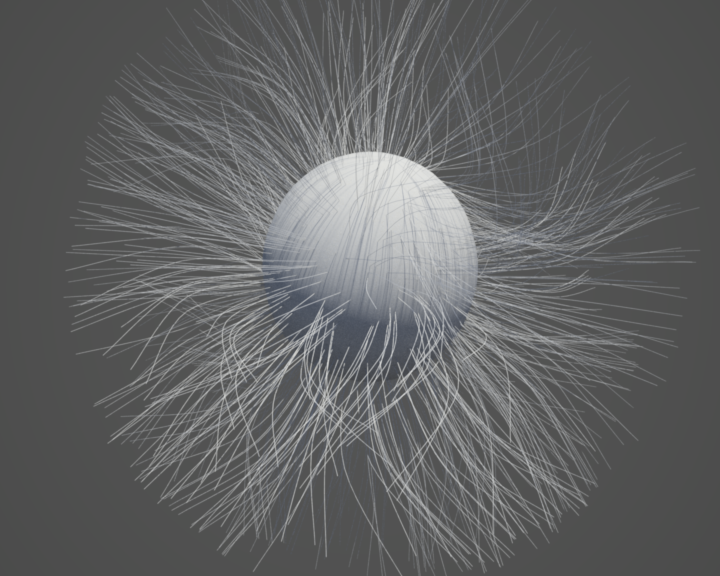
| Volume Trace Depth: 1 | 11 | 31 |
| Asset Courtesy of Walt Disney Animation CC BY-SA 3.0 License |
||
The Transparency depth parameter puts an individual cap on how many times a transparency ray can pass straight through objects.
Transparency is utilized for things like Opacity in the Redshift Material to go much deeper and render much faster than refractions.
Transparency Depth is not limited by the Combined Depth parameter.
|
|
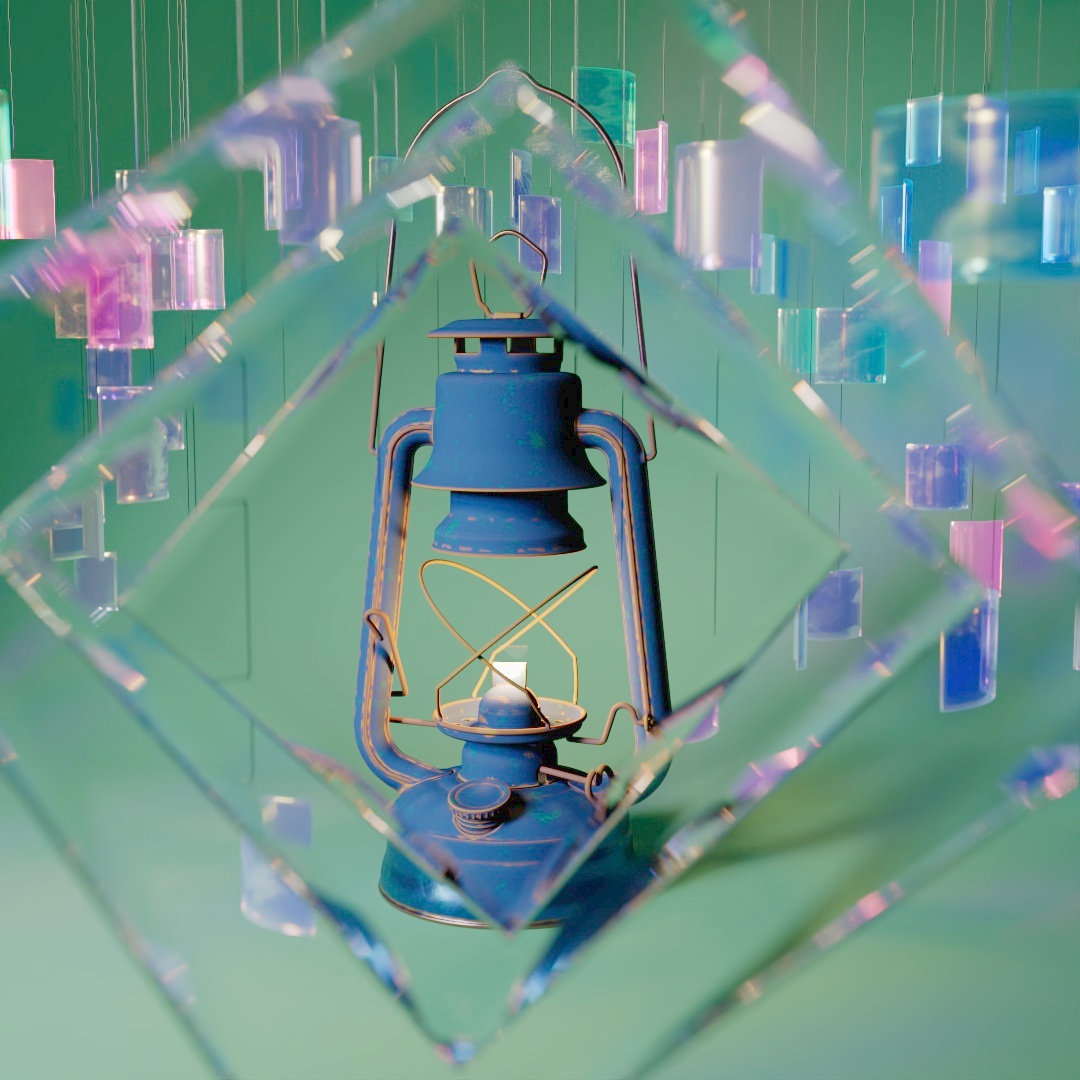
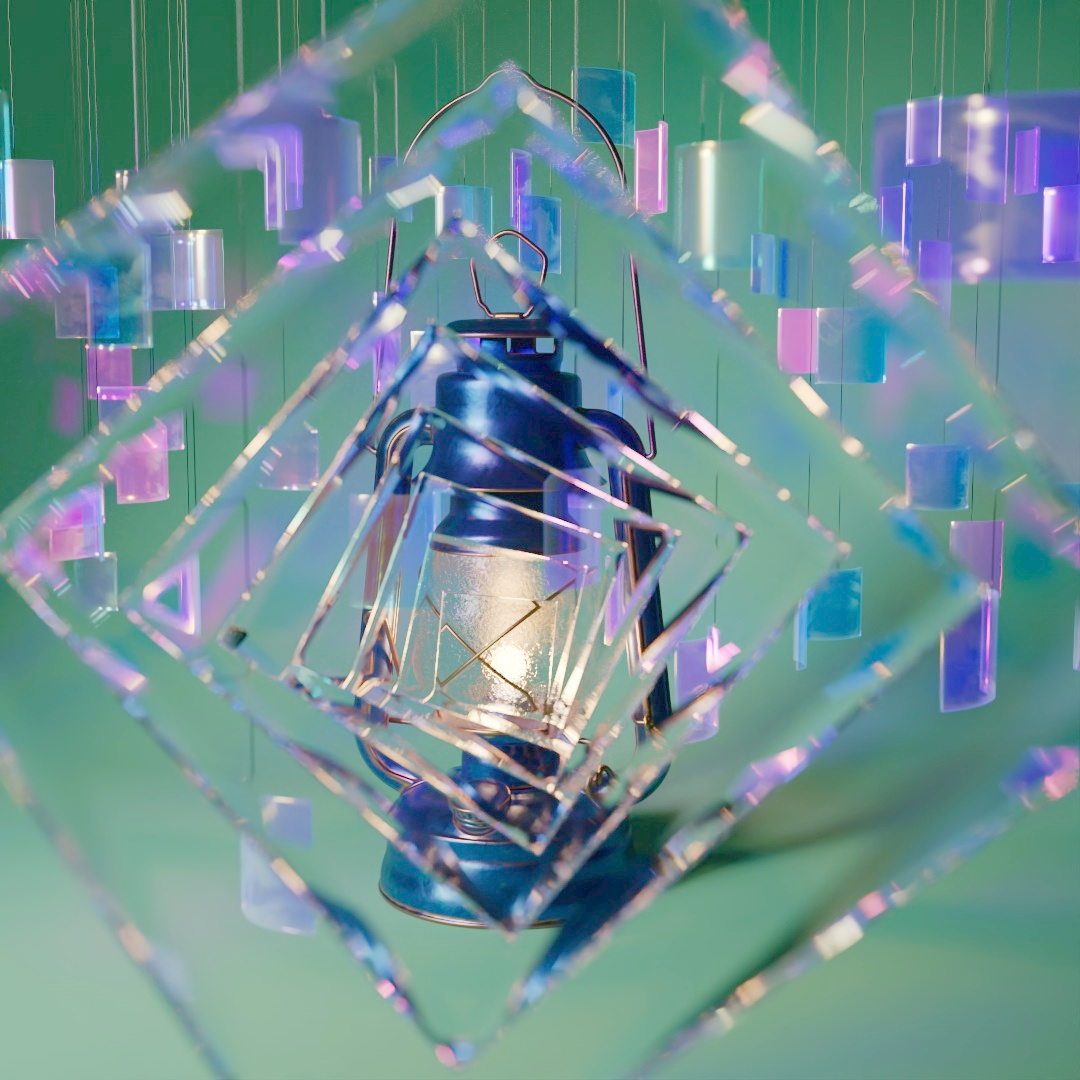
| Example scene |
|
|
|
|
|
| Combined: 6 Reflection: 4 Refraction: 6 Transparency: 16 |
8 6 8 20 |
24 20 24 48 |
24 1 24 48 |


Displacement
|
When enabled, by default, any material that uses a Displacement shader node and a displacement texture is displaced automatically.
Manually configured displacement settings at the Object level take precedence over Global Displacement.
When disabled, displacement is not automatic and must be manually enabled on each object.
For more information, please see the Tessellation and Displacement page.
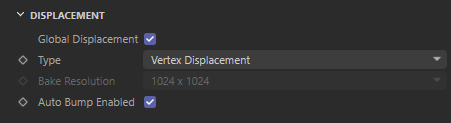
Sets the displacement type for use with Global Displacement.
Vertex Displacement is the most capable and compatible form of displacement, though it has low interactivity. The quality of Vertex Displacement must be managed on a per-object basis by controlling the tessellation level and cannot be easily adjusted from the render settings.
Texture Displacement is great for interactivity and quickly adding detail to large low-poly areas like bricks on walls or detail on a large ground plane. Texture Displacement makes it easy to control displacement quality across an entire scene by adjusting the Bake Resolution below.
For more information, please see the Tessellation and Displacement page.
Only used with Texture Displacement
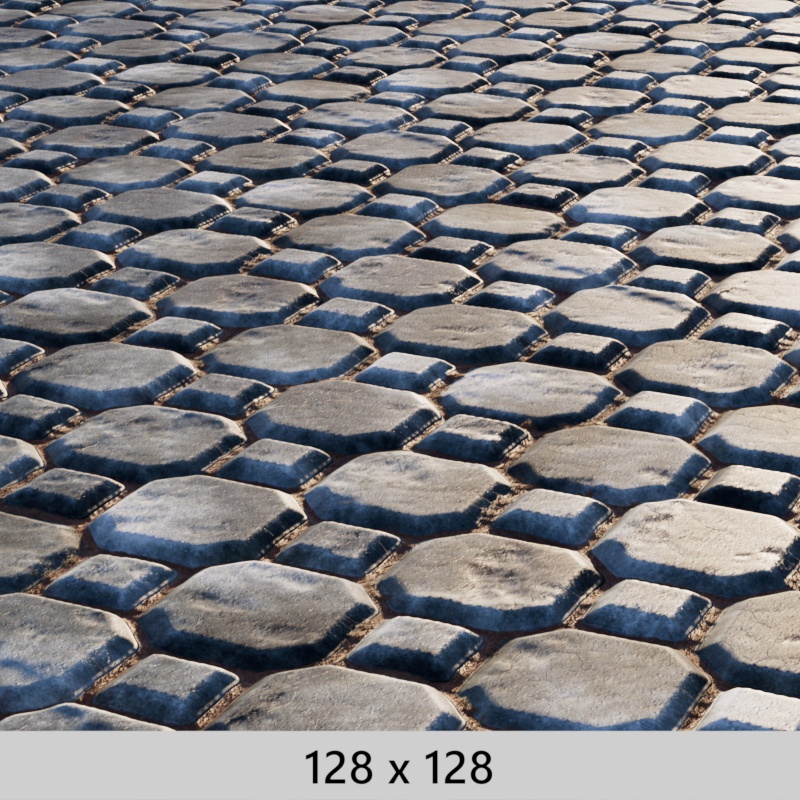
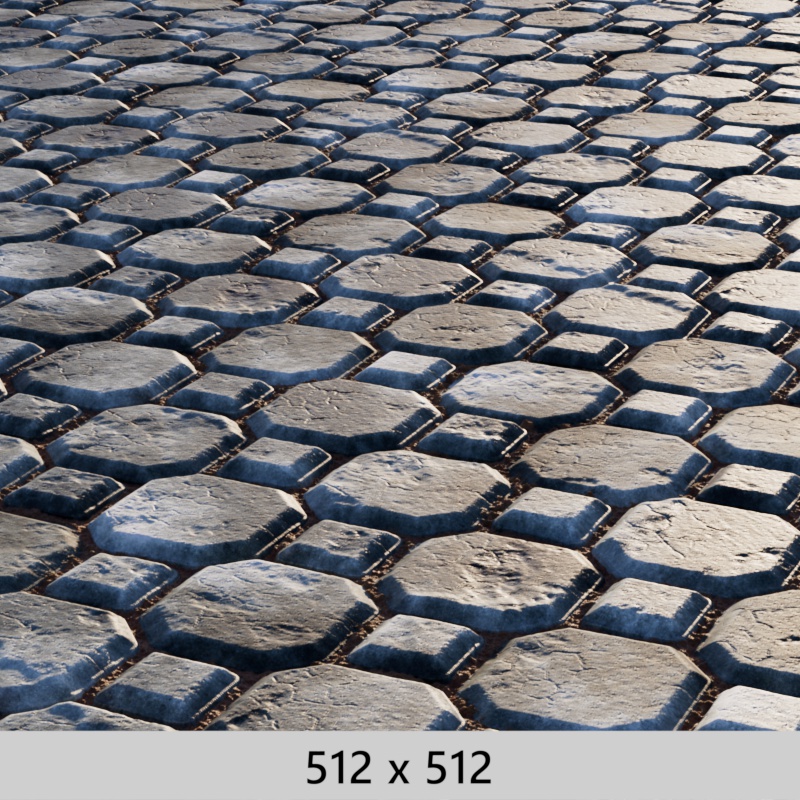
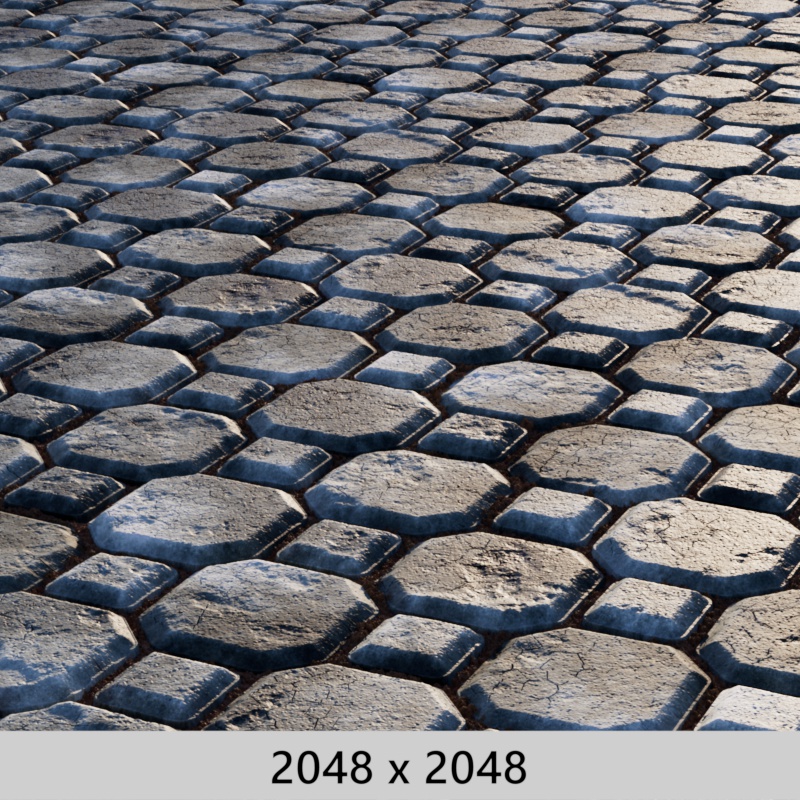
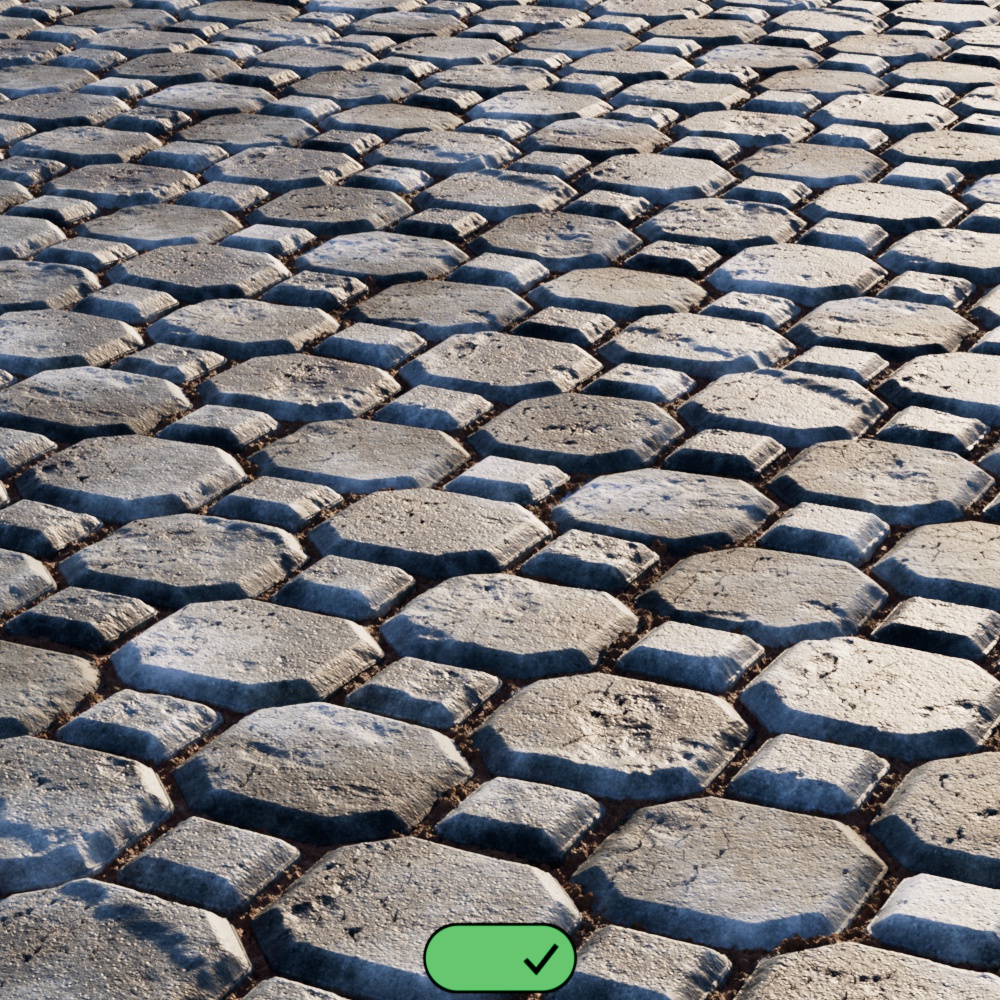
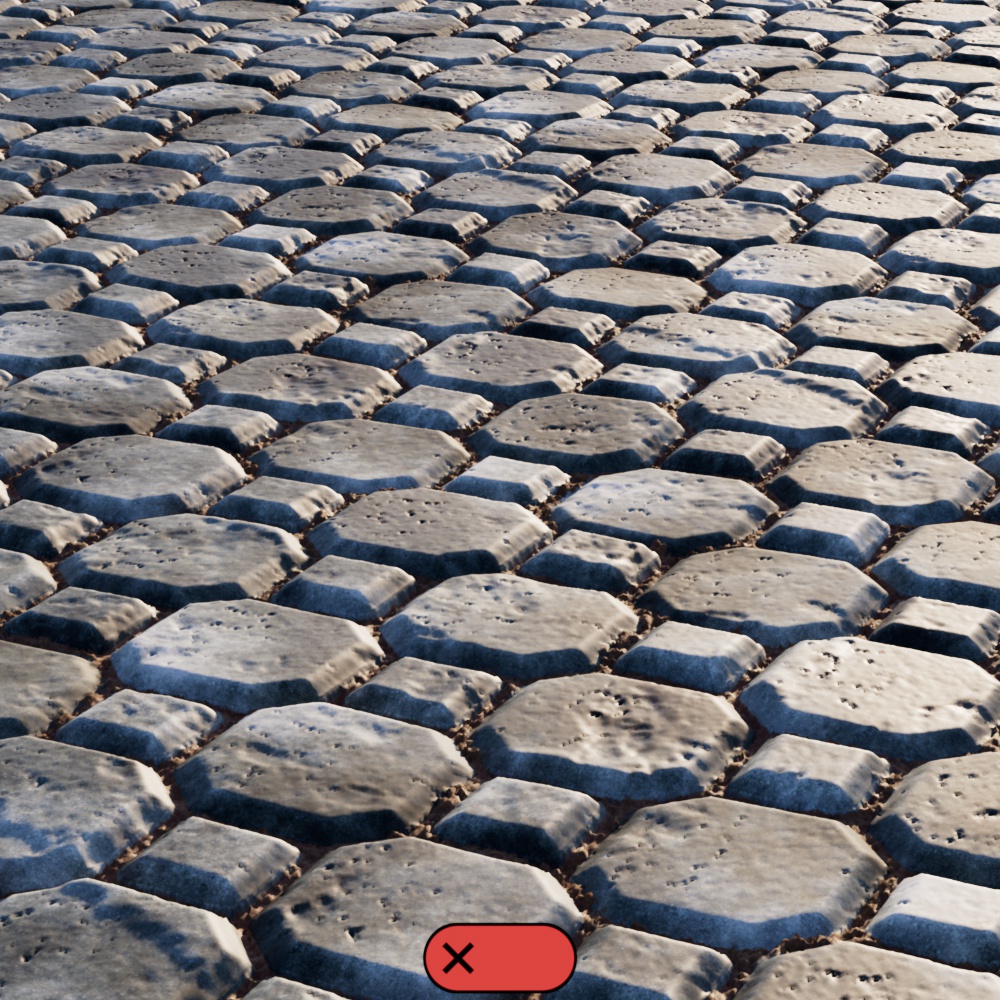
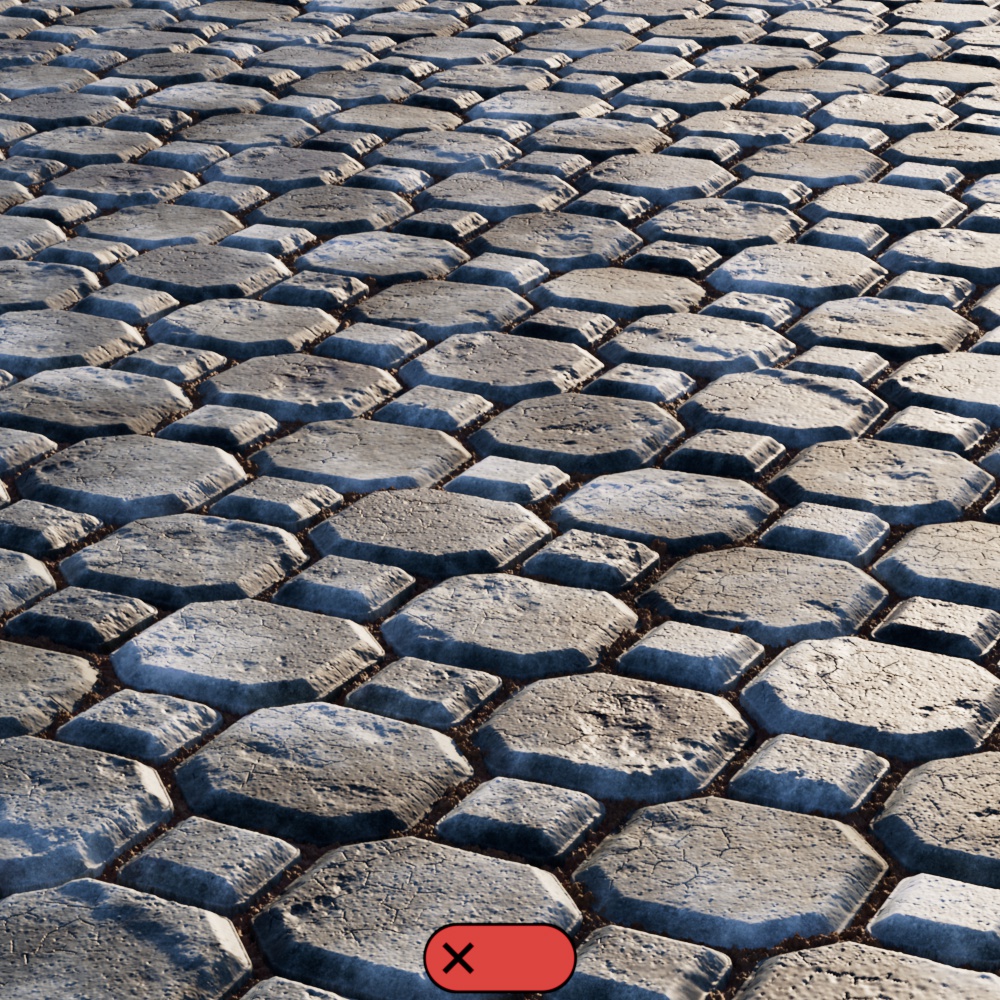
Controls the resolution for the baked displacement texture used by Texture Displacement. Higher resolutions result in higher quality displacement but take longer to bake and render.
Baked textures cannot go out of core, so it's important to find the right balance for your scene. Don't set the Bake Resolution unnecessarily high.
|
|
|
|
| Bake Resolution: 128 x 128 Render Time: 51s |
Bake Resolution: 512 x 512 Render Time: 1m 11s |
2048 x 2048 2m |
8192 x 8192 2m 45s |
Fine surface details require very high tessellation levels or high bake resolutions in order to look nice and sharp, otherwise the surface is likely to look soft and blurry. However, this means higher memory usage and frequently longer render times.
The Auto Bump Mapping option can be used to get around this by essentially using the displacement texture map to automatically drive bump mapping for increased detail. When using Vertex Displacement it may be possible to use less tessellation to achieve the same level of visual quality, or a lower Bake Resolution when using Texture Displacement.
- Off: Never use the displacement texture for additional bump mapping detail
- Displacement Only: Only use the displacement texture for additional bump mapping detail when the surface is actually being displaced.
- On: Always use the displacement texture for additional bump mapping detail.
When Auto Bump Mapping is set to "On", any connected displacement texture will add a bump mapping effect - even when displacement is disabled on the object.
This can be helpful when setting up materials that are used across a variety of situations. For example, sometimes the material might take center stage and require displacement, where as other times it may sit in the background and displacement would be a waste of performance. When the material is used in the background it still receives bump mapping even without displacement, and there's no need to wire up a separate bump map node just for that effect.
In the examples below, note how the first two images use the same number of subdivisions but when Auto Bump Mapping is enabled the detail level looks much higher. The third image is provided for reference, it has a higher subdivision level that results in greater detail but it uses more then double the amount of memory since it has to generate and displace many more vertices. These examples use Vertex Displacement but the use case is the same for Texture Displacement.
In some scenarios, like when using extreme displacement scales, Auto Bump may result in artifacts and should be disabled.
|
|
|
| Auto Bump Mapping: On Max Subdivisions: 5 |
Off 5 |
Off 7 (for reference) |
Only used with Texture Displacement
Controls how surface normals are handled with Texture Displacement, this is helpful for dealing with holes that may appear on geometry with hard edges.
- Smooth Normals - (Default) Overrides and smooths all surface normals. This option ensures that holes do not appear due to split normals when using Texture Displacement.
- Vertex Normals - Uses the surface normals as set on a mesh. This option should be used for objects that need special attention, holes produced by split surface normals will need to be manually adjusted per-mesh.
For the easiest workflow, use "Smooth Normals" globally to ensure that holes don't appear and only manually set Edge Handling to "Vertex Normals" on the per-object displacement settings for any mesh that requires it.
|

|

|
| Edge Handling: Smooth Normals Normal Angle: 0 |
Vertex Normals 0 |
Vertex Normals 40 |
Objects with very few subdivisions between angle changes may look strange when using Smooth Normals. This happens because there are not enough vertices to smoothly transition across as the displacement angle blends between each normal. It can be fixed by subdividing the geometry, beveling corners, or adding support loops.
In the first example below, a cube with no subdivisions uses "Smooth Normals" for Edge Handling, this pushes the displacement out at an angle as it converges toward the nearest vertex. In the second example the corners are beveled, this gives the displacement more vertices to transition between which allows the displacement to push straight out on the flat sides.
|
|
| Smooth Normals with no subdivisions | Smooth Normals with beveled edges |
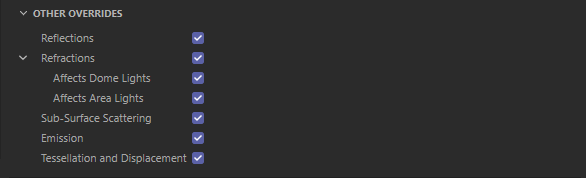
Other Overrides
|
Enables or disables all Reflections in the scene.
Enables or disables all Refractions in the scene.
When enabled, it allows for all Dome Light rays to be affected by refraction bending if their "Affected by Refraction" parameter is set to "Auto" or "Always."
When disabled all Area Lights will be rendered as if the "Affected by Refraction" was set to "Never."
When enabled, it allows for all Area Light rays to be affected by refraction bending if their "Affected by Refraction" parameter is set to "Auto" or "Always."
When disabled all Area Lights will be rendered as if the "Affected by Refraction" was set to "Never."
Enables or disables all Sub-Surface Scattering in the scene.
Enables or disables all Emission in the scene.
Enables or disables all Tessellation in the scene.
Enables or disables all Displacement in the scene.
Color Management

|
Color Management in greater detail
For more information on the subject of color management please see the Color Management - OCIO ACES page.
This sets the path to the OpenColorIO config file to be used.
By default Redshift ships with and uses its own predefined configuration but a custom OCIO config be set here as well.
This sets the linear color space that Redshift renders in, ACEScg by default which allows Redshift to make full use of its wider rendering color gamut.
This is the Output Display Transform that should be set to a color space that is supported by the display that you are working on, for most people this will be sRGB.
This determines how the image is displayed on screen and works in conjunction with the Display transform. By default this can be set to 4 different views, an ACES SDR tone-mapped result, un-tone-mapped, a logarithmic color space (ACEScct) or the raw linear result which is unaffected by the Display transform.
|
|
|
|
|
| View: ACES 1.0 SDR-Video | Un-tone-mapped | Log | Raw |


When enabled this setting will bake in the view transform.
When enabled this will use any file rules established within the currently used OCIO config file. OCIO file rules are used to automatically set the correct color space for assets that fall within established parameters.
Examples:
- If a file is a jpg / png and has the words "albedo" or "diffuse" in the file name use the sRGB color space
- If a file is a jpg / png and has the words "roughness" or "normal" in the file name then use the Raw color space.
Hair
|
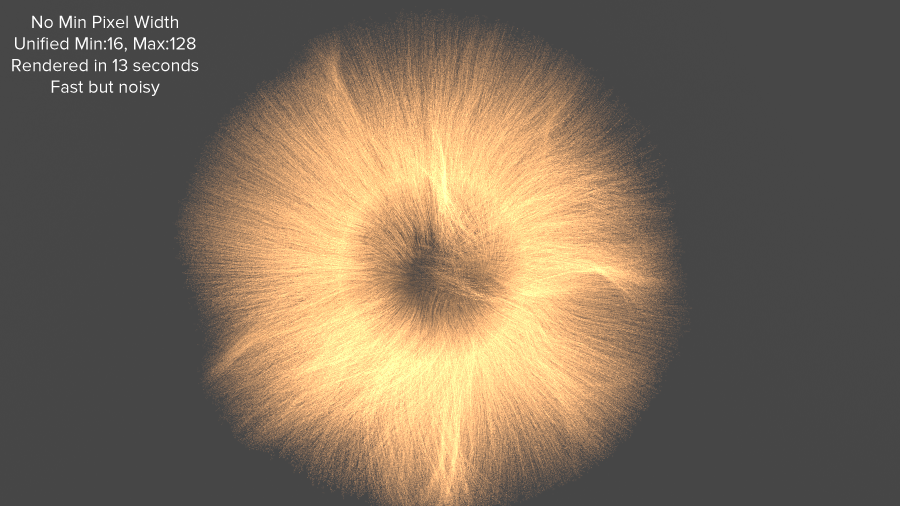
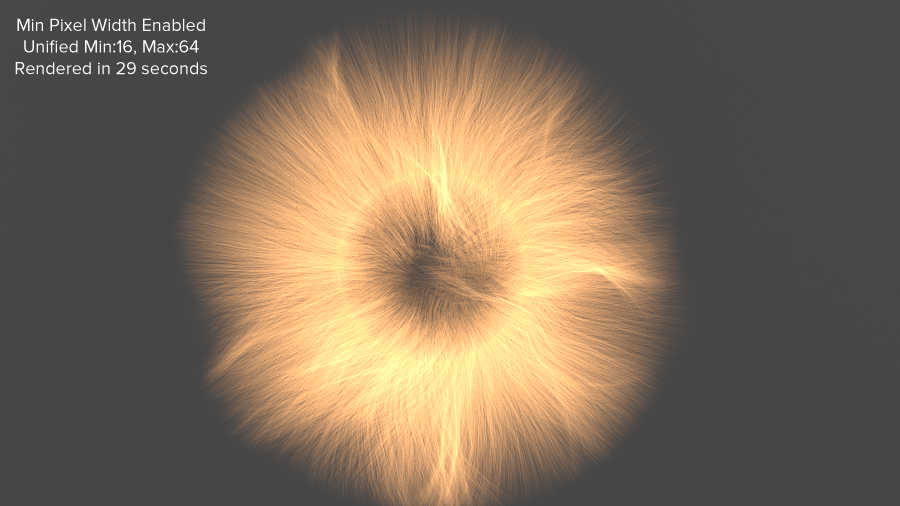
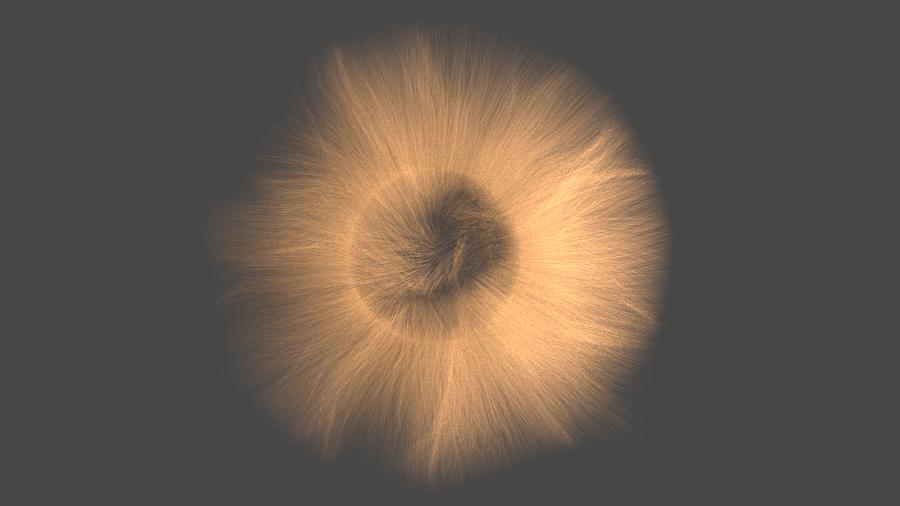
When enabled Redshift will render hair using "Min Pixel Width," a technique that alleviates aliasing issues by automatically thickening hair strands and making them appropriately semi-transparent to compensate for the thickening, this is disabled by default.
Min Pixel Width render times
"Min Pixel Width" introduces semi-transparency so it can impact render times! However, since it helps render smooth hair with fewer unified samples, it may result in an overall improvement to render times. This is especially true when the rest of the frame renders well with a reasonable number of samples.
|
|
|
|
| Min Pixel Width: Disabled Render Time: 13 seconds Min / Max Samples: 16 / 128 Result: Very noisy |
Disabled 76 seconds 64 / 1024 Less noisy but much slower |
Enabled 29 seconds 16 / 64 Less noisy but much faster |

When enabled Redshift will automatically compute a threshold based on the number of unified samples in order to simplify and optimize
We recommend that most users use the automatic setting.
Manually controls the amount of hair thickening that will happen when Automatic Threshold is disabled.
The value represents the fraction of the pixel by which the hair will be thickened. The larger the value, the more thickening will happen.
A value of 1.0 means "as thick as the pixel" while a value of 0.125 means "an eighth of a pixel".
A higher level of thickening means more semi-transparency and, therefore, longer rendering times. It is advised that users keep this parameter as low as possible.
If the scene needs plenty of unified samples for other reasons (depth of field or motion blur), the min pixel technique will work fine with less thickening, i.e. smaller thresholds. Too low of a threshold, on the other hand, means hair will start getting missed again by unified samples which, in turn, means the min pixel width technique will be less effective and the rendered images will be noisier.
Controls the number of transparency levels for hair when hair Min Pixel Width is enabled since the technique makes hair semi-transparent along with thickening it.
The larger the trace depth, the longer the min pixel width technique works and the higher the quality.
When the trace depth is exhausted, the min pixel technique will be automatically disabled, so the hair will no longer get thickened and semi-transparent. Practically speaking, this means that hair behind several layers of other hair will start rendering noisy again. However, because it'll be obstructed by these "in front" layers, the noise might no longer be visually important.
|
|
|
|
| Trace Depth: 2 | 4 | 8 |


Determines how hair should be tessellated at render time.
Hair Tessellation improves the smoothness of hair rendering at render-time without requiring more VRAM but it can increase render times. The following hair Tessellation options are available:
- None - Disables render-time hair tessellation.
- 4-Steps - Tessellates hair strands by 4
- 8-Steps - Tessellates hair strands by 8
Below we show a hair mesh using only 2 segments per strand. Notice the angular artifacts on the "None" image and how render-time hair tessellation fixes them.
Please keep in mind that, from a performance point of view, it's best for each strand to contain a few segments and not rely solely on render-time tessellation. Depending on the length of the strands, we recommend using 3-8 strand segments and then using 4 render-time tessellation steps to essentially "multiply" the strand segments. In the following example, we intentionally used only 2 strand segments in order to be able to show the benefits of 8-steps.
With a more ideal setup having each strand use 4-5 segments instead, the 4-steps hair tessellation option was producing pristine results and the rendering was significantly faster, too!
|
|
|
|
| Mode set to "None". Lots of angular artifacts are visible. |
Mode set to "4-steps" Hair strands look much smoother |
Mode set to "8-steps" |