System
Table Of Contents
- Log
- Feedback Display
- Material Override
- Shadow Ray Biasing
- Ray Tracing Acceleration Structure
- Hair Tessellation
- Experimental Options
- Render in camera space
- Render Two Passes For Denoising
- Disable Bump Smoothing On Lighting Silhouettes
- Bucket Rendering
- Debug Capture
- Global Preferences
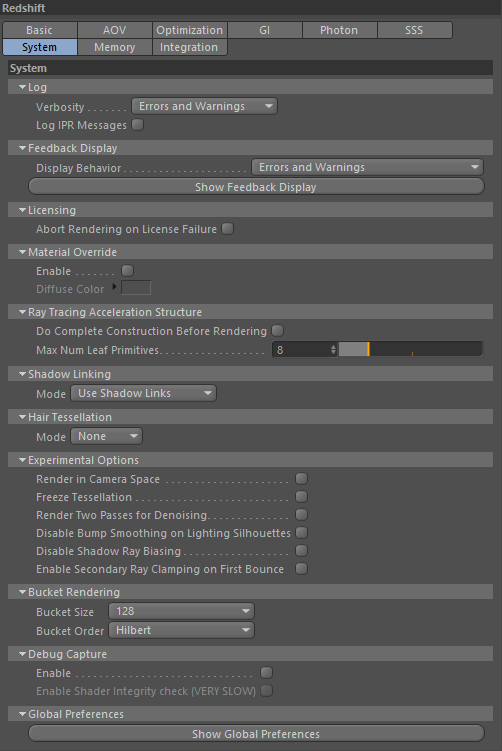
Log
Defines the path of the Redshift log file and the verbosity (detail level) or the log messages printed out within the 3d app. Setting the verbosity to "Debug" will make Redshift print out all messages to the 3d app.
You can find more information about the log file here.
Feedback Display
Redshift can show important statistics about the scene (such as GPU memory usage and certain errors/warnings) in its " Feedback display" window. The 'Show behavior' option determines when the window should pop up. By default, it only pop ups when there is an important error or warning that the user should know about. But it can also be configured to appear always (when the user renders a new frame) or only when important errors are triggered (but not warnings).
Material Override
Redshift has the ability of overriding every material in the scene with a gray lambert material. This is also known as a 'clay render'. This can be a useful feature when diagnosing lighting/shading issues.
This clay render can also be easily toggled on and off directly from the Redshift Render View.
Shadow Ray Biasing
For information on what is 'shadow ray biasing' and why you might want to disable it, please look here.
Ray Tracing Acceleration Structure
Do Complete Scene Construction Before Rendering
By default, Redshift loads and optimizes geometry data during the rendering process. This has the benefit of only loading/processing data that is actually visible by rays. The drawback is that, in certain cases, the CPU utilization might be less than ideal which means that geometric data processing might take longer than needed.
This option forces Redshift to load and process all geometry upfront, before actual rendering starts. For certain scenes this can have a positive performance impact.
Max Num Leaf Primitives
This option determines the accuracy of the ray tracing acceleration structures. Lower values can speed up difficult-to-ray-trace scenes such as ones that contain lots of hair, leaves or grass. However, reducing the number of leaf primitives also increases the GPU memory requirements. We, therefore, advise using lower values (such as 4, instead of the default 8) on fairly lightweight scenes or if your GPU already has plenty of VRAM. You can diagnose the ray tracing acceleration structure memory requirements by looking in the Redshift log file, at the memory usage statistics printed at the end of each frame.
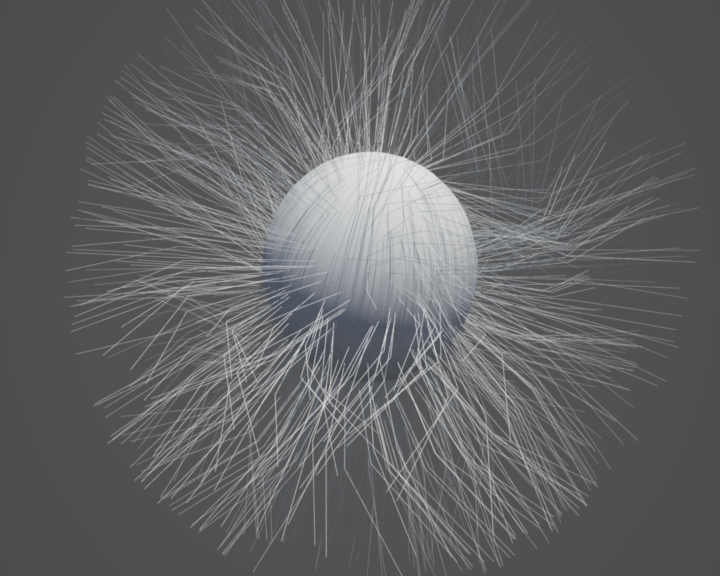
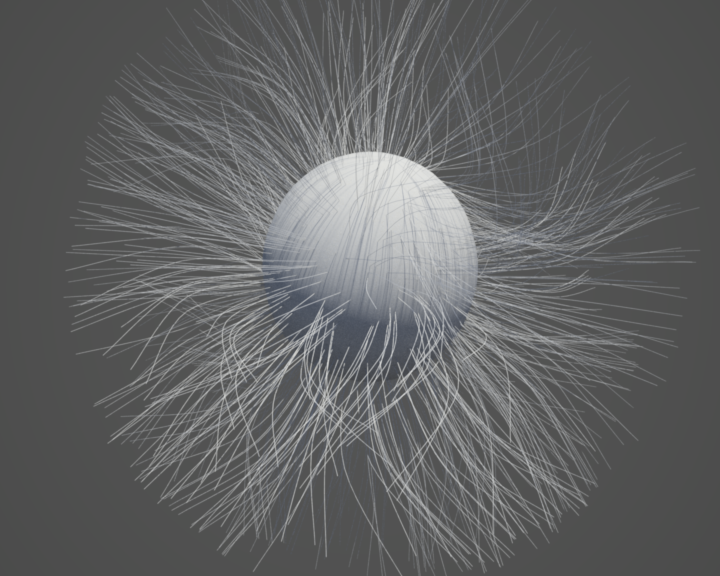
Hair Tessellation
Mode
Determines how hair should be tessellated at render time. Render-time hair tessellation improves the smoothness of hair without requiring more VRAM. However, it can increase render times.
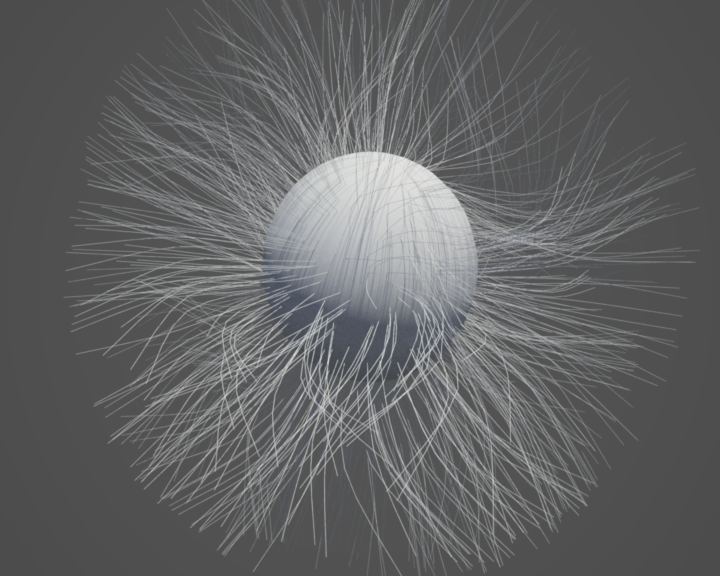
Below we show a hair mesh using only 2 segments per strand. Notice the angular artifacts on the "None" image and how render-time hair tessellation fixes them.
Please keep in mind that, from a performance point of view, it's best for each strand to contain a few segments and not rely solely on render-time tessellation. Depending on the length of the strands, we recommend using 3-8 strand segments and then using 4 render-time tessellation steps to essentially "multiply" the strand segments. On the following example, we intentionally used only 2 strand segments in order to be able to show the benefits of 8-steps. Having each strand use using 4-5 segments instead, the 4-steps hair tessellation option was producing pristine results and the rendering was significantly faster, too!
|
|
|
|
|
Mode set to "None". Lots of angular artifacts are visible. |
Mode set to "4-steps" |
Mode set to "8-steps" |
Experimental Options
Render in camera space
When a scene has large extents (for example a space battle scene), precision problems might appear far away from the scene origin, i.e. the (0, 0, 0) coordinate. These precision problems might look like triangles being warped, lighting leaking through geometry or gaps appearing between polygons.
The "render in camera space" option eliminates this type of issue by moving the scene around the camera so that numerical precision is maintained as much as possible.
Render Two Passes For Denoising
Generates pairs of all active AOVs, with the filenames post-fixed with _denoise0 and _denoise1. These two images can be used by Innobright's Altus Denoising System.
Disable Bump Smoothing On Lighting Silhouettes
Redshift by default smooths bump and normal maps on the light silhouettes of objects. I.e. there the surface normal and the light direction are perpendicular to each other. This is done to avoid faceting artifacts that can arise on those areas, especially if the object is low-poly. However, this can also produce loss of surface detail that might be necessary in some cases. For this reason, Redshift allows the user to turn off the light silhouette bump smoothing.
Bucket Rendering
When Redshift renders in non-progressive mode, it renders the image in square tiles. These tiles are also known as 'buckets'.
The size of each bucket can be important to GPU performance! By default Redshift uses 128x128 buckets but the user can force Redshift to use smaller ones (64x64) or larger ones (256x256). We recommend that the users leave the default 128x128 setting. Please keep in mind that, when rendering with multiple GPUs, using a large bucket size can reduce performance unless the frame is of a very high resolution. This is due to the 'last bucket effect' where the frame's last bucket has been assigned to a GPU and is currently rendering while the other GPUs have finished with their buckets and waiting for that last bucket to be rendered. This effect, in essence, reduces parallelism and can waste several seconds of rendering time per frame. For this reason, we recommend using 128x128 buckets. Please refrain from using small 64x64 buckets as these can underutilize the GPU.
The order that the buckets are rendered can also be configured. There are three available options:
- Horizontal, where buckets are rendered left to right, top to bottom
- Hilbert, where the buckets are rendered using a zig-zag pattern that is designed to pick the next closest bucket to the current one
- Spiral, where rendering starts at the center of the frame and then gradually covers the outer parts
Debug Capture
If the user gets a GPU crash, they will see a message recommending that they re-rendering their frame using the 'debug capture' option enabled. This option allows Redshift to produce a lot of extra information during rendering which, when sent to the developers, can help them diagnose and fix issues.
Global Preferences
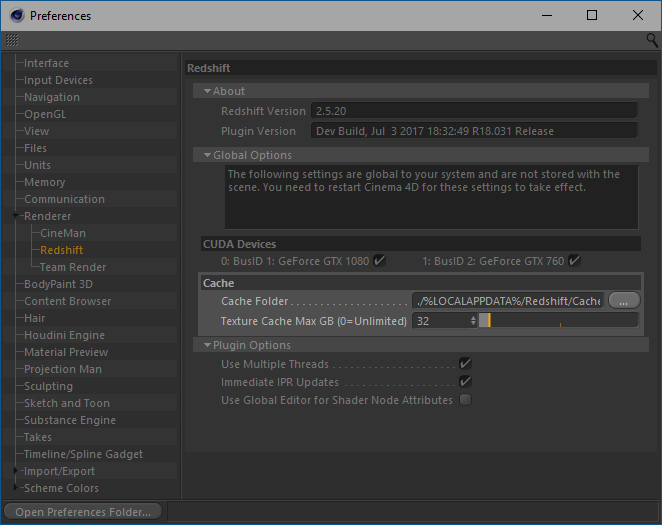
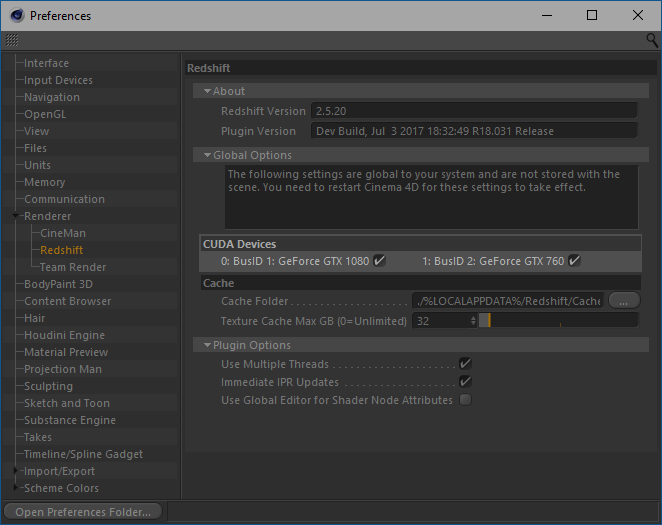
Selecting the GPU
The standard installation of Cinema 4D will come with a CPU version of Redshift, that doesn't allow to use the GPU for rendering. Only by installation of the full version of Redshift, you can also choose to render on your GPU, which will be many times faster compared to the CPU in most cases.
By default, Redshift will select the first available and compatible GPU on your system. You can configure Redshift to run on a particular GPU in the Redshift section of the C4D
Preferences window.
A GPU can operate in 'headless' mode, which means it's not connected to a monitor and Windows does not use any of its memory. If you have more than one GPU in your system, we recommend that you connect the least powerful GPU to your monitor and configure Redshift to use your unconnected ('headless') GPU. Using the most powerful GPU for Redshift in 'headless' mode has two benefits:
- Windows will not use any VRAM on the headless GPU, giving Redshift access to more VRAM without competing with other 3D applications.
- While Redshift is rendering on the headless GPU, the system will still be 100% responsive so you can do other things – even open up another 3d app and continue working!
Cache Folders
Redshift transparently converts any textures used for rendering to a proprietary tiled format for optimal rendering performance. These converted textures are cached to disk and regenerated only when the source texture changes. Because the texture cache can occupy a significant amount of disk space, Redshift allows you to customize the location of the cache folder and to set a limit on how large the texture cache can grow.
You will find these settings in the Cinema 4D Preferences in the Renderer > Redshift section.