Animation Palette
The Animation Palette contains the most-used navigation and recording tools from the Timeline itself. This bears the advantage of not having to constantly switch to the animation layout, thus speeding up workflow.
The Animation Palette consists of the following three main elements:
-
The Timeline Ruler: The Timeline Ruler is made up of two halves. You can click on the top half to view the current image. Press the Ctrl/Cmd + Shift keys to set a marker at the current location. The lower half of the Timeline Ruler displays the keys of active objects or selections. The Timeline Ruler can be scaled or moved using the hotkeys 1 and 2, respectively.
- The Powerslider: The Powerslider can be used to quickly navigate throughout the animation. The Powerslider's length can be varied by dragging the arrows at its left or right ends. This lets you navigate the preview area. Double-click the grayed-out frame numbers at either end of the Powerslider to manually define a preview range. Clicking on the Powerslider while simultaneously pressing Cmd/Ctrl + a will extend the Powerslider to the entire length of the scene (alternatively you can double-click on an empty location on the Powerslider; double-clicking again will reset it to the previous preview range length). Simultaneously pressing the Alt-key while dragging on one end of the slider will scale the slider at both ends.
- Navigation and Mode icons: These icons let you play an animation, define recording modes and much more. These functions are described in detail in the Animation menu.
Naturally the Animation Palette communicates with the Timeline, i.e., keys created or deleted here will also be created and deleted in the Timeline.
Current image as well as the beginning and end of a scene can also be set numerically (see above image).
To jump to a specific point in your animation simply click on the top half of the Timeline Ruler or drag the current frame to the desired location (during which the animation will play in the editor view). If you do not want the animation to play, press the ALT-key while dragging the frame.
Editing Keys:
- Ctrl/Cmd + click on the bottom half of the Timeline Ruler to create a key for an active object without changing its time in the animation. The type of key created depends on the settings you define at the bottom right of in the Animation Palette.
- If you press the Shift key (after first clicking on the Timeline Ruler) while dragging the current frame (Timeslider) in the top half of the Timeline Ruler, you will automatically snap to each key.
- Individual keys can be grabbed and moved with the mouse.
- Click and drag in the bottom half of the Timeline Ruler to make a selection. Keys that lie within the area over which you dragged will change color. These keys can then be moved with the selected area (press theShift key if placing Keys onto frames). The keys can also be scaled using the handles. Selected areas can be moved without moving or scaling the keys by simultaneously pressing the Shift key. Keys that lie within a selected area can be moved, deleted, copied, scaled, etc.
- The selection of keys can be restricted to those of a particular track. All you have to do is select a track. Only the keys in this track can then be selected in the Animation Palette. When using this method, deactivate the Show Inactive Keys option (right-click on Timeline Ruler or Powerslider).
- To select all Keys, press Ctrl/Cmd (Mac: Cmd)+a. Deselect all Keys by pressing Ctrl/Cmd (Mac: Cmd)+Shift+a.
- Keys that lie within the selected area can be duplicated and moved by simultaneously pressing the Ctrl-key (first click with the mouse, then press the Ctrl-key) while moving or scaling the selection.
- The selection (not the keys) can be deleted by simply clicking anywhere outside of the selection in the lower half of the Timeline Ruler.
- The selection can be moved uniformly at both ends by simultaneously pressing the ALT-key while dragging a handle.
- If your layout should lose its configuration to such a degree that no Timeline or Powerslider can be seen (and the default layouts are also missing), Drag & drop the Timeline Scroll Bar (Key Area) and Timeline Scroll Bar (Power Area) commands from the Command Manager into an empty palette to correct this.
Context Menu
Right-clicking on the Timeline Ruler or Powerslider will open a menu with the following options:
The following 7 commands should already be familiar to you from the Timeline. These can be used to modify the key interpolation for selected keyframes.
See ![]() Linear.
Linear.
See ![]() Spline.
Spline.
Key Interpolation
See ![]() Soft.
Soft.
See ![]() Ease In.
Ease In.
These functions will affect the keys that lie within a given selection. Cut will delete the keys and save them to the clipboard. These keys can then be pasted to another location or into another selection using Paste in Place. When using Paste in Place the keys will be scaled proportionally to fit the selection. Copy saves the keys to the clipboard without deleting them and Delete removes the keys. Alternately you can use the keyboard combinations Ctrl/Cmd + X, Ctrl/Cmd + C, Ctrl/Cmd + V and Backspace / Delete.
Copying keys in the Animate palette
- Select all objects (Incl. Child objects in hierarchies) and tans in the Object Manager whose keyframs should be displayed in the Animate palette.
- In the Animate palette, select all keyframes that should be copied and call up the Copy function.
- Now select the objects and tags in the Object Manager that should be copied to the keyframes and call up the Paste function. If these have the identical hierarchy (see below), these will be transferred precisely onto the selected elements. Missing Tracks will be added. If the target hierarchy does not reflect the original hierarchy, problems can occur (e.g., faulty animations can result)
What is meant with "identical hierarchy"? The hierarchical structure that you copied must be the same as the one you paste. It doesn't matter if the latter lies below different objects or contains additional objects.
Options
This option determines if the pasted keys should be pasted over existing keys (Ripple Edit deactivated) or if a range in a corresponding length should be created before the existing selected area, whereby subsequent keys will be pushed farther down the timeline.
When keys are deleted (Ripple Edit active) subsequent keys will automatically be moved to the left accordingly.
If a track is selected in the Timeline, only the keys for this track can be edited in the Animation Palette, even though keys on other tracks will still be visible. Activating this option lets you better differentiate between active and inactive keys.
Activating this option will unlink the Powerslider (bottom left half) from the Timeline Ruler (top half). Only the Timeline's preview area will be defined by the Powerslider. The animation range will remain unchanged.
Activating this option will display the time format, as defined in the program presets (e.g., frames or SMPTE), in the animation range.
The differences in functionality between the default Animation Palette and the Advanced Mode are nominal. All functions described for the default mode can be used in the Advanced Mode. The exceptions are explained below.
The Advanced Mode was implemented in order to offer those switching from other applications a familiar environment.
Differences
 The most obvious difference is the look of the Keys and selected elements.
So, what's the difference between the Advanced Mode and the default (normal) mode?
- The Timeruler is not halved horizontally, i.e., it is easier to access with the cursor.
- Selections are defined while pressing the Shift key; selections can be deselected by pressing the Shift key and clicking in an area free of selections.
- Individual Keys cannot be grabbed and manipulated interactively. A selection must first be defined.
- Double-clicking the Timeruler will play the animation, double-clicking it again will stop the animation.
(only in Advanced Mode)
Visually, no difference will be seen between Position, Scale or Rotation Keys if this option is enabled. Keys will always be displayed as vertical lines that span the entire height of the Timeruler.
Disable this option in order to get a better overview of Key types:
(only in Advanced Mode)
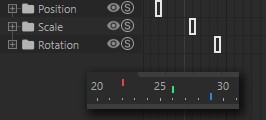
Position, Scale and Rotation Keys are arranged in different colors and at different locations vertically on the Timeslider:
- Position: Red; upper 3rd
- Scale: Green; middle 3rd
- Rotation: Blue; lower 3rd
(only in Advanced Mode)
When enabled, the Position, Scale and Rotation Keys’ X, Y and Z components will be assigned different colors and positions along the Timeslider:
- X components: Red; upper 3rd
- Y components: Green; middle 3rd
- Z components: Blue; lower 3rd
Edit
All keys within a given selection will be reversed, i.e., the animation will run in reverse.
A given selection, including keys, will be moved either to the far left or far right of the visible animation range.
A given selection, including keys, will be scaled so that the left-most key lies at the far left and the right-most key lies at the far right of the visible Timeline range.
This option sets the scene length and time to the values defined by the Powerslider.
This option does the opposite of what Trim to Work Area does. The Powerslider will take up the complete scene length. Alternately you can Ctrl/Cmd + A + click on the Powerslider.
Deletes all markers.

A sound track loaded via the Timeline's Create / Add Special Tracks / Sound command can be displayed in the Powerslider. This makes it easier to create a soundtrack synchronous to the animation.
If multiple sound tracks are being used a menu will appear from which you can select the desired track.
(only in Advanced Mode)
Enabling this option lets you set keys that do not lie entirely on a full Frame (e.g., on Frame 34.4) to the nearest full Frame (in this case to Frame 34).