Timeline Ruler

The Timeline Ruler is located at the top of the Timeline.
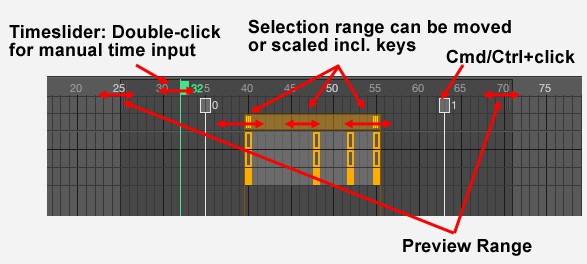
- Markers can be created via Ctrl/Cmd + click. Markers can be moved at any time using the mouse. To delete a marker, simply drag it out of the Timeline to the bottom. Clicking on a marker will make its properties visible in the Attributes Manager.
- The preview range, which can be re-sized by dragging each end. The preview range is primarily the section of the animation that is played when the Play button is pressed. The preview range can also be applied elsewhere in Cinema 4D. For example, only the preview range can be output when rendering or the animation can be made to cycle within this preview range only (main menu: Animate / Play Mode / Preview Range).
- The top half of the Timeline Ruler displays the numeric location (normally in frames, but can also be displayed in seconds or SMPTE, as defined in the Preferences’ Units menu) within the animation range and the Timeslider. The Timeslider can be moved back and forth in order to view how the objects move in the editor view. Simply clicking on a given location on the Timeline Ruler will snap the Timeslider to that location.
The Timeslider has the following special features:
- If you press the Shift key while moving the Timeslider, the animation will not play in the editor view.
- Double-clicking the Timeslider will open a small dialog box in which you can enter the exact location (frame, second, etc.) to which you want to jump.
- You can move the Timeslider interactively without touching it by pressing the j key and dragging horizontally with the mouse. This function is also referred to as "Timewarp".
The bottom half of the Timeline Ruler contains the following items:
- The Selection Range (only available in Dope Sheet mode) always includes the outer temporal limits of a key selection. This area is usually created automatically when tracks or keys are selected. Included is the entire range between the first and last key within the selection. Alternatively you can pull a selection in the bottom half of the Timeline Ruler up. The resulting Selection Range will then include all existing keys within this animation range. The Selection Range can be moved, or scaled temporally, including all keys, within the selection by grabbing the handles at the ends.