Property Transfer
![]()
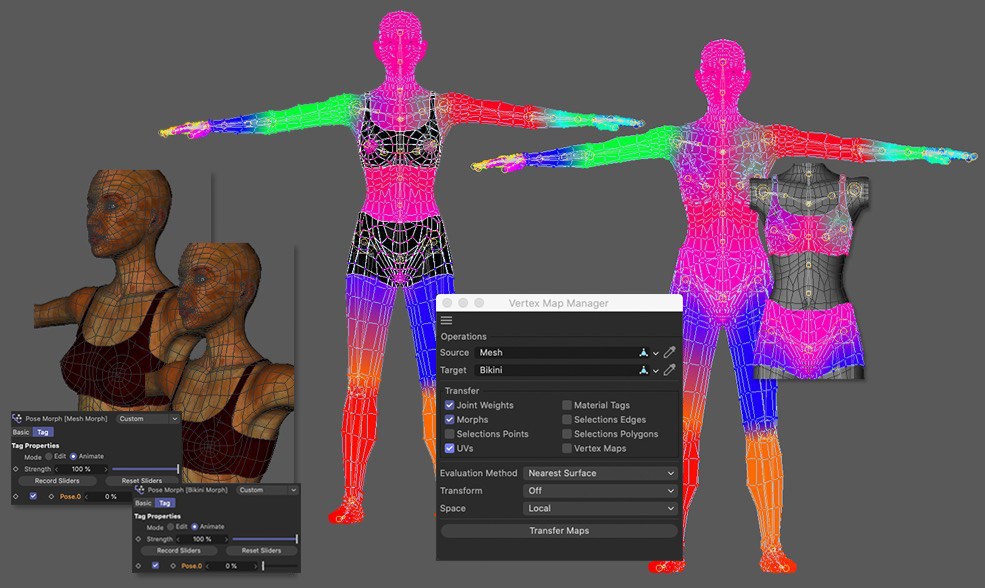
The Property Transfer Manager (formerly VAMP) is an extremely powerful tool for transferring point-based information from one object to another. The two objects do not have to be identical in terms of their number of points or structure. In addition to Vertex Maps and Vertex Colors, you can also transfer various selections, UV coordinates, Normals, the weighting of an entire rig and even the morph target of a Pose Morph Tag. Furthermore, all these operations can also be mirrored along any axis. Another important function is that the Property Transfer enables the easy mirroring of morph targets of a Pose Morph Tag. For example, if you have created the morph targets for the facial expressions of a character on the left-hand side, you can use the Property Transfer to very quickly create mirrored duplicates with the facial expressions for the right-hand side. The following illustration shows a few examples of the areas in which Property Transfer can be used:
Operations
This group includes all operations possible with the Property Transfer.
Source
This link field is intended for the object from which you want to read information. However, an object does not necessarily have to be dragged into this field. To speed up the workflow, the Property Transfer follows the following simple rules:
- If an object is dragged into the field, this object is always used as the Source object.
- If no object is dragged into the field, the active object in the Object Manager is used as the ource.
- If no object is selected in the Object Manager or if several objects are selected at the same time, the system searches for a selected tag. In this case, the object to which the tag belongs is used as the Source, although only this one tag is transferred if this type of tag is activated in the filter options described below.
- If neither a tag nor an object is selected or assigned as a source, no property transfer can take place.
Target
Drag the object to which information is to be transferred into this link field. However, something does not necessarily have to be assigned here either. If you leave this field blank, Property Transfer uses the same object as the Source and Target. For example, you can use Property Transfer to create mirrored copies of all existing Vertex Map Tags or Point Selection Tags. Even if you want to mirror all morph targets of an object, simply leave the Target field empty. If you only want to mirror a specific pose, the easiest way to do this is to use the context menu in the settings of the Pose Morph Tag in Edit Mode. Alternatively, you can select a Pose there and the Property Transfer will create a mirrored copy for this one pose only.
This allows you to quickly create a mirrored copy of just one Vertex Map Tag, for example. Simply leave both Source and Target empty, deselect all objects and select the tag. In the Property Transfer Manager, you now only need to select the mirror axis and make sure that the Vertex Maps option is activated before clicking on Transfer Maps.
Transfer
In this group you define what you want to transfer.
Joint Weights
Activate this option if you want to transfer the joint weightings of the object linked to Source.
Morphs
Activate this option if you want to transfer the pose morph target of the object linked to the Source.
Selections Points
This option allows you to transfer all Point Selection Tags from the Source object to the Target object. Depending on the option selected in the Evaluation Method, the best possible counterpart for each selected point of the Point Selection Tags is searched for in the Target object.
UVs
This option will attempt to transfer the UV processing of the Source object to the Target object in the best possible way, depending on the option selected in the Evaluation Method.
Selection Edges
This option behaves in exactly the same way as Selections Points, except that the Edge Selection Tags are transferred here.
Selections Polygons
This option behaves in exactly the same way as Selections Points, except that the Polygon Selection Tags are transferred here.
Vertex Colors
This option can be used to transfer vertex colors from the Source object to the Target object. All Vertex Color Tags of the Source are taken into account.
Material Tags
With this option, all Material Tags can also be transferred to the Target object.
Normals
This option transfers the vertex normals of a Normal Tag from a Source object to a Target object. The prerequisite is therefore always that the Source object has a Normal Tag. If this is not the case, a normally always present ![]() Phong tag can also generate a Normal Tag.
Phong tag can also generate a Normal Tag.
Note that the Normals Projection calculation method produces the best results here.
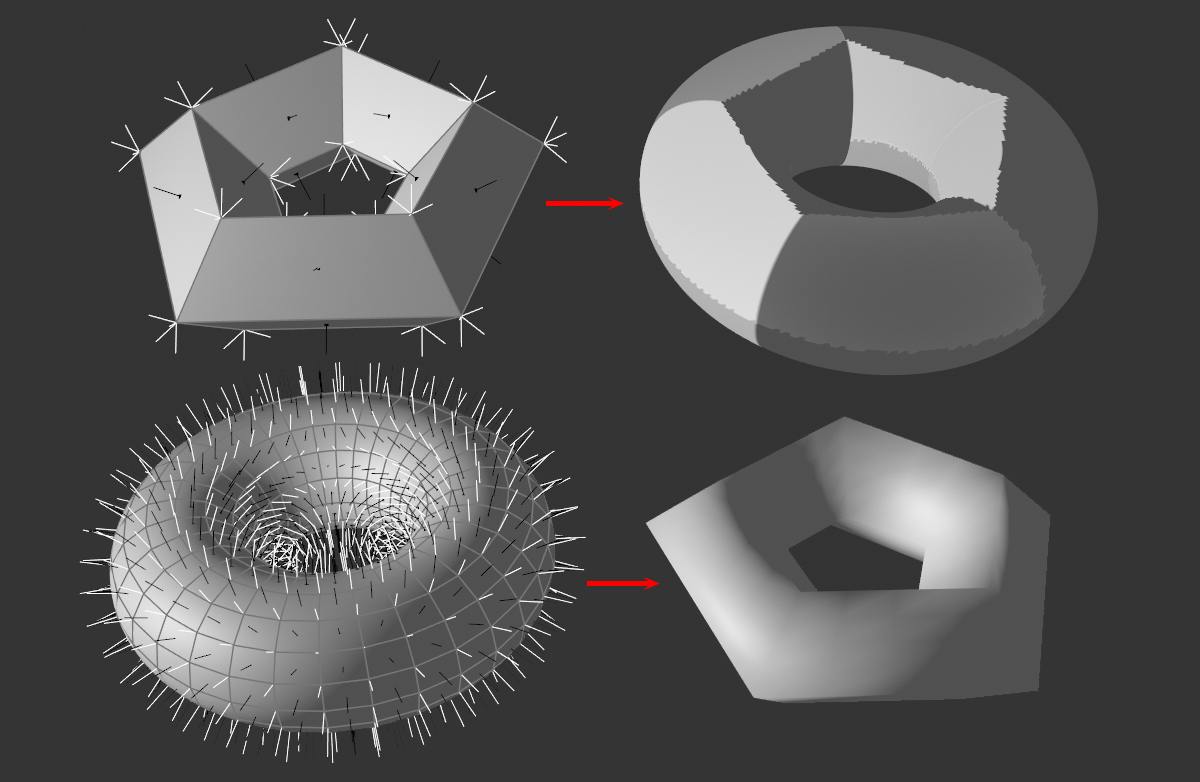
Here you can see above how a pentagonal, unsmoothed ring - i.e. differently oriented vertex normals at the corners - transfers its vertex normals to a high-resolution ring.
Below, a smoothed ring - i.e. identically oriented vertex normals at the corners - transfers its vertex normals to a low-resolution pentagonal ring.
Vertex Maps
This option behaves in exactly the same way as Selections Points, except that all Vertex Map Tags are transferred here. Of course, the weighs of the vertex map are also transferred.
Here you can select which method you want to use to assign the points of both objects to each other:
-
Nearest Surface: This method takes a point of the Source object and searches for the point on the surface of the Target object that is closest to this point. This can therefore also be in the middle of a polygon. The points of this polygon are then used for the point weightings. This method produces very good results for objects that have a similar shape in terms of surface, but whose points are placed in completely different locations, even if both objects have very different quantities of points.
-
Nearest Point: The nearest point to the Target object is searched for here in order to transfer the weightings to it.
-
Normals Projection: This method is very similar to Nearest Surface, except that a ray is emitted from each point of the Source object along its normal to see where it meets the surface of the Target object. Depending on the geometry, this does not necessarily have to be the next point on the surface.
-
Source Axis Projection:This method projects a ray for each point of the Target object that intersects this point and the axis of the Source object. If the beam hits a point on the Source object in any direction, this point is used for the transfer.
-
Target Axis Projection: In principle, this method works in exactly the same way as Source Axis Projection, except that in this case the beam is projected through the axis of the Target object.
-
Nearest Polygon (With Data Breaks): This method is specially designed for transferring UV coordinates organized in UV islands. With older Cinema 4D versions, there were often problems at the edges of the UV islands, as these were always connected to the rest of the UV mesh, which made the result unusable without much reworking. This now works much better with the Nearest Polygon (With Data Breaks) option.
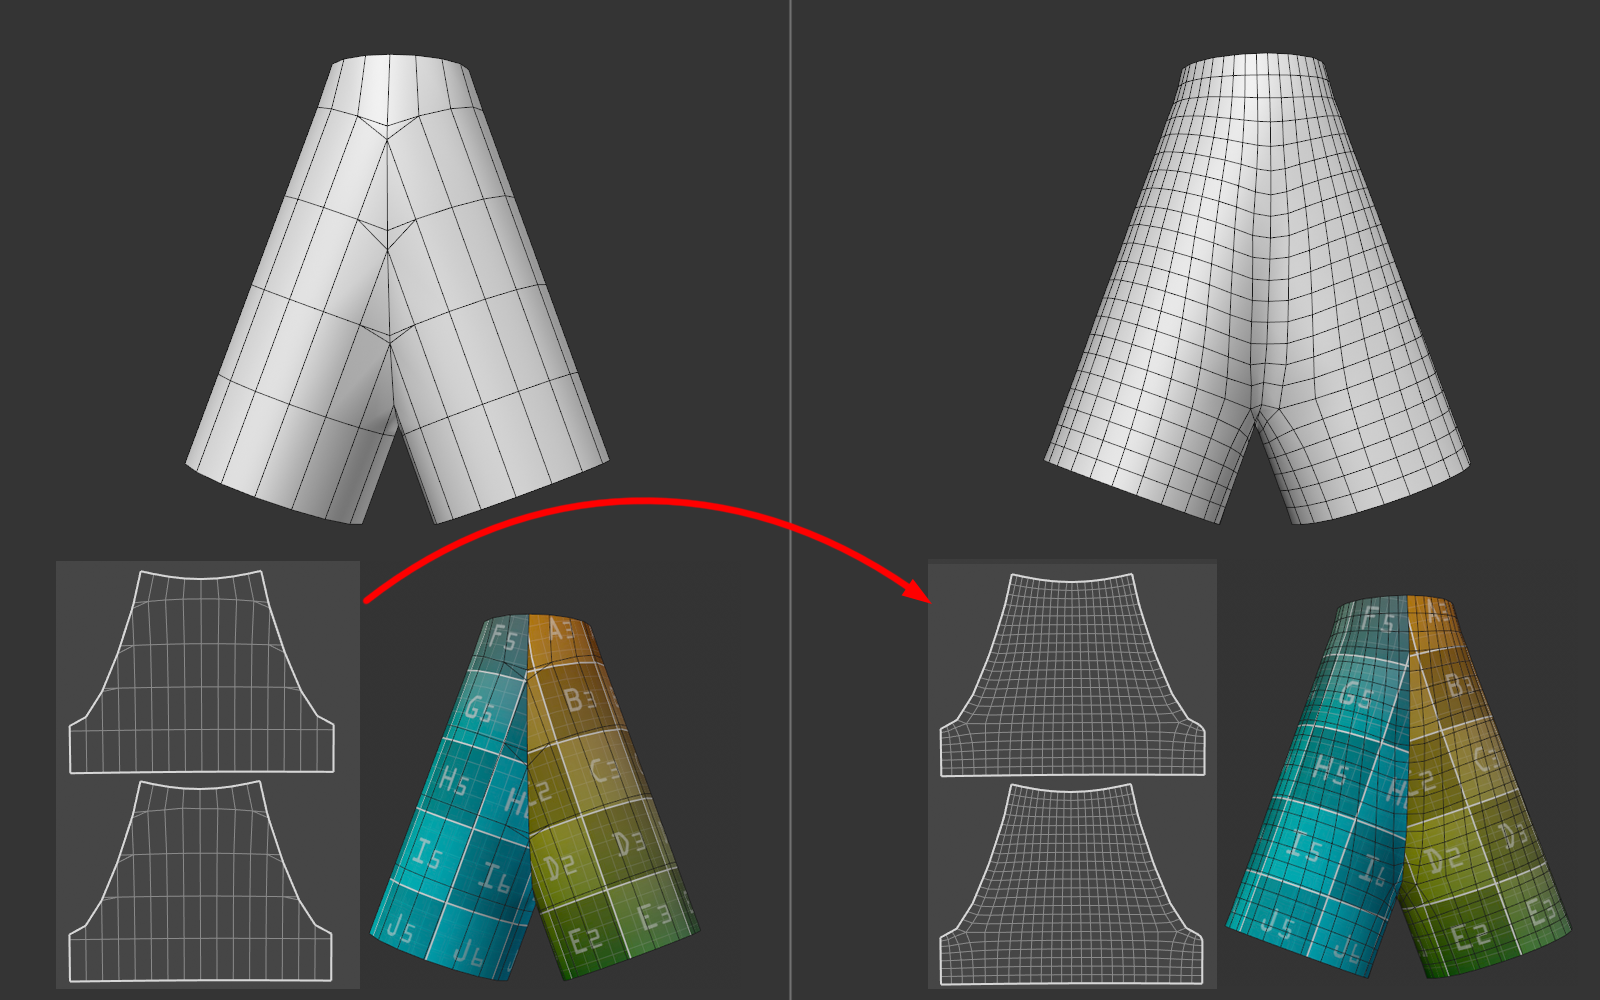
In this example, the UV mesh on the left is transferred to the object on the right with a different topology. As you can see, the texturing is almost identical.
You should avoid as many small UV islands as possible in the Source objects, as this can lead to problems.
These options make it possible to mirror the data to be transferred during transmission:
-
Off: If this option is selected, all information is transmitted without being mirrored.
-
Flip X: With this option, all information is mirrored along the X axis, i.e. on the Y-Z plane.
-
Flip Y: With this option, all information is mirrored along the Y axis, i.e. on the X-Z plane.
-
Flip Z: With this option, all information is mirrored along the Z axis, i.e. on the X-Y plane.
Space determines whether your information is transferred using the world axis or the object axes:
-
Local: Select this option to use the object axes for calculating the transfer. If this option is selected, the source and target objects do not have to be in the same place, but can be positioned, scaled and rotated anywhere in your scene. However, the axes of both objects should have a similar relationship to the mesh.
-
Global: In this case, the world axis is used for the transmission. The objects in your scene should therefore be positioned as exactly on top of each other as possible. The relationship between their object axes is irrelevant for this method.
Transfer Maps
Use this button to start the transfer of information.