Team Render Machines
Team Render Machines
![]()
Selecting this command will open a window in which a list of all computers found on the local network will be displayed (those that have the Enable Team Render option enabled in their Preferences menu). In this window you can define which computer(s) should be used simultaneously for rendering.
Operation
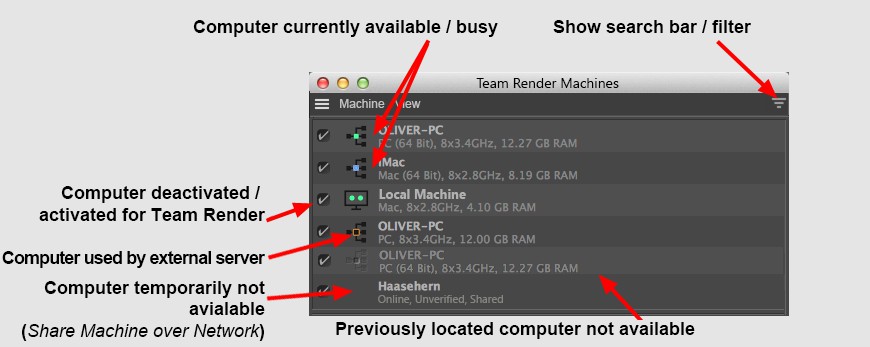
In the left column you will find a series of options that can be enabled. Here you can define which computer(s) in the list should be used by Team Render. In the right column you will find all computers, which have currently or previously been located on the network, with their corresponding names and information pertaining to these computers (see Team Render Troubleshooting).
Individual selections can be made in the list and commands can be selected from the Machine menu that can be applied to the selection(s). You can also right-click on a selection to display a context menu from which you can select a command.
- a new IP address can be entered for computers in offline mode
- a Security Token can be entered for computers that have not been verified.
The following icons can be found at the left of the computer names:

- Render Clients: External (network) computers
- Local Machine: The current computer. This computer can also be used as a render client any time (right-clicking on it will open a context menu with which you can open the Preferences menu's Team Render settings).
These icons are given the following dot colors:
- Green: Ready to render using Team Render
- Yellow full: Currently rendering using Team Render (will not be used for the next render job), current computer = server; empty: currently being used by external server.
- Blue: Blue will be displayed for the instances being rendered by the active computer.
- Gray: Not available for Team Render
- Red dot: An error has occurred. The render client (see console for details) cannot connect to the current computer.
To the right of the icons you will find the name of computers that have been located on the network, including information pertaining to each computer (hardware status).
On the computers taking part in rendering, a render client status symbol will be displayed at the bottom left of the status bar.
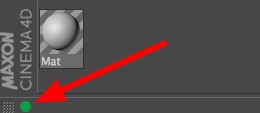
The colored dots symbolize the following:
- Green: Team Render is enabled. You can render both on your own computer as well as on network computers.
- Yellow full: The current computer is being used for Team Render by a network computer (or by itself), current computer = server; empty: currently being used by external server.. Positioning the cursor over the yellow dot will display the computer (server) name.
- Gray: The current computer is not available for Team Render from external computers but can itself use external computers for Team Render. This dot is also gray if an internal Team Render error exists. Positioning the cursor over the gray dot will display the error message.
- no dot: Team Render is disabled in the Preferences menu (Renderer/Team Render tab).
Menu
Machine
This command (or double-clicking in an empty area of the Team Render Machines window) can be used to connect computers as render clients in a local network via IP addresses and ports, without the use of Bonjour or SSDP Service. This method can be used if computers are not displayed in the Team Render Machines window despite Bonjour or SSDP Service being installed.
Calling up this command will open a dialog window in which you can enter the IP address and port number of the respective render client, separated by a colon (e.g., 192.168.1.2:5400, or you can use a host name, e.g., "Render-pc-example-en:5400)". After clicking on OK, another dialog window will open in which you can enter the Security Token (defined in the Team Render preferences) for the render client.
Note that IP addresses are often assigned dynamically and may therefore change!
This is how you can ascertain an IP address:
- Windows: Open the Command Prompt (in Win 7: Start/Programs/Accessories) and enter "ipconfig". In the list that appears you will find the IP address under "IPv4 Address".
- Mac: The IP address is displayed in the System Settings’ Network menu.
- Computers that are only used as Render Clients will have their individual IP addresses and ports displayed in the console window.
The port can be defined in the respective render clients’ Preferences menu in the Renderer/Team Render menu and has the port number 5401 by default. The port number for regular versions of Cinema 4D is 5400.
Let's assume you have 17 verified render clients. 2 months later your computer crashes completely and the operating system hast to be re-installed. Since you've forgotten all Security Tokens in the meantime, a lot of effort will be required to reconnect to all 17 render clients.
This won't be the case if you used Save Machines … to save the list of computers, including Security Tokens, and use Load Machines … to load this information. As long as the Security Tokens weren't modified you can start rendering right away.
You can also create a render list manually so you can quickly add multiple computers to the Team Render Machines list. To do so, create a text file that contains a list of computers, like in the following example:
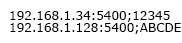
The list (in contrast to saving via the corresponding command; this list also contains a render client ID, which means that the machine doesn't have to be online when the list is read out) is made up of IP addresses only (host names can also be used instead), followed by a semi-colon and the respective computer's Security Token. This list can be loaded using the Load Machines … command. Note that it may take a few moments for the list to load.
This command checks the render client computers using a Ping function. The following window will open:

You can see whether or not the render client responds. If not, the Restart Client command can be used.
This command lets you display the connection speed (upload/download) with the respective render client. This can be useful for users who connect via wifi (which is not recommended) and wonder why Team Render isn't working correctly. Team Render often has to transfer enormous amounts of data back and forth.
Computers that will be used as render clients must first be verified, i.e., the respective computer's operator must give an ,OK’ by making the computer's Security Token known (located in the Preferences menu's Renderer/Team Render tab). This Security Token must then be entered in the dialog window that opens when this command is selected.
Already verified computers can be unverified. This means that the Security Token must be re-entered if you want to use this client for Team Render.
For example, if you are working on another person's computer and you want to temporarily use it as a render client for yourself only, this computer can be unverified after rendering in order to prevent it from being used.
Selected or all Instances of Cinema 4D that were installed exclusively as render clients (which cannot be used for Project work due to their lack of an interface) can be restarted using these commands.
Opens the Team Render preferences where you can, for example, define ports and security tokens.
Removes Render Clients from the list. They will also be unverified.
View
Use these options to define the icon size. Selecting Small Icons will only display a dot.
Use this filter to hide or display render clients using the available icons:
- Eye icon: Hides/displays the corresponding category
- Magnifying glass icon: Results can be fine-tuned further in conjunction with the search bar
As with the Search Bar, this is also a display filter only (verified, hidden render clients will still render!).
Show or hide corresponding elements in the list.
If this option is disabled, only the computer name will be displayed (this name can be defined freely in the Preferences menu). If this option is enabled, the complete host name (if Bonjour is used) and the IP address, including the port will be displayed.
Enabling this option will assign the same color to the computer name in the list as the Buckets in the Picture Viewer. This lets you see which render client is rendering which Bucket.