Edit Menu
This function removes the active materials and copies them to the clipboard. These can be retrieved from the clipboard using the Paste function and inserted into the Material Manager of another scene, for example.
This function copies the active materials to the clipboard. From there, the copy can be recalled as often as required using the Paste function and inserted at the beginning of the material list in the Material Manager.
This function inserts the materials stored in the clipboard at the beginning of the material list. To distinguish the materials from the original, they are numbered consecutively at the end of the name(Name.1, Name.2, etc.).
This function deletes the active materials. Alternatively, you can also use the Delete or Backspace button. The same function is also available as an icon directly above the header area of the manager.
This function deletes all materials that are not assigned to any object or texture key in the timeline.
This function is very helpful if you have added an extensive material library to a scene, for example, of which only a few materials are actually used in the scene.
This function only works with classic materials and deletes all materials that already exist in identical form (same parameters). Only the material furthest to the left/top of the identical materials in the Material Manager remains. All links to these identical materials in Material tags are automatically corrected and switched to the remaining material copy.
Materials and layer
 The layers in Layer Manager and Material Manager correspond with each other.
The layer concept of Cinema 4D (see a. The Layer Manager) naturally also covers the materials. If you assign a level to a material, e.g., via its Basic tab, this level name is also displayed as a tab in the Material Manager. The following illustration shows the assignment and configuration of a level directly on the material. You can then either assign an existing layer or create a new layer.
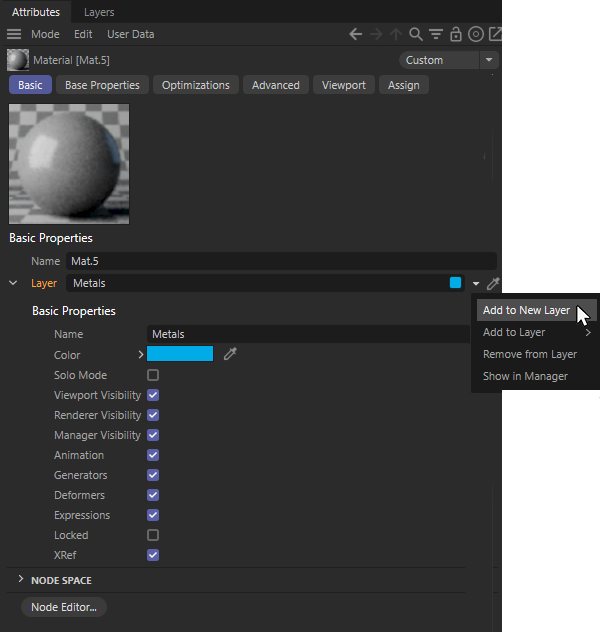 Management of the layer property on a selected material
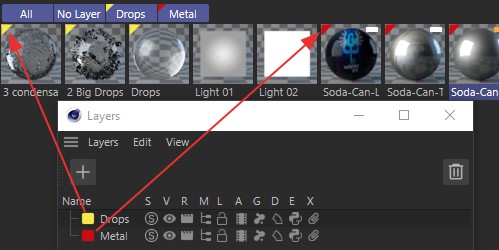
However, a new layer can also be created directly in the Material Manager using the Add to new layer command, whereby all currently selected materials are assigned to this layer. The layer color is displayed as a small triangle in the material icon at the top left.
In this way, materials can be organized very clearly. Click on a tab to display the assigned materials. Several tabs can be selected at the same time.
You can move selected materials to other layers using drag & drop. Simply drag the materials in the Material Manager to another Material tab.
There are also the All and No level tabs. The All tab displays all materials contained in the scene, while the No layers tab contains all materials that are not assigned to a layer. The material layers are renamed by double-clicking on the tab.
When copying materials into new scenes, the assigned levels are also copied so that the material division is retained.
This is used to add selected materials to one of the layers to be selected.
This command removes the selected materials from any assigned layers.
This can be used to open a Material Editor in which the currently selected material can be edited. With classic materials, this gives access to all the properties of the material. With Node materials, the Material Editor works like a separate Attribute Manager. If the Node material uses several Nodes, editing via the Node Editor is clearer (see the following function).
Use this to load the selected Node material into the Node Editor. Double-clicking on the Node material also opens the Node Editor by default. Otherwise, you will also find a Node Editor... button to open the Node Editor in the Basic settings of a selected Node material in the Attribute Manager.