Key properties
Please note that you can also define most of the settings here in the project settings under Animation as a default for new keys to be created.
 The three interpolation types, which can also be displayed visually in each key in Dope Sheet mode, provided the keys have been scaled large enough.
Use this selection menu to define how the interpolation of the current key between this key and the next key should be calculated. You select from the following:
- Spline: The most common type when it comes to creating realistic acceleration and deceleration animations. Only this type has key tangents with which you can define the curves individually for each key.
- Linear: The value changes at a constant speed.
- Stage: There is no interpolation: The value initially remains unchanged after the key, and it jumps to the new key value when the next key is reached.
Such animations should be used for on/off animations where abrupt value changes are required. For example, the intensity of a light source can be switched from 0% to 100%.
If you mute a key, this key is treated as if it did not exist and the F-curve no longer runs through it. However, it can still be selected and can then be reactivated here.
For example, a value change driven by other mechanisms, such as an expression (Vibrate tag), can take over during this period.
The key is positioned at this animation time.
This value is the size that is stored in the key. This can be a position, a light brightness, an activated or deactivated state of an option or one of the thousands of other parameters that can be animated.
If you want to fix the key in time so that it cannot be moved horizontally in either key or F-curve mode, activate this option.
Locked keys (with regard to time) are grayed out in both Key and F-curve mode.
Activate this option if you want to fix the key value so that it can no longer be changed interactively by mistake.
Locked keys (in terms of key value) are grayed out in Dope Sheet mode.
 The keys marked in red have been turned into breakdown keys. If the orange-colored normal key is now moved, the adjacent breakdown keys are also moved relative to it.
Breakdown keys are special keys that represent a special character pose or another important animation state, for example.
These are shifted proportionally in time when neighboring keys are moved. This lets you fine-tune animation sections that are limited in time. If you want the key values to remain the same, press the Shift key while moving.
Breakdown keys are otherwise no different from normal keys and have the same properties that you can change in the Attribute Manager.
This option lets you give keys a (single) different color, for example to visually mark particularly important keys/poses; this coloring is displayed in all relevant places (e.g., timeline, animation palette, etc.). Apart from the color, this property does not change the animation.
Tangent presets each represent a combination of key properties (click on the small arrow to the left of the Key preset to displaythem) that work well together. You can choose from the following:
- Custom: Is displayed if you use an individual combination.
- Auto Clamped: the auto-tangents behave exactly as usual from previous Cinema 4D versions (<R17), i.e. the auto-tangents and clamped options are activated.
- Auto Weighted: You should use this mode if you do not want to deal with tangents at all. Most things happen automatically here. You will also find this mode in other 3D programs (usually as standard).
- Auto No Overshoot: like Auto-Key: Classic, but with optimized, stepless overshoot prevention.
- Fixed Weighted: Another mode characterized by an activated fixed angle.
Unfortunately, these presets cannot be strictly assigned to an animation task (e.g., character animation or technical animations). There are simply different ways in which auto tangents behave. You can only find out which of the presets to use or whether you prefer to rely on an individual combination by trial and error. This depends primarily on your own workflow.
This preset, only for the Type Spline automatically defines the tangent length and angle in such a way that interpolation is as smooth as possible. The tangents of the first and last key are executed horizontally.
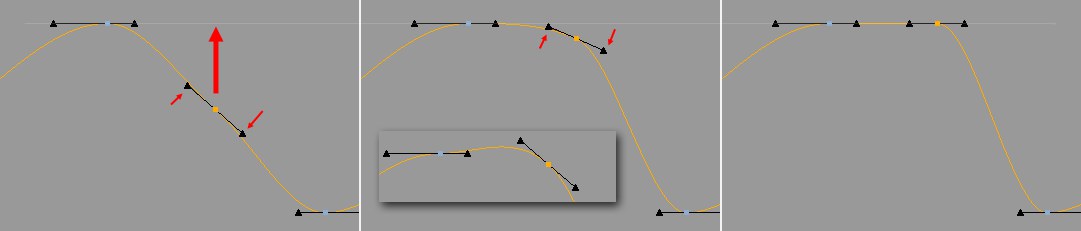
 Overshoot of the animation between keys of the same value and at a minimum/maximum can be prevented by truncating. Above, initial position; below, after activation of Clamp.
With this special option, you can prevent overshoots during soft interpolation (Auto Tangents) between keys with the same values. Normally, such an overshoot is not critical, but in some cases it is not desirable. Imagine an animated foot that should not sink into the floor when it touches it.
Clamp now replaces the soft interpolation between 2 keys (this option must be activated for both keys) with the same values with a linear one. If the value of one of the two keys is changed, Clamp has no effect and interpolation is carried out normally.
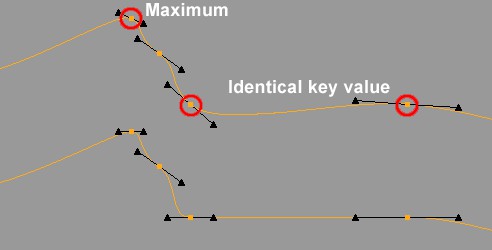
In addition, local maxima and minima (keys whose two key neighbors on the left and right are smaller and larger respectively) as well as the first and last track key are provided with horizontal tangents.
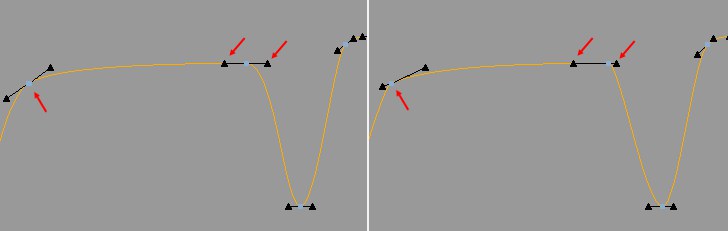
 The middle key is moved to the left. Center, Angle Automatic; right, Fixed (here you can also see the effect of Weighted tangent).
You have a choice of 2 ways to define the tangents automatically:
- Automatic: When moving a key (or its neighboring keys), the tangent gradient is variable; it changes the closer you get to a neighboring key in time. This results in smoother curves overall.
- Fixed: The tangent slope remains constant within the range of two neighboring keys (unless they change or options such as Clamp specify otherwise). You can move the key with a constant tangent gradient. This mode works best together with Weighted Tangent.
 In the center below, the overshoot effect is also shown when only the Clamp option is activated.
This option is very similar to Clamp, with the difference that the "overshoot prevention" does not start abruptly when the key value leaves the value range specified by the neighboring keys (whereby an overshoot occurs shortly before this), but instead sets the tangent increasingly horizontally as the limits are approached. This means that there is definitely no overshoot.
Note how the tangents in the image above approach the horizontal as the key value approaches that of the neighboring key value.
 Left Weighted Tangent deactivated, right activated.
The following applies to the activated option: weighted tangents change their tangent length if the Auto Tangent option is activated at the same time depending on the distance to the neighboring key. The closer the neighboring key, the shorter the corresponding half of the tangent length (while the other half is lengthened at the same time). Depending on what is defined for the Step, this happens slightly differently, but we don't need to worry about this in detail. However, the step remains the same in any case when the option is activated/deactivated.
The ratio between the short and long tangent can only be freely determined manually by breaking the tangent.
The tangent halves with different lengths automatically result in slightly more even F-curves.
If the Auto Tangent option is switched off, the ratio of left to right tangent remains constant when the key is moved. If you pull on one (unbroken) tangent, the length of the other changes according to the previous length ratio.
If the option is disabled, the (unbroken) tangent length halves are set to the same length again.
When the option is activated, a one-off weighting is carried out as described under Weighted Tangents. The time (=X) component of the tangent is then fixed. The tangent handles can then only be moved vertically, so the tangent itself can only be rotated. The slope remains constant when the key is moved. Incidentally, this option is similar to the auto-tangent behavior in other software.
Here, the tangent cursor coordinates are displayed starting from the key itself. In most cases, it will not be necessary to change anything here manually, as it is much easier to edit the tangents interactively in F-curve mode. Here is a brief reminder of which keys (Shift also works in combination with the other two) you can use to influence the tangents when editing:
- Shift: Tangents are broken, left and right tangents can be edited independently of each other.
- Ctrl/Cmd: Only the tangent length can be changed.
- Old: Only the tangent angle can be changed.
The effect of these keys can be restricted by opposing options (e.g., with the Lock tangent length option activated, even holding down the Ctrl/Cmd key will not change anything).
You can use this to fix the tangent stop. This keeps the animation speed constant near the key.
The tangent handles are provided with a colored edge as a marker. Tangents can then only be changed in length.
With interactive tangent plucking, the Ctrl/Cmd key can be pressed to temporarily keep the angle constant while editing.
If Lock Tangent Lengths is also activated, the key tangents are also hidden.
Activating this option fixes the tangent length. The tangent can then only be changed in its angle.
With interactive tangent plucking, the Alt key can be pressed to temporarily keep the length constant while editing.
If Lock Tangent Angles is also activated, the key tangents are also hidden.
If this option is activated, left and right tangents can be edited independently of each other. The tangent starters are then marked with disks instead of triangles.
Use broken tangents to create jerky changes in the animation. Imagine, for example, an object hitting a wall.
With interactive tangent pulling, the Shift key can be pressed to break tangents while editing.
This lets you keep the angle between the left and right tangent constant. This option can only be activated if the tangent is broken (angle between the two is not equal to 180°).