Constraint
Constraints enable you to limit how far an object can move during the animation relative to another object or objects. There are many different types of constraint available that allow you to limit an object's movement, all of which you'll find in this tag.
Much of what the tag can do is also possible using XPresso. The advantage of the tag is that its constraints execute faster than their XPresso equivalents. The tag is also faster to set up and easier to use in many cases compared with using XPresso. Last but not least, a few of the tag's constraints are simply not possible to achieve using XPresso.
You can activate multiple constraints in the tag and define several targets for each constraint. This means that usually one tag is all you need to constrain the object; unless, that is, you want to set the constraints to different priorities. The tag's constraints are evaluated in the following order:
-
Parent
-
Transformation
-
Mirror
-
Clamp
-
Spring
-
Aim
- Up Vector
If the constraint has more than one target, the targets are evaluated from top to bottom.
Not only is the tag useful for character animation, it is also generally useful for anything that moves in the scene. Even still scenes can benefit from the use of constraints. For example, you can use constraints to arrange objects on top of an uneven surface.
1. Example
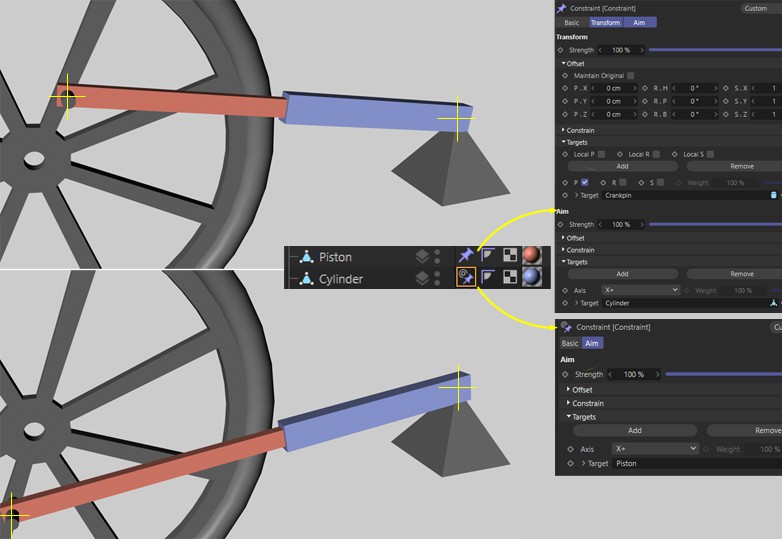
A flywheel attached to a pistons: Normally you would animate the flywheel to rotate and the pistons and cylinder would have to move accordingly. In doing so, the following is important: The pistons and cylinder should each have the correct rotational axis (Axis tool). Pistons and cylinder will each be given a Constraint with the following settings.
 The crankshaft moves the piston, which in turn is connected to the cylinder.
The piston is assigned a Constraint tag with two constraints:
- A Transformation constraint that constrains the piston to the crankshaft
- A Target Constraint that constrains the piston's angle, which should be aligned directly to the cylinder's point of rotation.
The cylinder now requires only one additional Constraint tag with a Target Constraint at the piston's (or crankshaft's) point of rotation. Don't forget that the Constraint will be applied in the order in which they are in the Object Manager. If, for example, the cylinder in the example above were to be moved above the piston in the Object Manager, the result would not be correct (unless you want to modify the priority of the Expressions directly.
The limitation's offset values can be of great help if you have parametric objects whose origin cannot easily be moved!
Constraint Commands
To make working with the Constraint tag easier we have added number of commands that you can use to easily set up the desired tag in connection with the selected object. The order in which elements are selected (not the hierarchy of the selected objects) is important:
- The object selected first receives the Constraint tag
- All subsequently selected objects will be used as target objects
It's a good idea to first deselect everything, select the object to be "constrained", then select target (Ctrl+click) before executing any commands.
As soon as a Constraint tag has been assigned - and is selected - other individual objects can be selected and added to the tag by Shift+(re)selecting the Constraint command (instead of creating a new tag).
The object will orient itself towards the target object.
The object can only be moved along the corresponding axis of the target object.
The object will be confined to its current distance from the target object's origin.
The object's movement will mirror that of the target object.
The object maintains a constant distance from the target object.
The object behaves as if it were a Child object of the target object and will move in accordance with the target object's movement.
The object will only move within the target object's XY plane.
The object will be confined to the nearest geometry object point of the target object.
The object will be confined at the target object's origin.
The object will be confined to the target object's origin and will be scaled and rotated along with the target object.
The object will exclusively assume the target object's rotation.
The object will exclusively assume the target object's size ("Coord." tab in the Attribute Manager: S.X, S.Y, S.Z).
The object will be confined to the Spline target object.
The object will follow the target object's spring movement.
The object will be confined to the target object's surface geometry.
The target object will be used an up vector.
The object movement will be restricted to the volume of a polygonal Target object or the inner area of a flat Target Spline.
