Tag Properties
Here you can switch back-and-forth between the Edit mode and the Animate mode. You will see different settings appear depending on which mode you choose. In the following text, the settings for Edit mode are listed first.
In this mode, you have all the settings you need to create and model the morph targets. Here you can also control exactly how each target should behave during the animation. All morph types share the same Edit and Animate interface, but some options will only be relevant for certain modes (for example, Correctional mixing mode does not apply to UV morphs since this mixing mode is intended for editing deformed geometry only and UVs can't be affected by a Deformer).
Here you will find a list of all the morph targets stored in the tag. When you add a new Pose Morph tag to an object, you will see two entries in the list. The first is the Base Pose, which represents the initial state of the object prior to morphing. The second entry is your first morph target. Initially, it looks exactly the same as the base morph. To edit the morph target, simply select it and any changes that you now make to the points, position, scale, UVs and so on … (depending on what is activated in the Basic tab) of the object will be stored in this morph target.
You can check how any morph target looks by selecting it (provided its Strength is set to 100%). You can rename targets by double-clicking their names. Once you have started to rename you can move up or down the list of names quickly to rename other items using the up and Down cursor keys. You can re-arrange targets via Drag & drop, except the Base Pose, which is always at the top of the list. Note that you can now select multiple morph targets.
If you already have morph target objects that were created as copies of the geometry and want to use them in the tag, simply Drag & drop the copies into this list. You will be asked if the targets should be imported as absolute targets. If you choose No, a new target will be created in the list and you no longer need the geometry target object. A target icon will be displayed. If you choose Yes, the object target will be linked in the tag. A new target will appear in the list but it will have a small a icon. If you select the target in the list, you will see that it has a link to your geometry target in the Target box. This means the object target needs to be present in the scene in order to still be referenced.
In the case of hierarchies, just drag the top parent into the Poses list, all following objects will then be taken into consideration automatically. For an object with a tag (UV, weights or Vertex Map), just drag the object containing the tag into the Poses list.
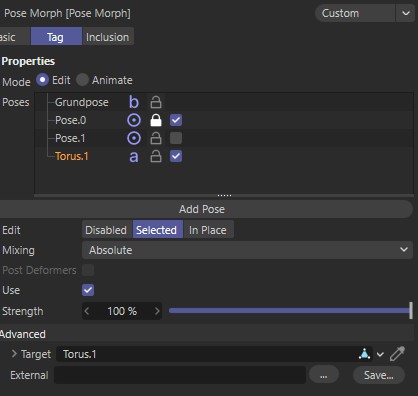
The Poses list now also offers some new icons. The lock icon lets you to lock the selected morph target to prevent further editing. The check box allows you to deactivate the morph quickly. This option will also appear in the Animate mode, much like the old Posemixer options.
Also useful is the context menu available in the list, where you will find the following options:
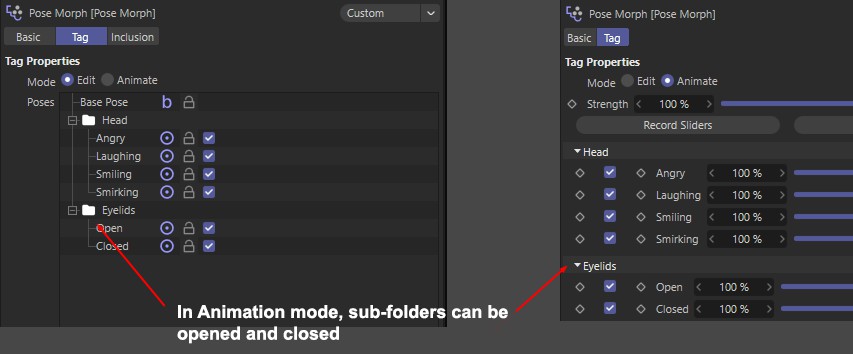
When right-clicking over an empty space of the Poses list, you can create folders which can be used to organize morph targets. Simply select your morphs (remember, you can make multiple selections now) and drag them onto their respective folders.
Morphs organized in folders in the Edit mode translate to foldable bars when you switch to the Animation mode. This makes it easy to keep your morphs organized and quickly filter what you need to display in your morphs interface, while animating.
If you have multiple morph targets selected, these will all be merged (with a Strength value of 100%) within one
morph target.
Mirrors the morph target along its X axis. To create a mirrored copy of a morph target, first copy and paste it in the Poses list, then apply the Flip X command. Note that when flipping PSR values, it is recommended to set your morph target to Absolute first, then use the flip command and revert to Relative afterward.
Mirrors the morph target along its Y axis. To create a mirrored copy of a morph target, first copy and paste it in the Poses list, then apply the Flip Y command. Note that when flipping PSR values, it is recommended to set your morph target to Absolute first, then use the flip command and revert to Relative afterward.
Mirrors the morph target along its Z axis. To create a mirrored copy of a morph target, first copy and paste it in the Poses list, then apply the Flip Z command. Note that when flipping PSR values, it is recommended to set your morph target to Absolute first, then use the flip command and revert to Relative afterward.
Sets the selected points of a given morph target to the corresponding base pose.
Creates a new object in the Object Manager (taking the Strength parameter into consideration) for the currently selected morph target. This is useful for creating geometry morph targets for use in other software. In case of point-based deformers and the Hair object, copies of these type of objects will be made.
Since multiple selections can be made in the Poses list, these commands can be used to easily select or deselect all items.
Will copy the selected morph targets (multiple selections possible).
Will paste, or duplicate, the previously copied morph targets into the list - if multiple targets were copied previously, then all these targets will be duplicated at once. Holding the Ctrl/Cmd key while pressing the Add Pose button will automatically create a duplicate of the selected morph target. If more than one morph target is selected, only the top most target will be duplicated.
Will overwrite the selected morph target with the previously copied one. You can replace several targets at once, if you previously copied multiple morph targets.
Freeze the current morph target state and protects it from further editing.
Locks all morph targets
Unlocks the selected morph target, so you can edit it once again.
Unlocks all morph targets, regardless of what is currently selected in the Poses list.
Enables one or all morph targets (has the same function as the checking the check box in the list).
Disables one or all morph targets (has the same function as unchecking the check box in the list).
Removes the active morph target.
Removes all morph targets.
Adds a new morph target to the bottom of the list.
Disables morph editing for all targets.
Allows you to edit the selected morph target.
Allows you to mix several morph targets to see their cumulative impact on the object. While in this mode, new morphs will be accumulated dynamically, while you edit them.
To create a new morph target based on these accumulated morphs, hold the Shift key while pressing the Add Pose button to create a new morph target that will take record the blended result of all the active morph targets. Note that each morph strength parameter can be adjusted for a more refined mix. You can also use the check boxes to quickly include or exclude morph targets from the accumulated effect.
Here you can choose how your morph target blends with other morph targets. The following options are available:
If this option is selected, the point positions are stored as absolute (i.e. as coordinates based on the object's origin). When you blend in an absolute morph target, the object will take the shape the morph target had when set to Absolute, even if you have changed the base morph since then.
Here, the changes are stored relative to the base morph. If the base morph is changed, the shape of the morph adapts to it. This is the default mode because it requires little memory and is very flexible because it can adapt to changes to the base morph.
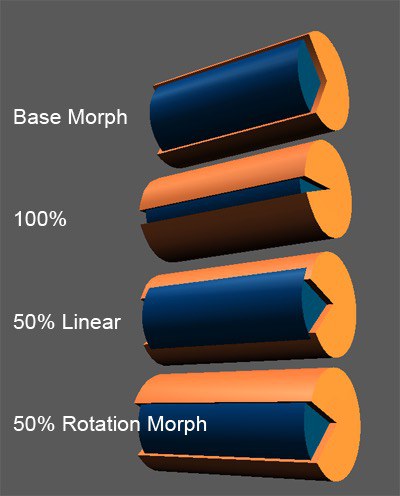
This is also a type of relative morph target. However, unlike the other two types of target, the points no longer move in a straight line as the morph blends in from 0% to 100%. Instead, the points move along a circular path defined by the Axis settings. The next example shows how you can use a rotational morph target to prevent an eyelid from intersecting the eye as it closes.
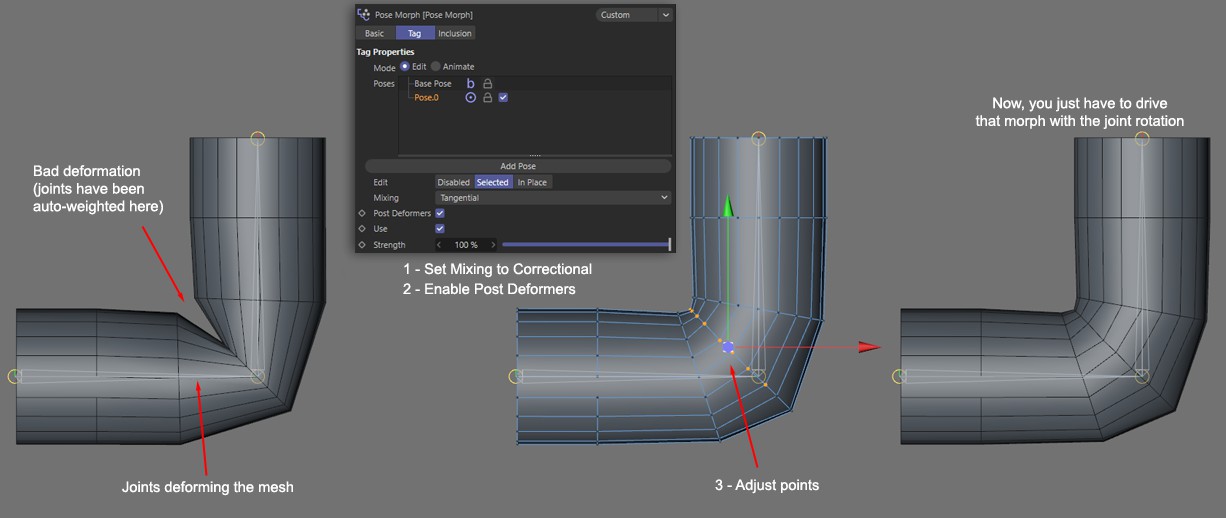
This new mode allows you to edit a morph target for an object that is affected by a deformer. This is used, for example, to create a morph that will correct the shape of a mesh that is being deformed by joints or other Deformers. To work in this mode, simply add a new morph target, switch to Tangential and activate the Post Deformer option (so it can calculate the points positions after the deformation). That's it, now you can edit your pose, and even change the state of the deformation dynamically (keep in mind that in the case of tangential morphs, you will often want to link their strength parameter to the object driving the deformation, such as the rotation of a joint, for example).
This sort of correctional morphs can be pretty useful on areas of a character that are very hard to weight properly, such as the shoulders and waist areas. Instead of fiddling with joints influence, just pose your character at each extreme pose and create a correctional morph for those. Now just link those morphs to their respective joints rotations.
This is the preferred method to use when your mesh is being deformed by Deformers other than Joints or if animated at the point level. This is because this type of morph looks at each individual Vertex Normal so the morph deformations can follow the point deformations themselves. The caveat is that vertex normals can change drastically when polygons collapse or intersect each other, which is not ideal when correcting bad deformations using this method and can lead to incorrect interpolations. For meshes deformed by Joints, it is recommended to use the Correctional PSD mode instead because it offers a much more stable interpolation in such cases.
This new mode allows you to edit a morph target for an object that is affected by a deformer, much like the Correctional mode. This mode differs in that it will also take into consideration the size of the surface area the morphs are in. If that surface area changes, the morphs will be scaled to reflect the changes in the size of this area.
This mode provides improved correctional deformations over the Tangential modes. It uses the industry-standard PSD (Pose Space Deformation) morphing system, which is calculated in relation to the Joints instead of relying on the previous morph state or base shape. This is a much more stable and accurate way of creating correctional morphs on meshes deformed by Joints that will translate much better once animated. This mode is ideal for creating corrective shapes for a mesh with bad deformations, or to emulate muscle movements by altering the mesh in place in its current state.
The other advantage of this mode is that it provides a much simpler workflow for driving morphs in a complex manner since much of it is automated. This is especially useful when your morph should be controlled by a Joint that has multiple possible orientations such as the shoulder joint, for example.
Limitations
Correctional PSD morphs will only work on meshes deformed by joints. They will not work on meshes deformed by other types of deformers or on meshes animated at the point level (PLA). In these cases, it is recommended to use Tangential morphs.
Correctional PSD morphs cannot be exported for 3D real-time use such as games, because they are interpolated in a more complex manner than with a simple strength parameter. They will have to be converted to Relative morphs beforehand.
The process of converting Correctional PSD morphs to Relative morphs is pretty straightforward:
Once your Correctional PSD morph is created, switch to the Animate mode and disable the Auto Weighting for the current pose in the PSD tab. This will stop the Joints from driving the morph automatically.
Next, select the Weight tag applied to your mesh and use the Reset Bind Pose command. You should see your mesh being deformed in its rest pose now.
Finally, switch back to Edit mode in the Pose Morph tag and set your morph to Relative and disable Post Deformers. Your morph is now a relative morph. Alternatively and you can export the Correctional PSD morph to a mesh so you don't lose your morph mode.
The PSD Morph creation process is fairly straightforward:
Enable Points Mode, then add a new Pose. Pose your joints in the desired pose for your mesh and then correct the mesh as needed so your deformations are suitable. That's it. The driver joints are automatically detected and assigned, and your morph will be blended smoothly into your joint deformation, based on its position, orientation and twist.
Note also the corresponding settings in the Basic tab.
Enable this option to calculate the points position of the morph after they are deformed by a Deformer. In the case of a tangential or Correctional morph, it will allow you to see and edit your mesh in its deformed state, for example.
Allows you to adjust the strength of individual morph targets. This can be used to check the transition or interpolation of each morph, or to dial morphs between each other when using the In Place edit mode.
Allows you to adjust the strength of individual morph targets. This can be used to check the transition or interpolation of each morph, or to dial morphs between each other when using the In Place edit mode.

This set of options will be displayed when a Correctional PSD morph is selected.
This command will record the current joint pose as the target pose for the selected Correctional PSD morph.
This command will pose the joints driving the selected Correctional PSD morph to the pose recorded when the morph was created.
This command will set the currently selected joints as drivers for the selected morph. Note that driver joints need to fit a few criteria: They need to have influence over the morphed points and to have a different pose than the bind pose recorded in the Weight tag. Details abaut the automatic assigment of joints as drifers can be found under Position Threshold.
This command will select the driver joints (and controllers, if applicable) recorded for the selected morph.
These options let you determine the algorithm used for the morph interpolations. It takes into consideration the point weighting of each joint as well as their variation in delta values (how much their position, orientation and/or banking has changed compared to the rest pose).
This mode will apply a deformation percentage by looking up the delta variations of all axes of each joint.
This mode will apply a deformation percentage by looking up the delta variations of each individual axis of each joint.
This mode will apply a deformation percentage based on the global delta variations of all the joints. All their delta values are averaged as a common strength value.
By default, the first Weight tag will be assigned as the target for Correctional PSD morphs. You can set your own tag here, if you are using several Weight tags on your mesh. Note that you need to use the Weight tag that is connected to the joints influencing your mesh, as they work in unison to drive the morphs.
When setting a morph target to Rotational mixing mode, the following options become available.
These coordinates are only available if Mixing is set to Rotational. They allow you to manually define the position of the rotation axis used for the rotational morph.
These coordinates are only available if Mixing is set to Rotational. They allow you to manually define the direction of the rotation axis used for the rotational morph.
You can also define the rotation axis for a rotational morph by selecting an edge then clicking this button. The edge will then be used as the rotation axis.
Another way to define the rotation axis for rotational morphing is via selected points. First, select two points, then click this button. An imaginary line drawn between the two points then becomes the rotation axis.
When you Drag & drop an object into the Morphs list, you have an option to choose whether the morph is relative or absolute. If you choose for the morph to be absolute, the object is linked instead and appears in this box. The morph will then be based on the state of the linked object. Note that if the linked object is removed from the scene, the morph target will disappear!
Here you have the option to save morph targets as external files.
This allows you to work with a huge number of morph targets without them requiring much memory. Choose a morph target that you want to save externally and click on the Save button. A Save dialog opens that allows you to save the morph targets to your hard drive.
The process is similar if you want to load previously saved targets: Click on the File Selection button and use the dialog that appears to open the file. External morph targets are saved each time you save your scene and a dialog box will appear to ask if you would like to save any external morphs that has been changed since the last save. Unsaved external morphs will appear with a small asterisk appended to their name, in the morph targets list.
Morph Target List
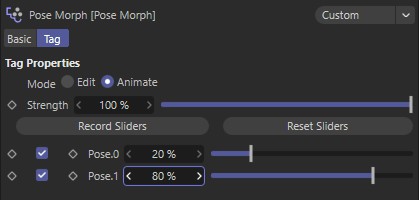
Here you will find a list of all morph targets, which you can animate using the sliders. Morphs can also be quickly deactivated using the checkboxes next to their name.
This slider controls the overall strength of the Pose Morph tag itself. It will impact all targets that have an individual strength above 0%. Useful to animate the influence between two morph tags.
Sets a keyframe for all sliders at once, at the current frame.
Resets all the sliders to 0% strength.