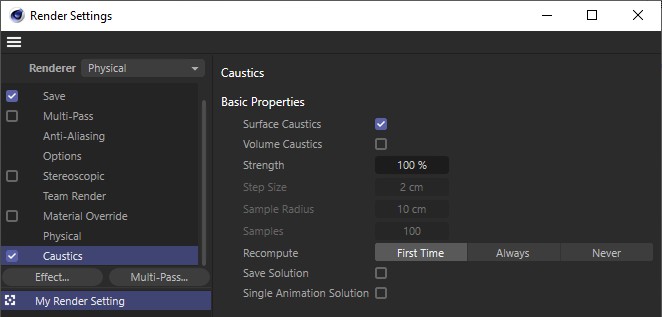
Caustics
- Photon Caustics (these are explained in this section): Faster than GI Caustics but have to be generated using individual light sources. They can be calculated volumetrically.
- GI-Caustics: with the IC mode is not very precise (a small but render-intensive trick: assign a Compositing tag to the object receiving the Caustics and activate Force QMC) Caustics), but will react to all luminous surfaces in the scene.
Both Caustics types work completely independent of one another and are calculated differently but can be used together or separately.
Parameters
-
Use the options on the Photon Caustics page to define basic properties of the effect.
-
You can refine the caustics effect for each material using the caustics settings on the Illumination page of the Material Editor or Attribute Manager.

Enable this option if you want the material to generate Photon caustics. Enter the strength of the effect into the input box.
The material must be transparent and/or reflective in order to create a caustics effect. -
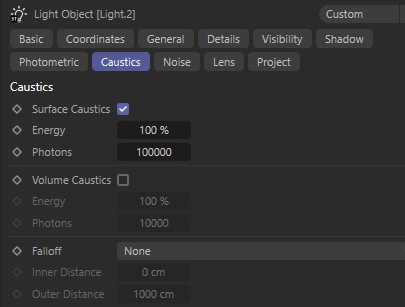
You can switch on caustics for any light source and refine the effect using the light's Caustics page in the Attribute Manager.
- The photon caustics (these are described in this section): Faster than GI Caustics but must be generated using individual light sources. They can be rendered volumetrically.
- GI-Caustics: Not very precise caustics in conjunction with IR modes (a quick but effective trick: assign a Compositing tag with activated Enable Forced QMC Sampling) but they do react to all illuminated surfaces within the scene.
Both caustics types are completely independent of one another and are rendered using completely different methods. However, they can be used either separately or combined.
What are caustics?
Caustics are patterns of focused light created by curved surfaces that are reflective or refractive.
Advanced Render enables you to create both surface caustics and volume caustics.
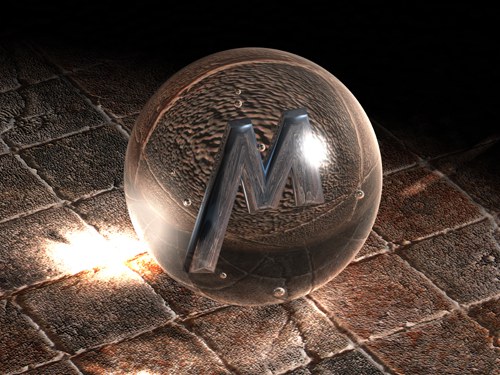 Copyright by Janine Pauke . Figure 1: The transparent sphere focuses light onto the tile to create a caustics effect (in this case, a bright spot).
- A surface caustics effect shows up on object surfaces only — examples are the transparent sphere and the ring (in both cases, the effect shows up on a surface: the floor).
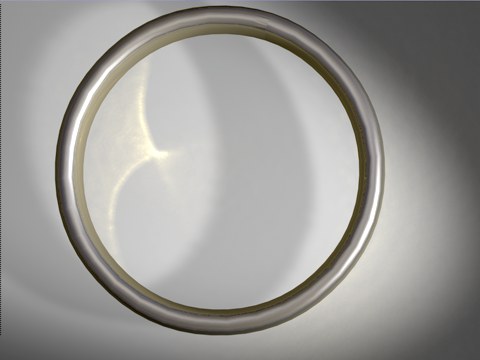 Figure 2: The metal ring shows a caustics effect generated by a reflective surface.
-
Volume caustics are visible as they pass through 3D space — they do not need a surface to illuminate.
See Figure 3.
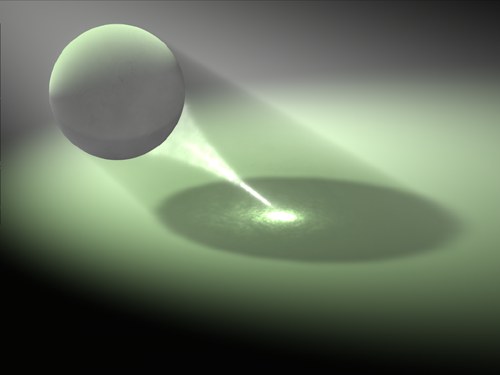 Figure 3: The bright tail extending from the sphere is a volume caustics effect.
The surface caustics algorithm
For surface caustics, you need:
- A light source that emits photons — enable surface caustics (in the Attribute Manager, on the light's Caustics page);
- An object with a material that generates surface caustics — the material must be transparent or reflective or both. The object must be curved in a way that focuses light;
- An object to receive the surface caustics.
Caustics are calculated in a very different way to global illumination and raytracing. Global illumination and raytracing send rays from the camera into the scene. With caustics, however, photons are sent from the light source into the scene. Each photon is given a starting energy. A photon's energy is reduced as it passes through the scene and is reflected or refracted by object surfaces (Figure 4).
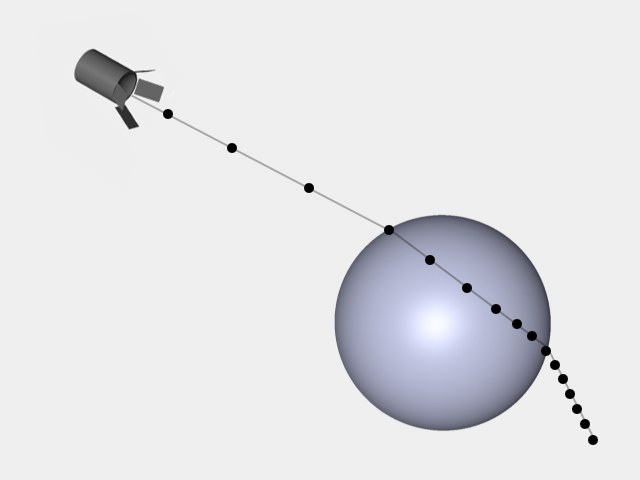 Figure 4: A photon refracted by a sphere.
When a photon hits a reflective or transparent surface, the photon is reflected or refracted. The photon loses some energy in the process and the material's properties are taken into account.
For example, if the surface reflects or refracts blue light only, the photon's color changes to blue. If the photon still has some energy left at this point, it continues to fly through the scene. When the photon hits a surface that is neither reflective nor transparent, the photon ends its journey there and its values are stored in a data structure called the photon tree — later, the values in the photon tree will be interpolated to calculate the caustics effect.
Once all photons have ended their journey in one way or another, the values in the photon tree are interpolated to calculate the surface caustics effect for the image.
Double-caustics are possible. This happens when an object focuses caustics onto another object that generates caustics. See Figure 5.
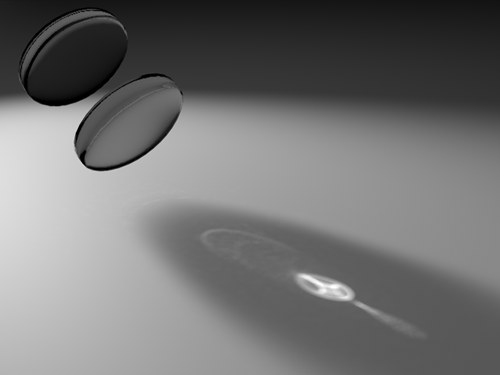 Figure 5: An example of double-caustics.
The volume caustics algorithm
Volume Photon caustics are calculated in a similar way to surface caustics. First you need the following:
- A volumetric light source to send out photons — enable volume caustics (Attribute Manager, Caustics page of the light source);
- An object with a material that generates volume caustics — the material must be transparent or reflective or both. The object must be curved in a way that focuses light.
As with surface caustics, when a photon hits a reflective or transparent surface, the photon is reflected or refracted. The photon loses some energy in the process and the material's properties are taken into account. For example, if the surface reflects or refracts green light only, the photon's color changes to green. Provided the photon still has energy, it then continues to fly through the scene.
In contrast to surface caustics, the photons of volume caustics are saved in the photon tree at regular intervals. When the photon hits a surface that is neither reflective nor transparent, the photon ends its journey there. Once all photons have completed their journey, the values in the photon tree are interpolated to calculate the volume caustics effect for the image.
Troubleshooting Surface Caustics
The best Photon caustics settings depend on factors specific to the scene such as the distance between the light source and the object that is generating caustics. However, the following steps should help you to achieve a good result.
- On the light's Caustics page (Attribute Manager), set Energy to a high value (e.g., 100,000%) and Photons to a low value (e.g., 100). This will enable you to see the individual photons as points of light so that you can check if enough photons (if any at all) are reaching the important area. If you can't see any photons, check the following:
- Is the light pointing in the right direction?
- Are the caustics options enabled in the following places?: render settings (Caustics page), light settings (Attribute Manager / Caustics page) and Material Editor (Illumination page).
- Does the object that should generate caustics have a reflective and/or transparent material?
- Once you can see the photons, increase the Photons value (and perhaps the Energy) until you achieve a good caustics effect. To fine-tune the sharpness, adjust Radius and Samples on the Illumination tab (Material Editor).
Troubleshooting Volume Caustics
If you notice artifacts of the type illustrated below when rendering volume caustics, on the light's Visibility tab, try reducing the Sample Distance value. This will, however, add to the render time.
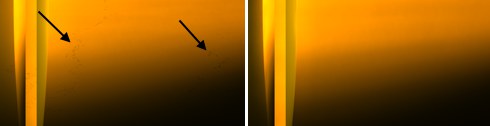 Reduce the Sample Distance to remove the artifacts indicated above. For this example, Sample Distance was set to 25 (left) and 5 (right).