Help Menu
Open the Cinema 4D help documentation here.
This is where all the most current information regarding Cinema 4D can be found (an internet browser and internet connection are required) so you can stay up-to-date.
If an internet connection exists, the Learning website will open if this command is executed. Here you will find links to valuable Cinema 4D learning resources.
RELEASE 21
Here a quick start dialog window can be opened if the automatic display is disabled for each Cinema 4D start (see Quick Start Dialog Enabled at Startup).
After the program has been started, the Online Updater (amont other things), which checks for new updates, additions, languages and/or documentation files will start. In the Preferences menu you can enable or disable the automatic checking for updates when the application is started (
In order for the Online Upater to be activated, you computer must be connected to the internet and your firewall may have to be configured accordingly.
If no updates are offered despite being connected to the internet, a proxy server might be the problem. Check the Proxy Server section for more information.
The Online Updater uses port 80, through which the normal http (web) traffic runs. Therefore, if your firewall has an issue with this you can bypass this to proceed.
If your computer does not have a connection to the internet and should remain offline, please read the Manual Instruction section below.
Protecting your personal data is important to us. If you take advantage of the comfort of our Online Updater, neither your personal information nor your computer’s information will be transferred!
Our Content Browser’s example libraries are made available and updated exclusively via the Online Updater. A manual installation of these libraries is not available.
Let’s take a closer look at the Online Updater:
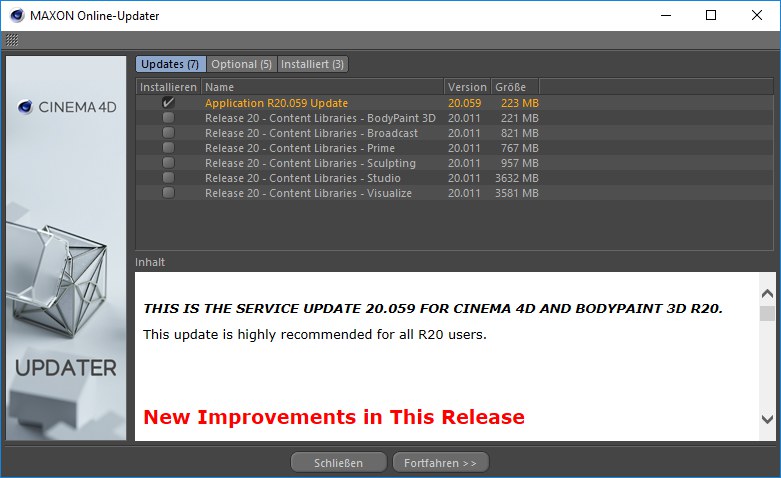
The three tabs at the top of the window show available Updates, Optional updates and a History of updates installed. Select the elements you want to install in either the Updates or Optional window. Activate the respective check box on the left.
Some important updates will already be checked or grayed out. These cannot be deselected. Only the entire update process can be stopped.
Clicking on an element in the list will display detailed information, if available, in the Description window below (e.g., a list of all bugs that have been fixed for a given version).
Once you’ve selected all elements you want to update, click on Continue. You will proceed to a page on which you can define update options:
Automatically restart application during installation
If this option is enabled, all necessary application restarts will take place automatically. If this option is disabled, you will be asked each time to confirm the application’s restart.
Any security promps from your operating system will have to be confirmed.
Delete downloaded archive after successful installation
If this option is enabled, all downloaded files which are no longer needed will be deleted automatically after the update has been successfully installed. Depending on the update, this can free up a great deal of hard drive space.
Create backup copy before installation
If this option is anabled, the current installation will be archived before the update is started. Enter the location to which the installation should be saved in the Path field. The default location is the user directory created by the application itself. If an arror occurs during the update - write error to the hard drive, computer crash, interruption of internet connection, etc. - you can restore the original state of the installation. Generally speaking you should always create a backup of your files.
The backup copy is compressed into a common zip archive with the name "c4d_backup_date_time.zip". If the file exceeds 500 MB it will be split into multiple archives. If you want to restore an archive made up of multiple parts, the individual archives must be unpacked in a common directory while maintaining the file structure.
Under Windows, double-click each archive individually in the Explorer window and drag the content of each archive to the desired (common) location or folder. If you use a different archiving program, select all zip files of a backup archive, right-click on the selection and select Unzip to (WinZip) or Extract here (7-Zip).
Under macOS, double-click the *.bat file that was created. The Terminal should start, which will restore the backup. If this is not the case, right-click (or Cmd + click on the *.bat file), select Open with / Other Program from the context menu and select the respective program from the Terminal. The files will then be restored in a new directory.
If this automatic procedure doesn’t work using the *.bat file under macOS, the process will be somewhat more complicated:
- First, unzip all archives individually.
- Open the Terminal.
- Type the following in the Terminal: cd[path to first unzipped folder or type cd (followed by a space) and drag the folder from the Finder into the Terminal window and press Enter.
- Now type: cp -r * [path to target folder or type cp -r * (again followed by a space) and drag the target folder into the Terminal and press Enter (if you get a ,permission denied’ prompt, add ,sudo’ before ,cp’. You will then have to enter your user password).
Repeat the steps 1-4 described above for each unzipped folder in order to copy them into the desired directory.
If the target order is the folder in which the updated Cinema 4D version lies, the content of this folder will have to be deleted before the restored items are copied into it.
Clicking on the Continue button will start the actual update process.
First, all required files will be downloaded from the Maxon update servers to your computer. In the following window you can follow the progress of the download (if you close this window, the download will continue in the background - it will not be halted).
Once all files have been downloaded, they will be unzipped, the application will be closed and the update will begin. If the automatic restart option is not enabled, you will be prompted to confirm each restart.
The new files will then be installed and the application will restart automatically (if this option is enabled) in the new version and/or language.
If updates are available, they will apply to both Cinema 4D and Team Render. Otherwise, these will be offered separately. Corresponding notices and updates will be made available at our website www.maxon.net.
If the application is updated, all Team Render Clients and Team Render Servers must also be updated accordingly!
If your computer is not conected to the internet or if you have the automatic Online Updater disabled in the Preferences menu, no available updates, additional languages or documentation will be shown or displayed. All of these program elements must be added manually.
.c4d update files can be found online at the Maxon website at www.maxon.net in the Support / Downloads section. These files must be made accessible for your computer, e.g., by downloading them with a computer connected to the internet and copying the files to a USB stick or to an internal server.
After selecting this menu option, select the update file you want to install and click on Open. All of the steps that follow are those of a normal update (see above).
Alternatively you can drag and drop the .c4d update file onto the Cinema 4D application surface - or open the file via the main menu.
To install the documentation for a specific language (if available), this language must first be installed in Cinema 4D.
A language version that matches the current program will have a correspnding hame, e.g., ,ENGLISH_20.009_ ... c4dupdate’. This (English) language package can only be used with R20.009 or higher. If, for example, the file name is ,ENGLISH_HELP_20.009 ... c4dupdate’, this package contains the (English) documentation for the corresponding (English) language.
After successful installation, the application will start in the language that was just installed and the documentation will be avialable. You can now select the documentation file exactly as just described.
If a language was installed by a different user, you must first enable this newly installed language in the Preferences menu (Cmd/Ctrl + e).
Note that after the application has been updated, the corresponding language package (if available) should also be installed.
RELEASE 21
This command signs you out of your user account. The current licensed will also be freed up and can be used by another computer. The current Cinema 4D instance will be without a license and must therefore be closed (or you can sign in again using your user account or a license server and request a new license). Compare also with ![]() Quit and Free License
Quit and Free License
This command can be used to open a window in which all copyrights, etc. for Cinema 4D are listed.
This opens the same info screen that appears while the program loads. Use this screen to check the version number of Cinema 4D — please quote this when contacting our Technical Support department. To close the window, click on it.