Various Methods of Creating Tracks and Keys
Cinema 4D offers several methods of creating keys / tracks and animations. These methods are described briefly below.
Animations can be created using one of the following 4 methods:
-
Keyframing in conjunction with the Record function
-
Auto-keying
-
Creating keys in the Attributes Manager
- Creating keys and tracks manually in the Timeline
Keyframing in Conjunction with the Record Function

The icons shown above are located in the Animation Palette.
The left-most icon (key symbol) records the current properties for all selected objects at that time in the animation and creates corresponding tracks and keys automatically.
The workflow is as follows: Drag the Timeslider to the desired point in your animation, edit the object to be animated and click the Record button. This process can be repeated as often as needed.
Alternately, you can Ctrl+click on the Animation Palette’s Timeline Ruler.
Autokeying (automatic recording)

Next to the Record button you will find a button with an "A" on it. Activate this button to turn on the Autokeying mode. When in this mode, all object properties will be recorded without having to manually click on any button.
The workflow is as follows: Drag the Timeslider to the desired point in your animation and edit a given object (for these, an animation Track must exist, see Autokeying). Drag the Timeslider to the next point in your animation and edit your object again, and so on. Tracks and keys will be created automatically.
Don’t forget to deactivate the Autokeying mode when you have finished your animation. Otherwise, you may end up overwriting the entire animation you just created!
Creating Keys in the Attribute Manager
Working with keyframe buttons
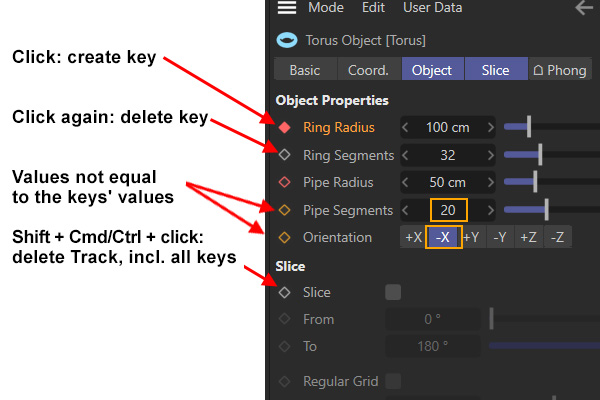 Solid red circle: A key exists at the current location in the animation. Empty red circle: An animation track (but no keyframe) exists at the current location in the animation. Solid yellow circle: a key exists at the current location but a different value exists in the Attribute Manager; empty yellow circle: an animation track exists but the value at the current location is a different one.
Any property that can be animated has a black circle with the gray background next to it in the Attributes Manager. Click on the black circle with the small circle to create a keyframe for that particular setting. A track will also be created automatically.
The workflow is as follows: Drag the Timeslider to the desired point in your animation and click on the black circle of the setting for which you want to set a key. Drag the Timeslider to the next desired point in your animation and edit the setting’s value and click on the circle again.
The following also applies to multiple selections:
- Click on the circle: Creates a new key.
- Shift+Ctrl+click: Deletes a track and all corresponding keys.
If in the Attribute Manager you change values at a given location in the animation and an animation track with keys already exists for a given value, this new value will be a temporary value, i.e., if, for example, you jump forward one frame in the animation the value will be ignored and the interpolated values or the key values in the Timeline will be used. A temporary value will be marked yellow:
- Filled yellow button: A key is located at the current time in the animation.
- Empty yellow button: No key but an animation track is located at the current time in the animation.
Keyframes can be created or deleted by clicking on a keyframe button and immediately dragging the cursor along the row of buttons (of course while continuing to press the mouse button). This also works for deleting Tracks using the keyboard shortcuts described above.
Creating Keys and Tracks Manually in the Timeline
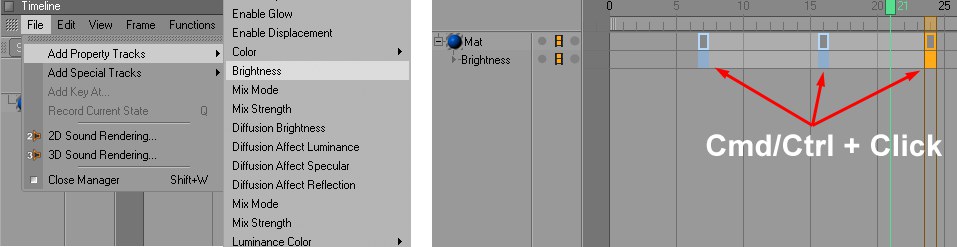
If you want to create an animation track manually for a given item, select the item in the Timeline and locate the setting or option you want to animate in the Create / Add Property Tracks menu. A corresponding animation track will be created and keys can be added using Ctrl/Cmd + click. The keys’ values can be edited as desired in the Attributes Manager.