The Take Manager
![]()
General
Many who work in 3D know about the problem of working with Projects that contain various animations, render settings, camera perspectives and a variety of other variations. This meant that several Project files had to be created and maintained accordingly when changes were made, which could require a great deal of time and organization effort. With the Take function, all of this information can be included in a single file, which can then be rendered (note also the powerful variable file and path names (Tokens), which was introduced together with the Take system).
Another application for the Take system would be for non-destructive work on a complex Project. In the past it was always important not to lose the scene’s initial state by changing settings or modifying animations. With the Take system, the initial state is saved in the Main take and new animations can then be used to fine-tune, test and modify the scene.
Simply put, the Take system is a valuable enhancement for all complex Projects that you want to integrate into your workflow quickly and reliably.
Example
Before we start describing the system itself we’ll use an example: In the description of the Color Chooser an image was used that showed a bottle with various textures and colors.
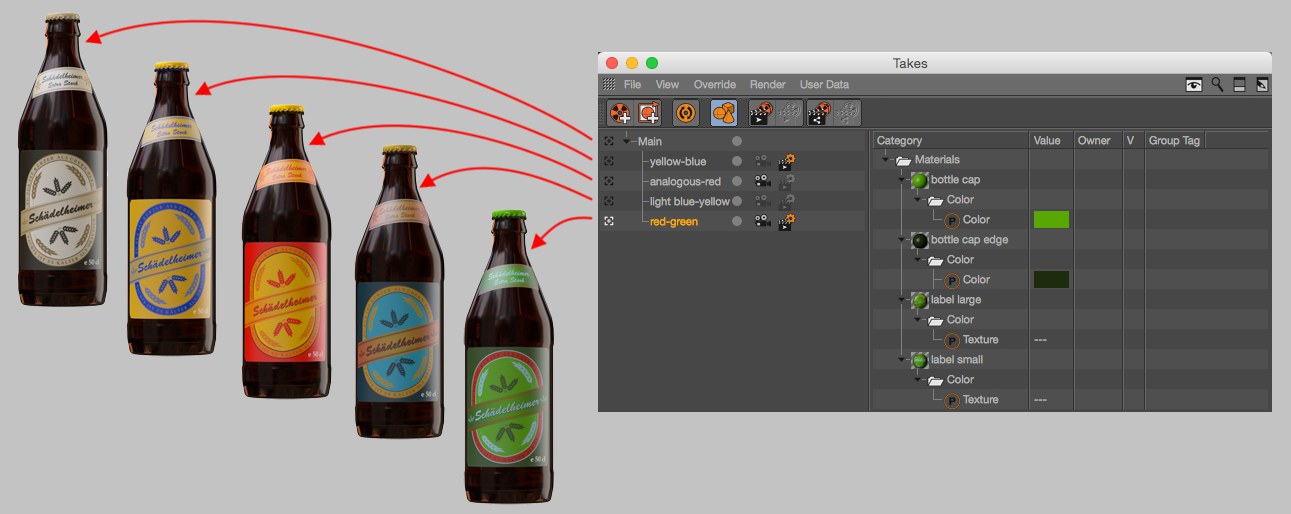
To create this image you would have to render 5 times, each time with a different label texture and cap colors. With the Take system, this can be quickly set up and everything rendered at once using the Render all Takes in PV command.
Just as textures and colors were switched in this example, this can be done with just about any Attribute Manager setting (incl. animation keyframes!).
What is the Take system and what can it do?
The Take system makes multiple states - e.g., varying (even animated) object/tag/material settings, render settings or cameras - of a given Project available in a single file.
These various states are referred to as Takes can be selected with a click of the mouse, which means that a large number of parameter changes can be included. With reference to the example above, the following can, for example, be done:
- In a different Take, use a different camera in which the bottle is hidden and only the bottle cap is seen.
- In a different Take, render a bottle with Sketch and Toon
- In a different Take, animate the bottle caps using Dynamics and render a video using the corresponding render settings
- The Take Manager helps you maintain an overview of it all
Only one Take can be active at once. This Take is then the current project, i.e., this Take will be exported (and not a Main Take).
If you want to work without the Take system, make sure that the Take Manager contains no Takes except for the Main. Cinema 4D will then work as it did in previous versions.
Where can Take settings be found?
- First and foremost in the Take Manager (see below)
- There are several commands and displays for the Take to be rendered available in the Render Manager
- A render preference can be assigned to a Take using the Render Setting's selection menu
- The Override XPresso node can output various values depending on the selected Take
- In the Attribute Manager's setting context menu you will find the commands Override and Remove Override
- In the Preferences menu under Take for creating Take presets
- The Object, Material and Layer Managers each have several commands with which selected elements and all their settings can be used to tell the Take Manager that they can be overridden.
Which settings work in conjunction with the Take system?
All settings available in the context menu in conjunction with the Attribute Manager's Override command. These include most settings for objects, materials, shaders, tags, nodes, etc.
Tool settings, Preferences, Project settings, and so on will not work. These are stored in the Main or are valid globally anyway.
Several special objects such as XRef objects (that modify the Project's content) can be applied in a limited fashion (reference objects cannot be exchanged in the master Project, i.e., the reference Project is the same in all Takes).
Animations
Animations are supported by the Take system, i.e., each Take can have its own animations that are independent of other Takes (with the exception of the Motion System). The following rules apply:
- Animations in the Main will initially be assumed by each new Take. The animated settings in the animation (as all others as well) can be overwritten in the new Take and be assigned any number of keys and key values.
- Completely new animations not present in the Main can be created as long as all respective settings are set to "Override" (otherwise activate Auto Take, which will do this automatically). Don't be surprised if there is no immediate response after clicking on the Record button when recording.
General information
- Note that when working with Dynamics, simulations can differ per Take but there is only one cache per Project file. For example, if you create a separate Project file for each Take using the (Export All Takes Incl. Assets) command, all Projects will have an identical cache. Each of these files has to be baked (see Cache).
- Elements that use properties for their functionality that are not displayed in the Attribute Manager (e.g., the Mesh Deformer or the FFD object that use the cage's vertex positions in the Viewport), only have restricted use. It must be emphasized again that only settings displayed in the Attribute Manager work together with the Take function. In such cases you will work with several elements that can be made active on a per Take basis.
- There are also limitations for elements whose settings (e.g., the Cogwheel object) are linked internally, i.e., modifying one setting automatically affects other settings. Changes made to Takes can result in changes to the Main Takes. To prevent this, overwrite all corresponding settings.
-
If settings for special elements (e.g., Motion Clips) are not displayed in the Attribute Manager, it can help to briefly switch to the Main Take where the element can be selected, and then switch back to the Take.
- When using XPressions (e.g., XPresso, Vibrate tag, Constraint tag, etc.) in a Take, these settings can be modified in the Main Take (one of the rare exceptions in which Takes can affect the Main Take)! If this should happen you can define a specific value for respective settings in the Main Take (e.g., Position). This can, for example, be done using a keyframe.
-
In special cases it can happen that a Take's settings affect other Takes. As an example we will use a Tension tag that, for example, affects a vertex map in a Take. If this vertex map is used in another Take, e.g., in a Restriction tag, the Takes can encroach on each other. An example of this is if the Tension tag is disabled in one Take and cannot affect the vertex map when you switch to the other Take. The vertex map state from one Take will be applied to the other Take. Therefore, you must make sure that the vertex map (or other element that may be affected) in the other Take has the chance to be updated.
In general it can also be put as follows: Elements that cannot be assigned a 'Overwrite' status (e.g., vertex or weight maps) can affect all Takes when modifications are made in one Take. -
Takes don’t work correctly with several Nodes in conjunction with Node Materials. These are Nodes with a dynamic interface such as Gradient, Layer or Switch Nodes. To surpass this limitation, you can use the Show Subchannels setting (right-click on the setting’s link icon) and modify the settings accordingly.
Furthermore, knot and layer numbers of Gradient and Layer Nodes, for example, cannot be modfied via Takes. Instead you can, for example, switch between different Gradient or Layer Nodes using Switch or Condition Nodes.
A material Node’s input parameters can either be controlled manually or via another input port. In conjunction with the Take System (which, for example, cannot switch connections) the following applies: a connection always has priority over a parameter modified by a Take.
 Note how the settings are initially grayed out. This changes once the settings are overwritten.
At the top left of the Take Manager (with default settings) you will see the Main Take. This option cannot be removed or moved elsewhere. All scene elements will initially be cached here. Even when an older Project is loaded, everything will be placed into the Main Take. The Main Take contains all elements such as objects, tags, materials, animations and the element's relations to one another (allocations, hierarchies, etc.), i.e., everything that makes up a given Project. It represents the complete Cinema 4D file as you know them from previous versions. If the Main Take is activated, all other overwrites in the remaining Takes will be displayed in the Override Tree.
You can create a new Take using the Main Take (double-click in the empty area on the left window). Each newly created Take will initially reflect the Main Take because it will inherit all properties (=Attribute Manager settings). This is evident by the fact that the newly created Take is displayed as a sub-object of the Main Take object in the hierarchy.
If you create a new object or tag or model an object on a give layer, all new elements or models will always be placed in the Main Take. The Take system primarily only varies properties of existing elements (whereby objects can naturally be hidden from rendering; e.g., Visible in Renderer is "only" a property).
An exception to the rule: On the one hand there are the Override Groups that only allow a few selected tags to work within a Take; on the other hand, Take-specific animations can be created whose animation keys are not placed into the Main Take. Note also this tip.
.
When a new Take is created, all element settings are grayed out in the Attribute Manager. What this basically means is that the settings from the parent Take will be assumed. If you want to subsequently change settings you have to 'overwrite' the parent settings with a new Take. This can be done in one of several ways:
- Drag the respective setting (or the entire element to include all its settings) from the Attribute Manager into the top Take Manager.
- Right-click on the setting and select Override from the context menu that appears.
- Enable the Auto Take mode File menu.
- Use the Override XPresso node
The setting value can then be modified in the Attribute Manager or by double-clicking on the respective setting in the Take Manager's 'Value' column. A setting that is overwritten in this way will in turn pass its values on to subordinate Takes and can overwrite these. The passing on of values reflects the behavior of the tags in the Object Manager: If an object at the top of the hierarchy has a texture, this texture will be inherited by all subordinate objects unless an object has its own Material tag.
You can switch between various Takes by clicking on the small cross icon at the far left of the Take names. It will turn white and the active Take will be displayed. The Take name will also be displayed in the Cinema 4D name list at the right of the file name.
Where there's light there's also shadow: It has to be noted that the 'readability' or the comprehensibility of a scene that is opened for the first time can be challenging, depending on the complexity of the scene. This was also true in the past but now it is, in principle, possible to load a seemingly different file by selecting a different Take. Open the following file:

Switch to the Take Manager and switch between Takes. You will notice the effect.
Take a look at how the scene is set up in the Layer Manager. Depending on the Take, different objects and materials will be hidden for both the Viewport and the Managers.
This is due to the fact that the Take system is so powerful that confusing Project states can be generated. In such cases, the scene should be commented (e.g., using the Annotation tag).
Take Tree
 Note also the Group Tag column where selected tags affect object groups (Add Override Group command in the File menu).
On the left of the image above you will see a list with existing Takes arranged hierarchically in a Take Tree. The items can be re-arranged via drag and drop (e.g., to modify hierarchies, render orders, etc.) or selected (Cmd/Ctrl + click to add/remove a selection; Shift to select a range; Del to delete a selection).
When Takes are selected, their properties will be displayed in the Attribute Manager below.
Each item listed has the following settings (from left to right):
Take Assignment
Defines the current Take. The current Take will be displayed in the Viewport and rendered when, for example, the Render to Picture Viewer is called up. This is currently active Project state in Cinema 4D. Note also that the Current Take HUD element (view settings / HUD tab) does the same.
Name
Each Take has a unique name, which can be changed by double-clicking on it. The Take will be displayed with this name at other locations within Cinema 4D as well.
Marker
Mark individual Takes, e.g., to only render a specific Take. Click on the Take to change its state.
Camera
Assign an existing camera to a Take as a render camera via click + selection from the selection menu. The selection menu also contains the following options:
- Default Camera: Renders using the Viewport’s camera, i.e., the camera that is used if no Camera object is activated in the Object Manager.
- Inherit from Parent: Assumes the render camera from the Parent.
Render Settings
Click on a Take to assign an existing Render Setting to it. The selection menu also contains the following options: Inherit From Parent: assumes the render settings from the Parent take.
Note also the context menu, which is displayed when you right-click on the Take Tree (these settings are described further below).
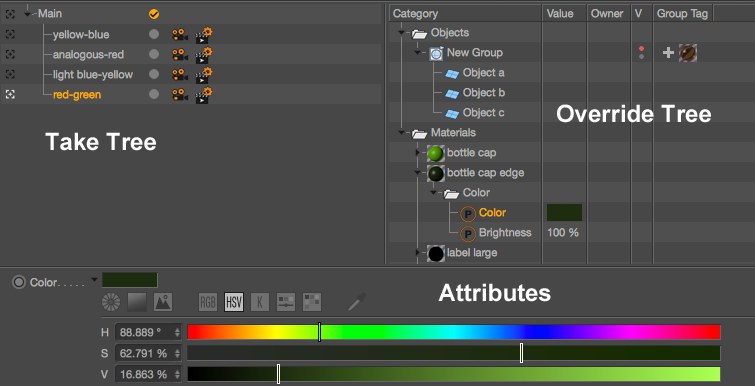
Override Tree
The Override Tree displays a list of the following settings when a Take is selected:
- Main Take: all overridden settings from all Takes. Changes made only apply to the Main Take.
- Other Takes: all settings of the active Take that deviate from the Parent or can be modified otherwise (i.e., have the ,Override’ state).
The settings are sorted hierarchically according to elements (objects, tags, shaders, etc.), sub-tabs and other structures, depending on the type, and their depiction is oriented according to the Attribute Manager.
The listed items can be selected in the usual manner (Ctrl/Cmd to add or remove selections; Shift to select a range; Del to delete a selection). Deleted settings will again assume the values of the Parent Take.
If the list appears to cluttered you can apply the filters - the first two icons at the top right of the Take Manager.
Selected elements/settings (but not folder names) each list their overwritten settings that can be modified in the attribute section (alternatively you can double-click on the individual setting in the Override Tree). Multiple selections only work well within the same element settings, i.e., for a single object or tag. The order of elements can be re-arranged via drag and drop within the folder (e.g., objects within Objects).
The following columns are available in the Override Tree:
- Category: Lists all elements hierarchically
- Value: Displays the setting values. These can be modified by double-clicking on them
- Owner: The corresponding object name or material/element will be displayed for tag or shader settings
- V (Visibility): The visibility of the group object in the Viewport or for rendering can be defined for Override Groups. These work as usual in the Object Manager. If the status button is gray, the status defined in the Object Manager will be applied.
- Group Tag: Here all Override Group tags as well as the button used to create a new one are listed.
Attributes
This is where the setting values of selected elements are displayed. These can be modified - or animated - here or in the Attribute Manager.
The four icons at the top right
The following icons are available at the top right of the Take Manager window:
- Filter: A display filter for the Override Tree that for the most part works like the Object Manager filter (see Show Filter): The eye icon hides or displays elements or element types (e.g., all tags). The magnifying glass icon defines if the respective element should be taken into consideration by the search bar.
- Search: The search bar should also be familiar to you from the Object Manager (see Show Search). The search string entered restricts search results to elements/settings whose name/setting name are part of the search string entered.
- Attribute Section Arrangement: The Attribute section can be positioned either at the bottom or on the right (or hidden using the next icon). Click on this icon to change this section’s position.
- Attribute Section On/Off: Click on this icon to hide or display the attribute section.
Menu Commands
File
Use this command to create a new, empty Take (it will inherit all properties of the Main Take). A new Take can also be created by double-clicking on an empty region of the Take Tree.
 8 different tags can be assigned to an Override Group. Tags assigned to Override groups are labeled with a T in the Object Manager.
This command can be used if a certain number of objects have to be grouped for a Take, which all have to be affected equally by the selected tags. It can, for example, be very useful for assigning an object group a common alpha channel (via a Compositing tag’s Object channel) and an object group with a different constellation in another Take the same alpha channel. Or, simply put: assigning a different material to different object groups per Take. The possibilities are wide-ranging. However, the Override tags are restricted to render-specific types and only one of these types can be applied per Override Group.
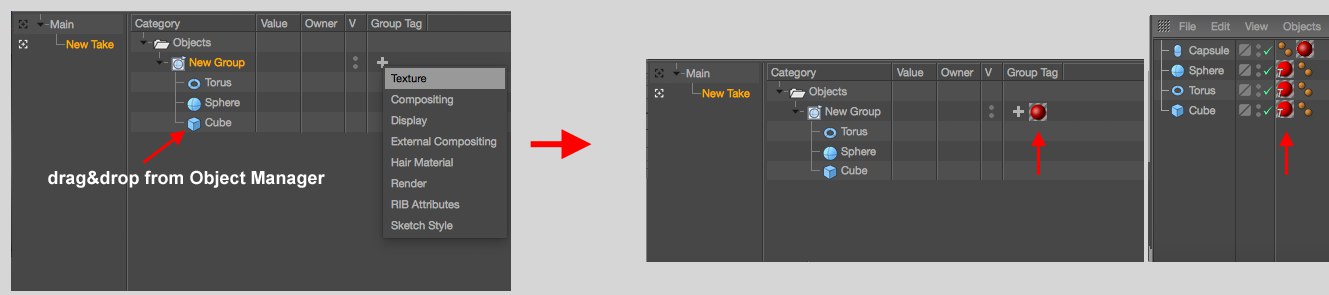
This is how Override Groups work:
- Call up the Add Override Group command for a given Take. A Null object named New Group will be added to the Objects folder.
- Drag the objects to be grouped from the Object Manager onto the New Group name. If these objects are already located in an Override Tree they can be dragged onto a New Group within this tree (and removed again by dragging them out of the group).
- Click on the + symbol in the New Group’s Group Tag column and select a tag from the list that appears. This tag will be assigned to all group objects (marked with a T for Take at the bottom left). If an object already has such a tag, the Override Group will assume it. The newly added tag’s settings can now be modified either in the Take Manager or in the Object Manager after activating one of the Override Group tags. The settings apply equally to all tags. The tags can only be deleted in the Take Manager and not in the Object Manager.
Note that one object per Take can belong to only a single Override Group.
Take presets can be saved for later use or distribution. Only Take names, hierarchies, Override Groups (incl. tags and their settings) and User Data will be saved. All Project elements such as objects, tags, materials, etc. and their setting values are not part of a Take preset.
Take presets are useful, for example, when they don’t have to be redefined when used in conjunction with User Data each time a Take is created.
Another use would be for maintaining studio presets, e.g.:
- Take 1: foreground
- Take 2: background
-
Take 3: characters
(with additional sub-Takes)
Such presets (which can easily consist of dozens of Takes) are easy to maintain and manage.
The Auto Take mode can be enabled to automatically assign the ,Override’ status to each modifiable setting (note that you can also drag entire objects, tags, materials, etc. into the Take Manager to make all of their settings overridable). The element settings will be colored accordingly (similar to Autokeying mode) and each setting will be modifiable (and will again be colored accordingly). All modified setting values will be placed into the Take Manager.
The Render Setting selections and render camera will also be set automatically in this mode.
Calling up this command will create a new document that contains all the properties of the current Take as a Main Take (incl. render settings and cameras). The Main Take will in essence be duplicated and all overridden settings will be assumed by the Main Take. Let’s say that you have a huge amount of Takes in convoluted hierarchies and no longer have an overview of which Takes override which settings, which setting value was inherited from which Take, etc. This command lets you get a fresh start with clearly defined setting values.
These commands resemble the already known ![]() Save Project with Assets..., only that Takes will be saved with their individual assets (required textures and other linked files can vary per Take!) as separate files in separate directories.
Save Project with Assets..., only that Takes will be saved with their individual assets (required textures and other linked files can vary per Take!) as separate files in separate directories.
The Take name will be added to Project file names and directories.
Takes can be marked by clicking on the light gray icons at the right of the Takes in the Take Tree (see also Marker).
Context Menu
Right-clicking on the Take Tree will open a context menu that contains the following commands, in addition to those previously described:
New Child Take
Creates a new Take as a Child of the Take selected per right-click.
Delete Takes
Deletes the selected Take. The same can be done using the Del or Backspace keys.
Selected Takes, including all Child Takes, can be copied and passed as Child Takes of the Main Take. If the Main Take is copied, all Child Takes (all except the Main Take) will be copied.
View
Depending on the type of overridden element, these will be placed in corresponding folders such as Objects, Tags, Materials, etc. If these folders are empty they will be hidden by default. Selecting this option will display these empty folders.
Tree modes
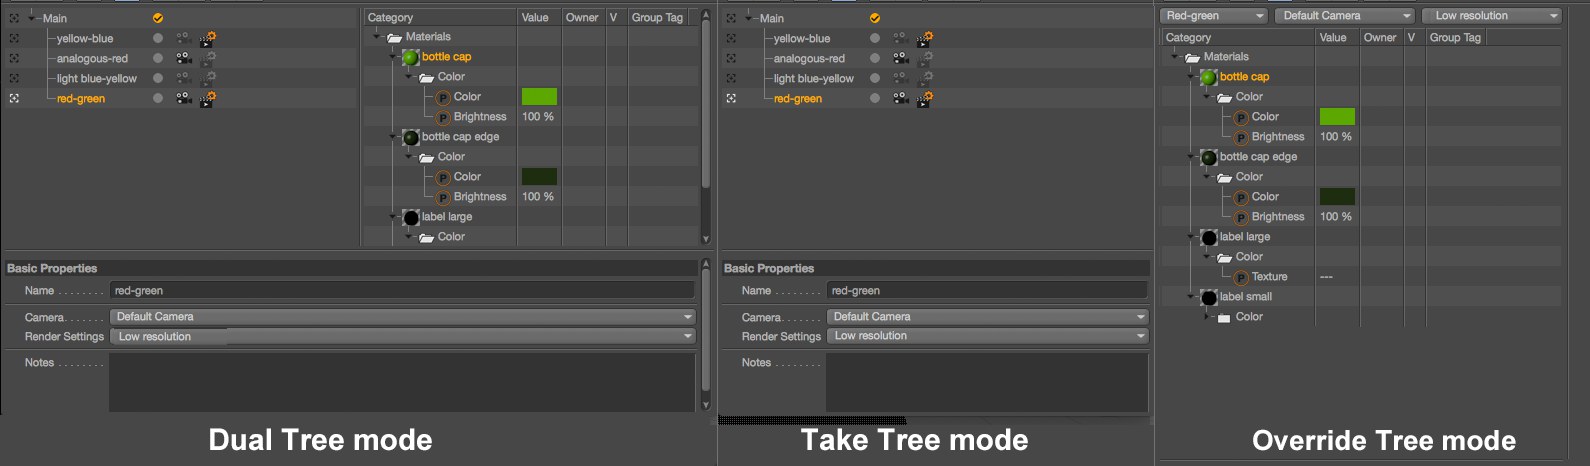
Use these two options to define how the Take Manager should be arranged (Take and Override Tree sections). The properties of Takes or elements can be hidden in the Attributes section, which can itself be hidden and is normally positioned at the bottom but can also be positioned as a third column on the right.
The following options are available:
Take and Override Trees are displayed next to each other. If a Take is selected on the left its Overrides will be shown on the right.
This mode only displays the list of Takes with corresponding icons.
In this mode, the Override settings are displayed and a selection menu is available at the top with the following options from left to right (exactly what can be selected in Dual Tree Mode):
- Take
- Render Camera
- Render Setting
If this option is enabled, the corresponding element in the Take Manager will be selected if an element in the Object or Material Manager is selected, and vice-versa. This can help give you a better overview of things.
Override
This menu’s settings let you omit specific sections from overrides (e.g., transformations, render settings, etc.), which means nothing more than that changes made to settings are no longer restricted to Takes but are global (no corresponding settings will be grayed out). This is useful, for example, if you only want to affect the visibility of objects in different Takes but keep all other settings modifiable and consistent across all Takes.
The settings made here apply if Auto Take is enabled or disabled.
Note that for each of the Command Manager options described below commands of the same name are available that can be quickly enabled or disabled via keyboard shortcut.
This option is usually enabled and should only be disabled temporarily (a hotkey can be set up for this). Disable this option for the following purposes: If you want to modify a setting, i.e., a global parameter change, in the Base Take when editing an active Take to avoid having to activate the Base Take.
This is how it’s done:
-
Disable Lock Overrides
-
Modify the respective setting
- Enable Lock Overrides
There is one small exception: Assuming Take #2 is a Child object of Take #1 and setting X in Take #1 is overwritten. If the previuosly described process is applied to Take #2, Take #1 (and not the Base Take) will be affected by the change made to setting X.
Use these settings to make all or none of the elements/sections available for the Override functionality.
Select these items to enable or disable the respective element for the Override functionality. The Others option includes such items as XPresso nodes or special plugin elements.
This command affects Generator activation (the green check mark in the Object Manager) and the Visible in Editor[Visible in Renderer] options (the dots in the Object Manager). These can be enabled or disabled for the Override functionality.
The term ‘transformations’ refers to all settings in the Object tab’s Coordinates fields. This option enables/disables these for the Override functionality.
These include all element settings with the exception of Transformations (Object tab’s Coordinates fields). This option enables/disables these for the Override functionality.
Use these settings to define whether or not separate render cameras or render settings should be defined for the Takes. If disabled, only the Main Take’s render cameras and render settings will be used. Takes can be marked by clicking on the light gray icons at the right of the Takes in the Take Tree (see also Markierung).
Rendering
The following options are available in the main Cinema 4D menu under Render/Takes.
Use these commands to render all or marked Takes in succession to the Picture Viewer (PV). Note the variable file and path names that can be assigned different names based on the Takes.
Use these commands to render all or marked Takes in succession to the Picture Viewer (PV) using Team Render. Note the variable file and path names that can be assigned different names based on the Takes.
User Data
A Take can be assigned any number of User Data, which can then output values and settings in combination with third-party plugins (e.g., render farm plugins) for the Take.
Note that User Data can be saved together with Take presets, which makes it easier to create new Takes in the future.
Creating and managing User Data is principally nothing new and works as described in the Attribute Manager section.