Primitives
The objects in this menu are parametric (primitives) objects, i.e., they are created from mathematical formulae using a number of preset values. A consequence of this is that such an object is initially simply a mathematical abstraction and is not editable. In plain language, this means that primitives have no points or surfaces that you can manipulate.
For example, you cannot edit a primitive using the Magnet tool, because the Magnet needs points to pull on. To apply polygon tools such as Magnet, you must first convert the primitive to polygons using the Make Editable command.
On the plus side, parametric means that you can change the parameter values of an object, such as height or radius, at any time. This allows you to experiment with the different parameters of an object in order to get a feeling for how it looks, behaves, etc.
However you choose a new object primitive, first of all the relevant primitive is created in the scene and its settings appear in the Attribute Manager. To display an existing object’s parameters in the Attribute Manager, select the object by clicking its name in the Object Manager or by clicking the object in the viewport. Often you will see settings for segments; use these to define the level of refinement of the particular surface or solid. This is useful if you are going to extend the object, perhaps to build further, more complex objects.
Suppose you want to create a curved rod starting with a cylinder primitive. If the cylinder has only one segment along its length, it will be impossible to bend it into a rod shape because there are no points along its length that can be transformed into a bend. The more segments you assign to the object, the more smoothly it can be bent or otherwise deformed.
In addition, most primitives use Phong shading automatically to smooth their appearance.
This can occasionally lead to problems when using chamfered fillets, when smoothing is not desired between the fillet and the other object polygon. In such cases, override the default Phong shading setting by assigning a Phong tag to the primitive (Object Manager: Tags / Cinema 4D Tags / Phong). You can then switch off the Phong shading by enabling the Angle Limit option and setting the Phong Angle to 0º. Since this removes all smoothing, you will probably need to increase the object’s number of segments. Or you may find that a low Phong Angle with not quite so many segments works just as well plus more quickly. You may often need to juggle segmentation and smoothing to achieve a balance between quality and render speed.
In Figure 1, the cylinder’s Phong shading (i.e. smoothing) is on (left), off (center) and on but with the Angle reduced to stop the shading spilling over the edges (right).
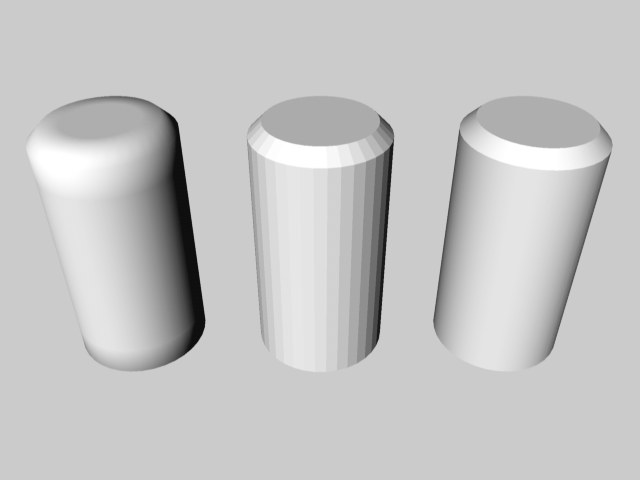 Figure 1. From left to right: Phong shading on but no angle limit, Phong shading off, Phong shading on with low angle limit.
In Figure 2, the curved cylinder on the left has four segments, the one in the center has 16 segments and the one on the right has 72 segments. The increase in smoothness is clear to see.
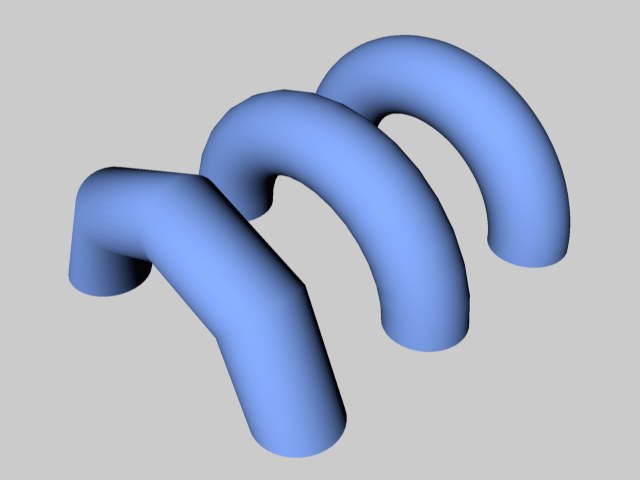 Figure 2.
Aim to use the lowest number of segments that produce a smooth enough result. Using more segments than is necessary adds to the render time and RAM requirements.
A parameter common to many primitives is Orientation; this lets you change how the object lies in the 3D space. Thus you can quickly move your object to lie in another direction. Notice that the actual geometry is affected by an orientation change, not the object axis system.