Field
What are Fields?
Imagine Fields as a spatial distribution of strength values that control an effect.
Something like a three-dimensional Noise that defines the strength of an effect using its grayscale gradient. The effect is strongest where the Noise is white and weakest where it’s black, and the grayscale values having a corresponding influence. The simplest Field is the Spherical Field:
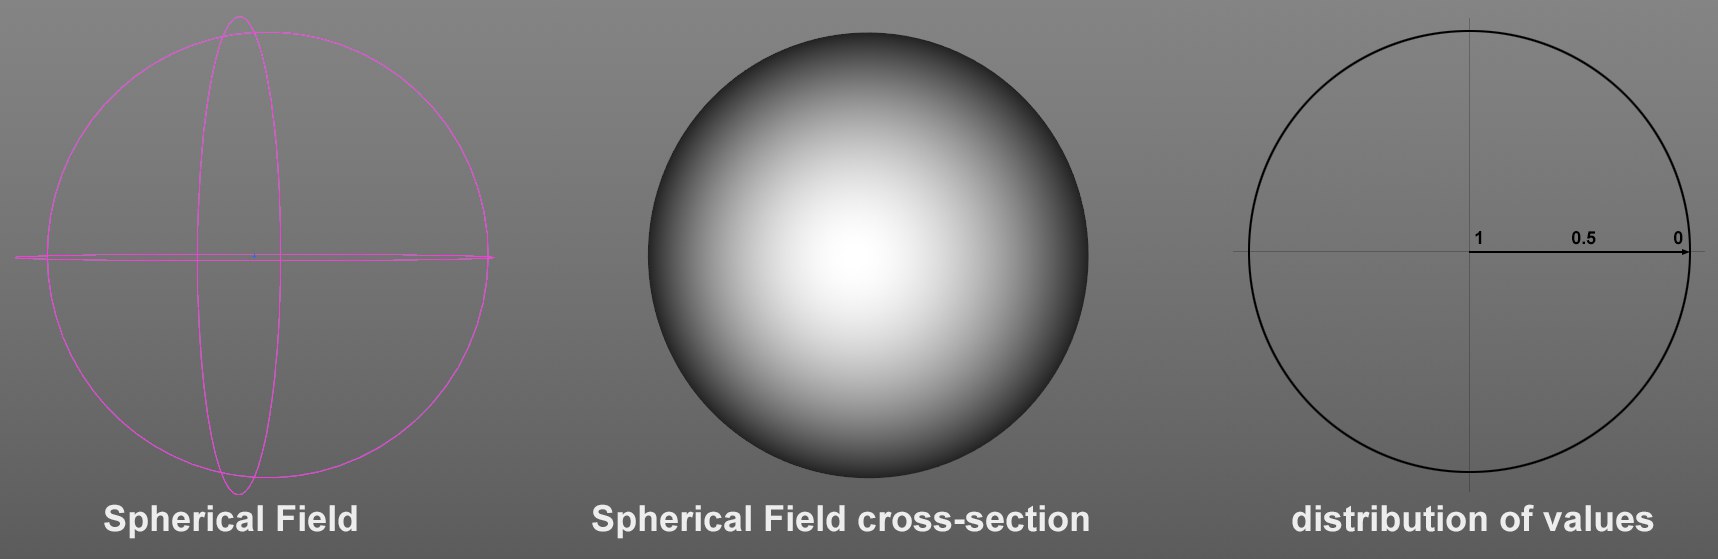 The default Spherical Field’s strength is greatest at its origin and diminishes outwards linearly to 0.
What is the spatial distribution of values good for? This distribution of values can, for example, be used by MoGraph Effectors to control the spatial strength of their effect (e.g., Y-offset of clones by 100cm or rotation of 30°, etc.). Or the Bend deformer uses a Field whose values define the strength of deformation for each object point position to be deformed. Below you will find a description of what Fields can be used to affect.
Spatial strength values will be made available primarily by the Fields mentioned above. Values from other objects and tags can also be used, for example:
- Tags such as the Selection tag (points, edges, polygons), Vertex maps, Vertex Color tags, MoGraph selections or Weight tags save values, for example from 0 to 1, 0-100%, 0-255%, etc., for each point on an object surface.
- volume Builder and Volume Loader are made up of Voxel grids, whereby each Voxel has a specific value.
These Fields and tags can be placed in ,Field lists’ (setting name Field or Fields). These can most often be found in objects or tags with an object/tag named ,Falloff’ or ,Fields’ (where they can be blended with each other. More info about this here.) These can, in part, also be converted into each other: e.g., a Spherical Field can be used to assign values to a Vertex map or Polygon Selection tag; or a Polygon Selection tag can be converted to a Vertex map or vice-versa.
Finally, test the effect (without an Effector) on less obvious elements (see below) such as tags, Deformers, etc. This is the best way to master the art of using the powerful and at times complex Fields. It’s worth the effort.
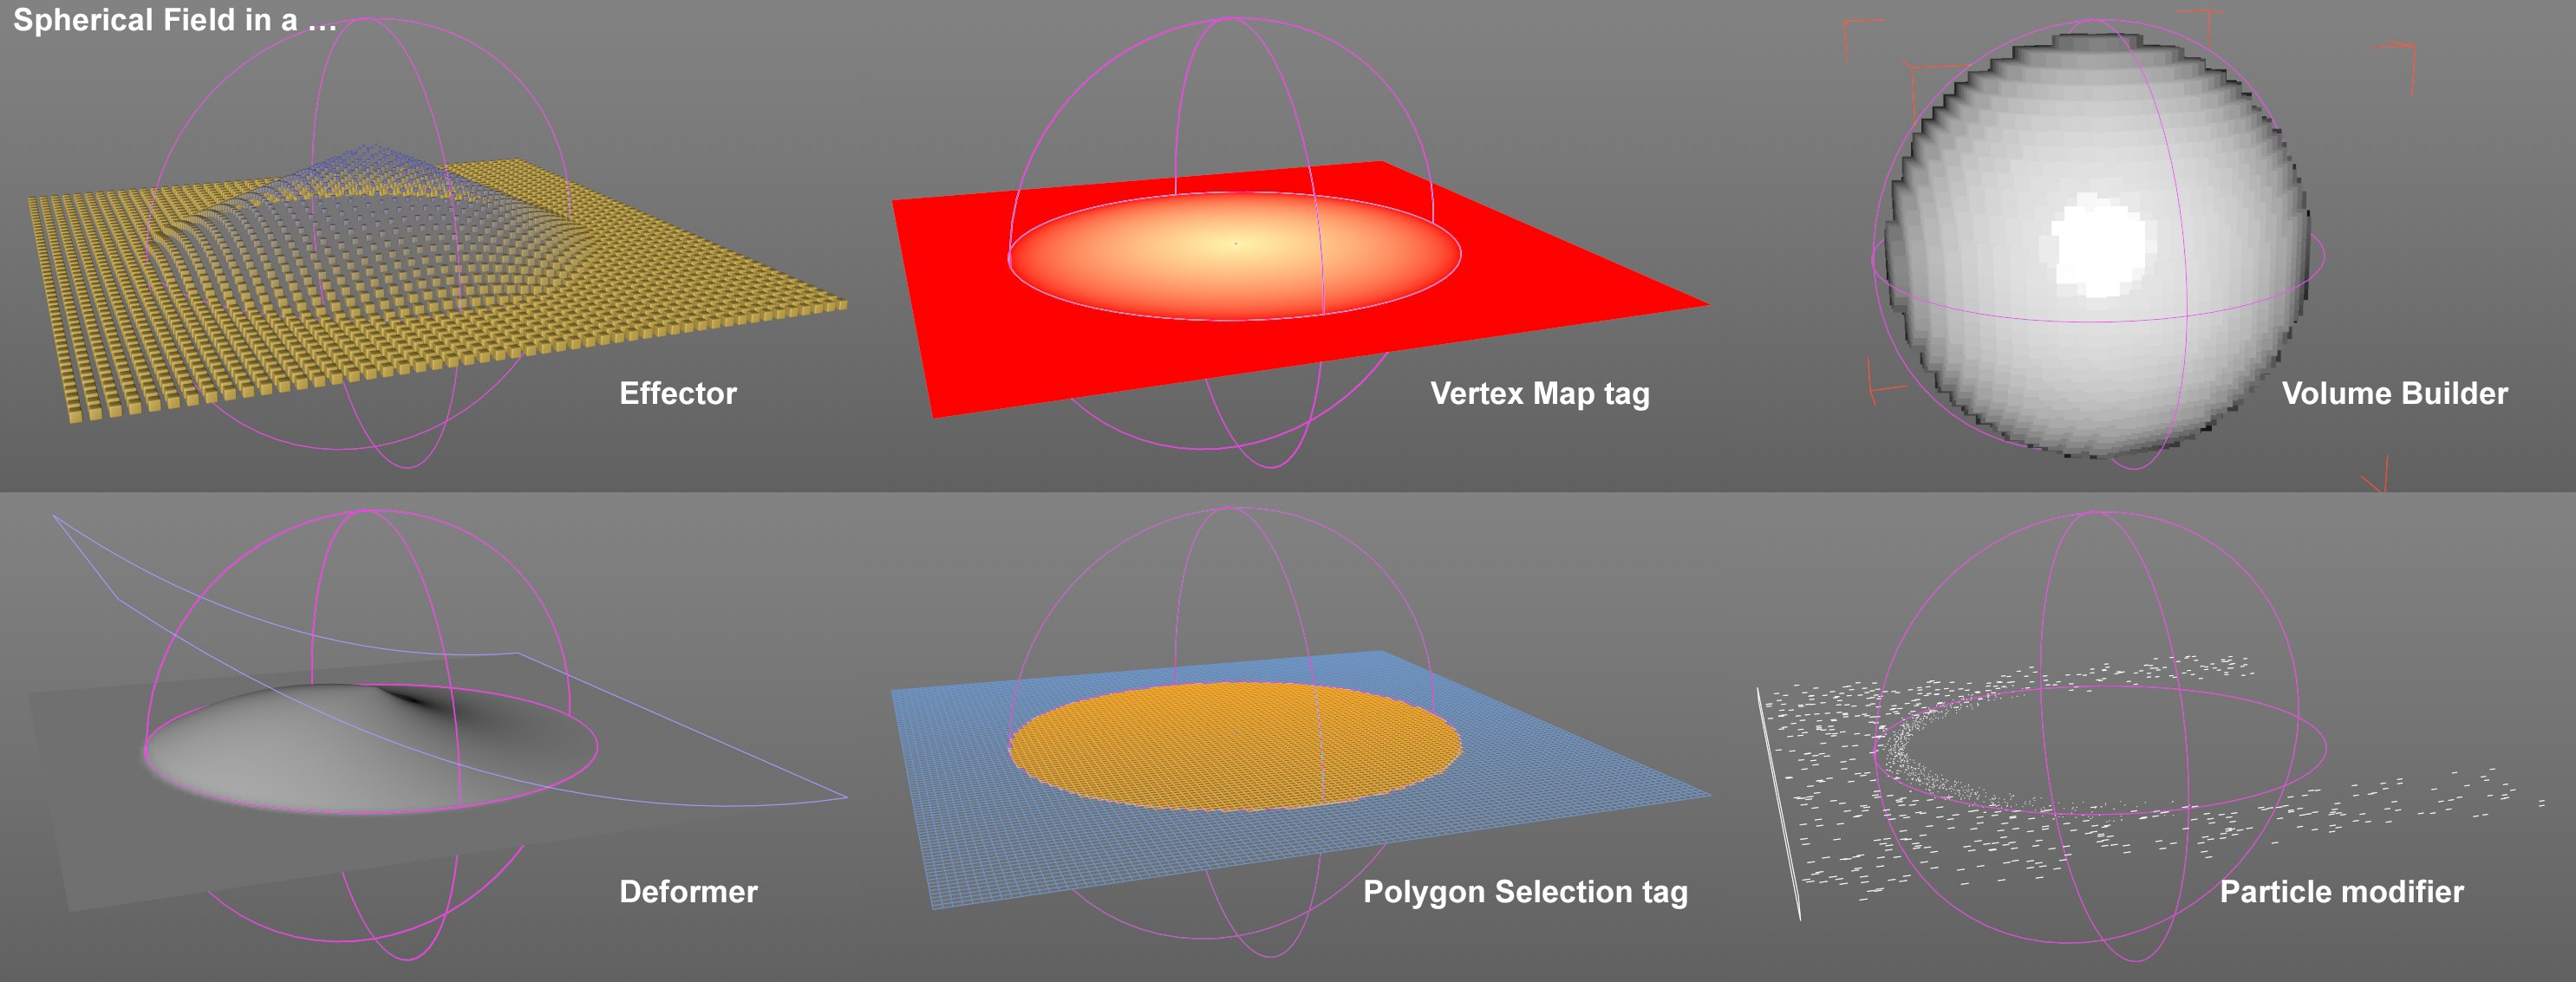
What do Fields affect?
Fields can be used to affect the following elements (these each have a Field list with a list named Field or Fields):
- MoGraph Effectors
- Deformer objects (also cloned objects with a Deformer object as a Child object and a separate Field: the Field will affect the Deformer object only)
- Volumes (Volume Builder).
- Particle modifiers (e.g., Attractor, Turbulence)
- Using Field Forces on dynamically controlled elements (particles, dynamics)
- Vertex maps, Vertex Color tags
- MoGraph Selection and Weight tags
- Point, Edge and Polygon Selection tags
- Normal tags
- Field Force object, etc.
Fields go much farther in their functionality than before and are not at all restricted to use with MoGraph elements.
Fields can, for example:
- spatially restrict the effect of other objects (e.g., as falloff in MoGraph Effectors or Deformer objects)
- spatially define the weighting of Vertex maps (e.g., a Random Field in a Vertex Map tag)
- generate Volumes (e.g., a Random Effector as a Child object of a Volume Builder)
- control the selection of a Selection tag (e.g., a Random Field in a Polygon Selection tag)
… and so on. To sum it up: the settings of various elements can affect one another and in part even be converted into one another (e.g., tag to tag).
 Fields can be used to affect many elements. Not pictured is the XPresso Falloff node, which makes the Field function available to even more areas in Cinema 4D.
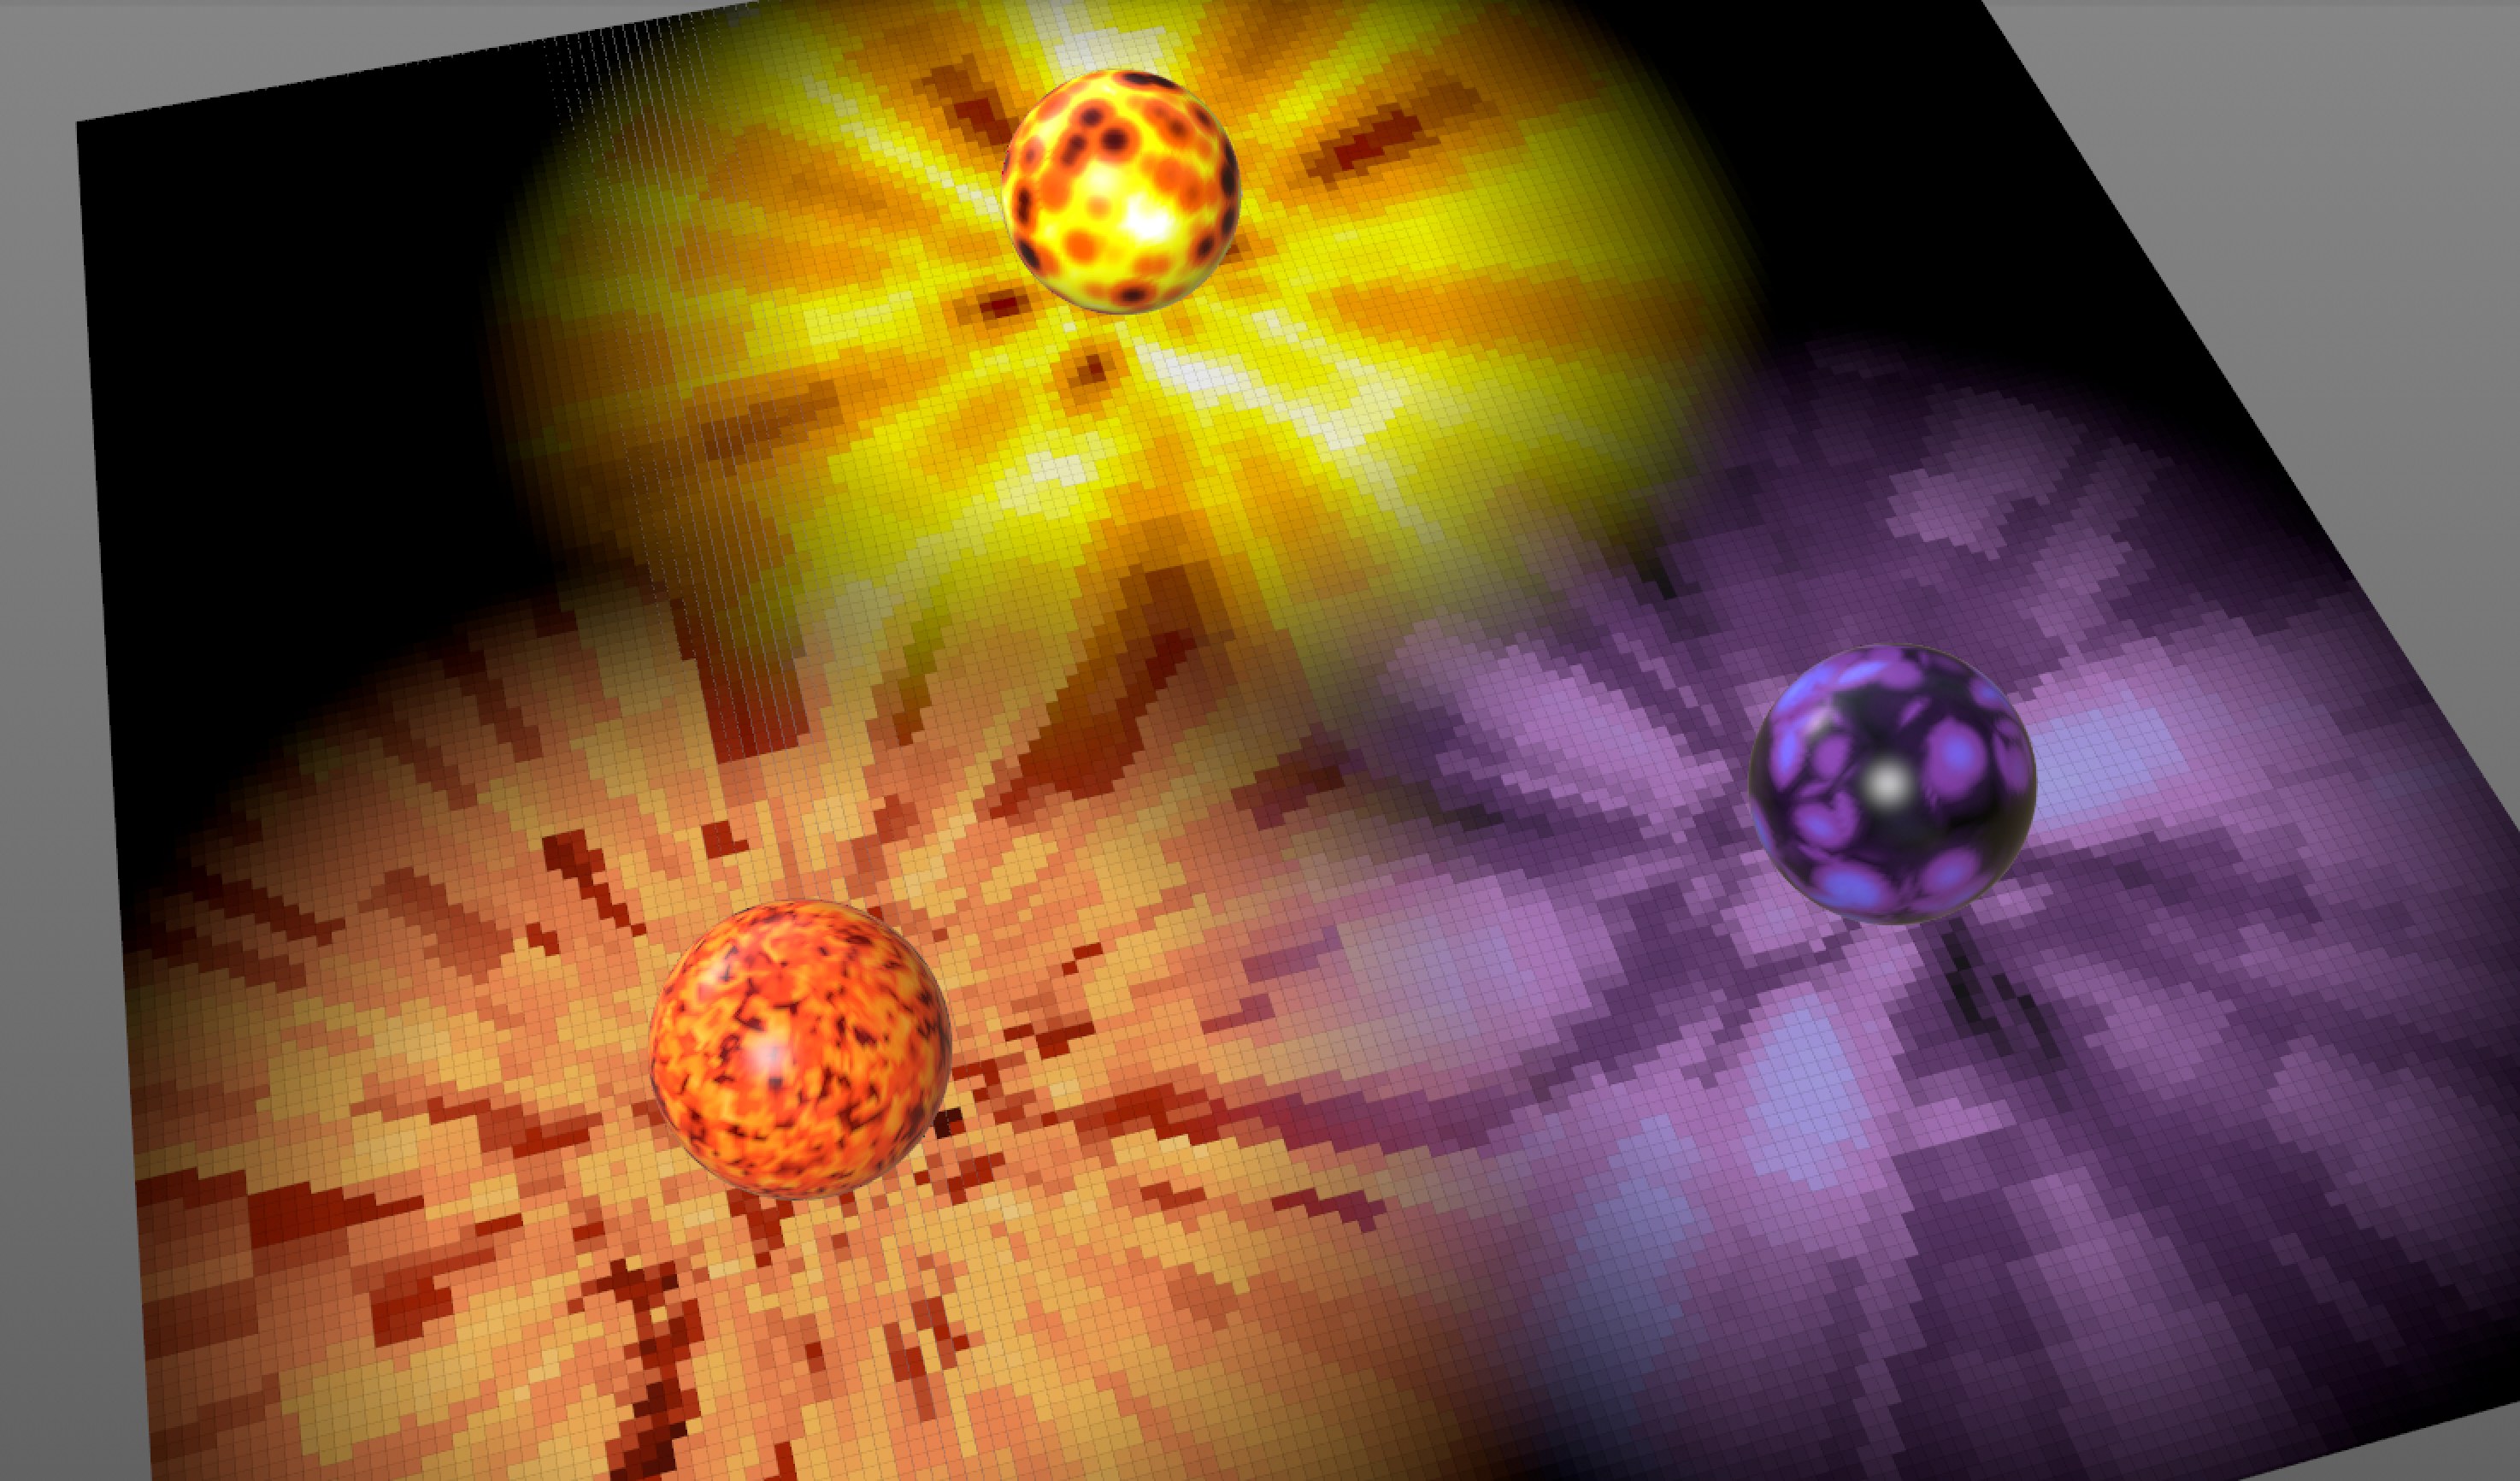
This diverse range of effects makes it possible for Fields to affect many areas simultaneously. In the following image, 1 Field is controlling each of the Vertex Color tags and the Vertex Color tag in turn textures the sphere via a Vertex Map shader and also colors the matrix using a Plain Effector.

How are layers blended?
For other areas of use, simply imagine simple masked object points (e.g., Deformers) or point weighting (e.g., Vertex Maps) instead of offset clones.
Blending colors and vectors is done analogously.
Since several Fields can be implemented simultaneously, they have to be combined with one another. This is done as follows in the respective Field list:
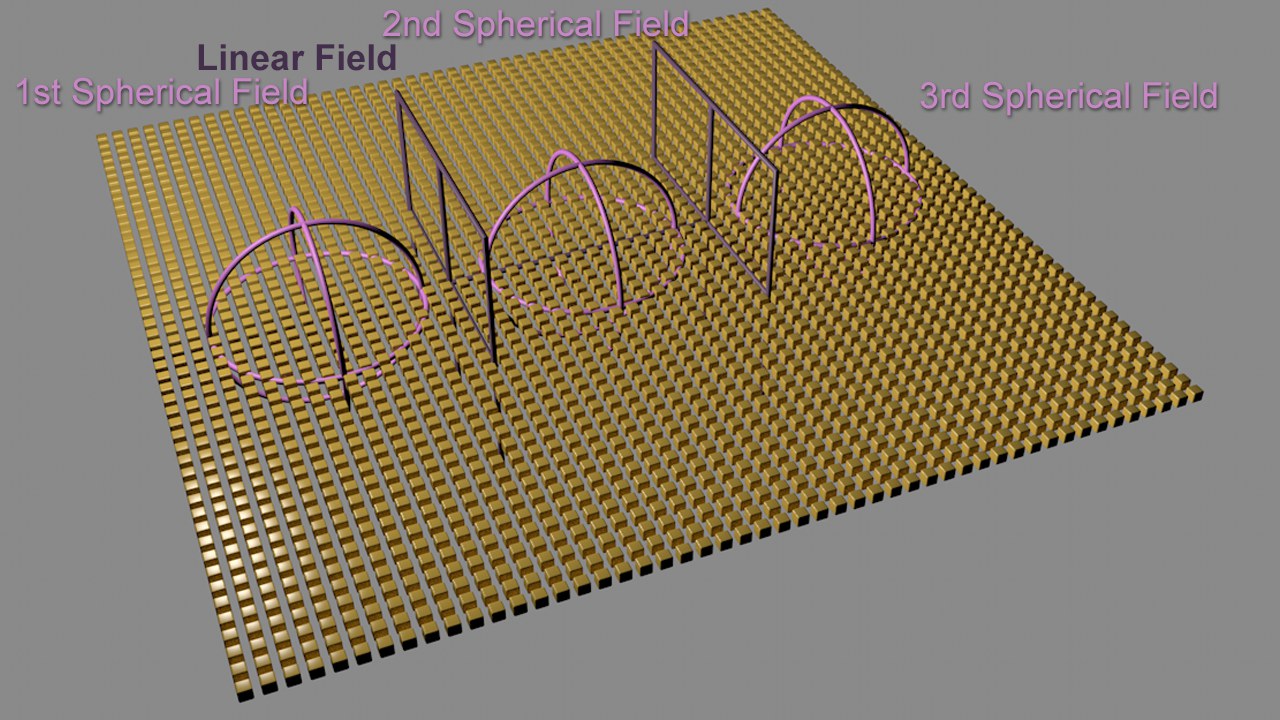 The arrangement of the 4 Fields (disabled here) on a Matrix object.
Pictured is a Matrix object that is affected by 4 Fields (the Fields are in a Plain Effector that raises the clones by 100cm, the value trim for the Field list from 0%-100% is disabled; Icon bottom right). Note the various Blending modes (strength always set to 100%).
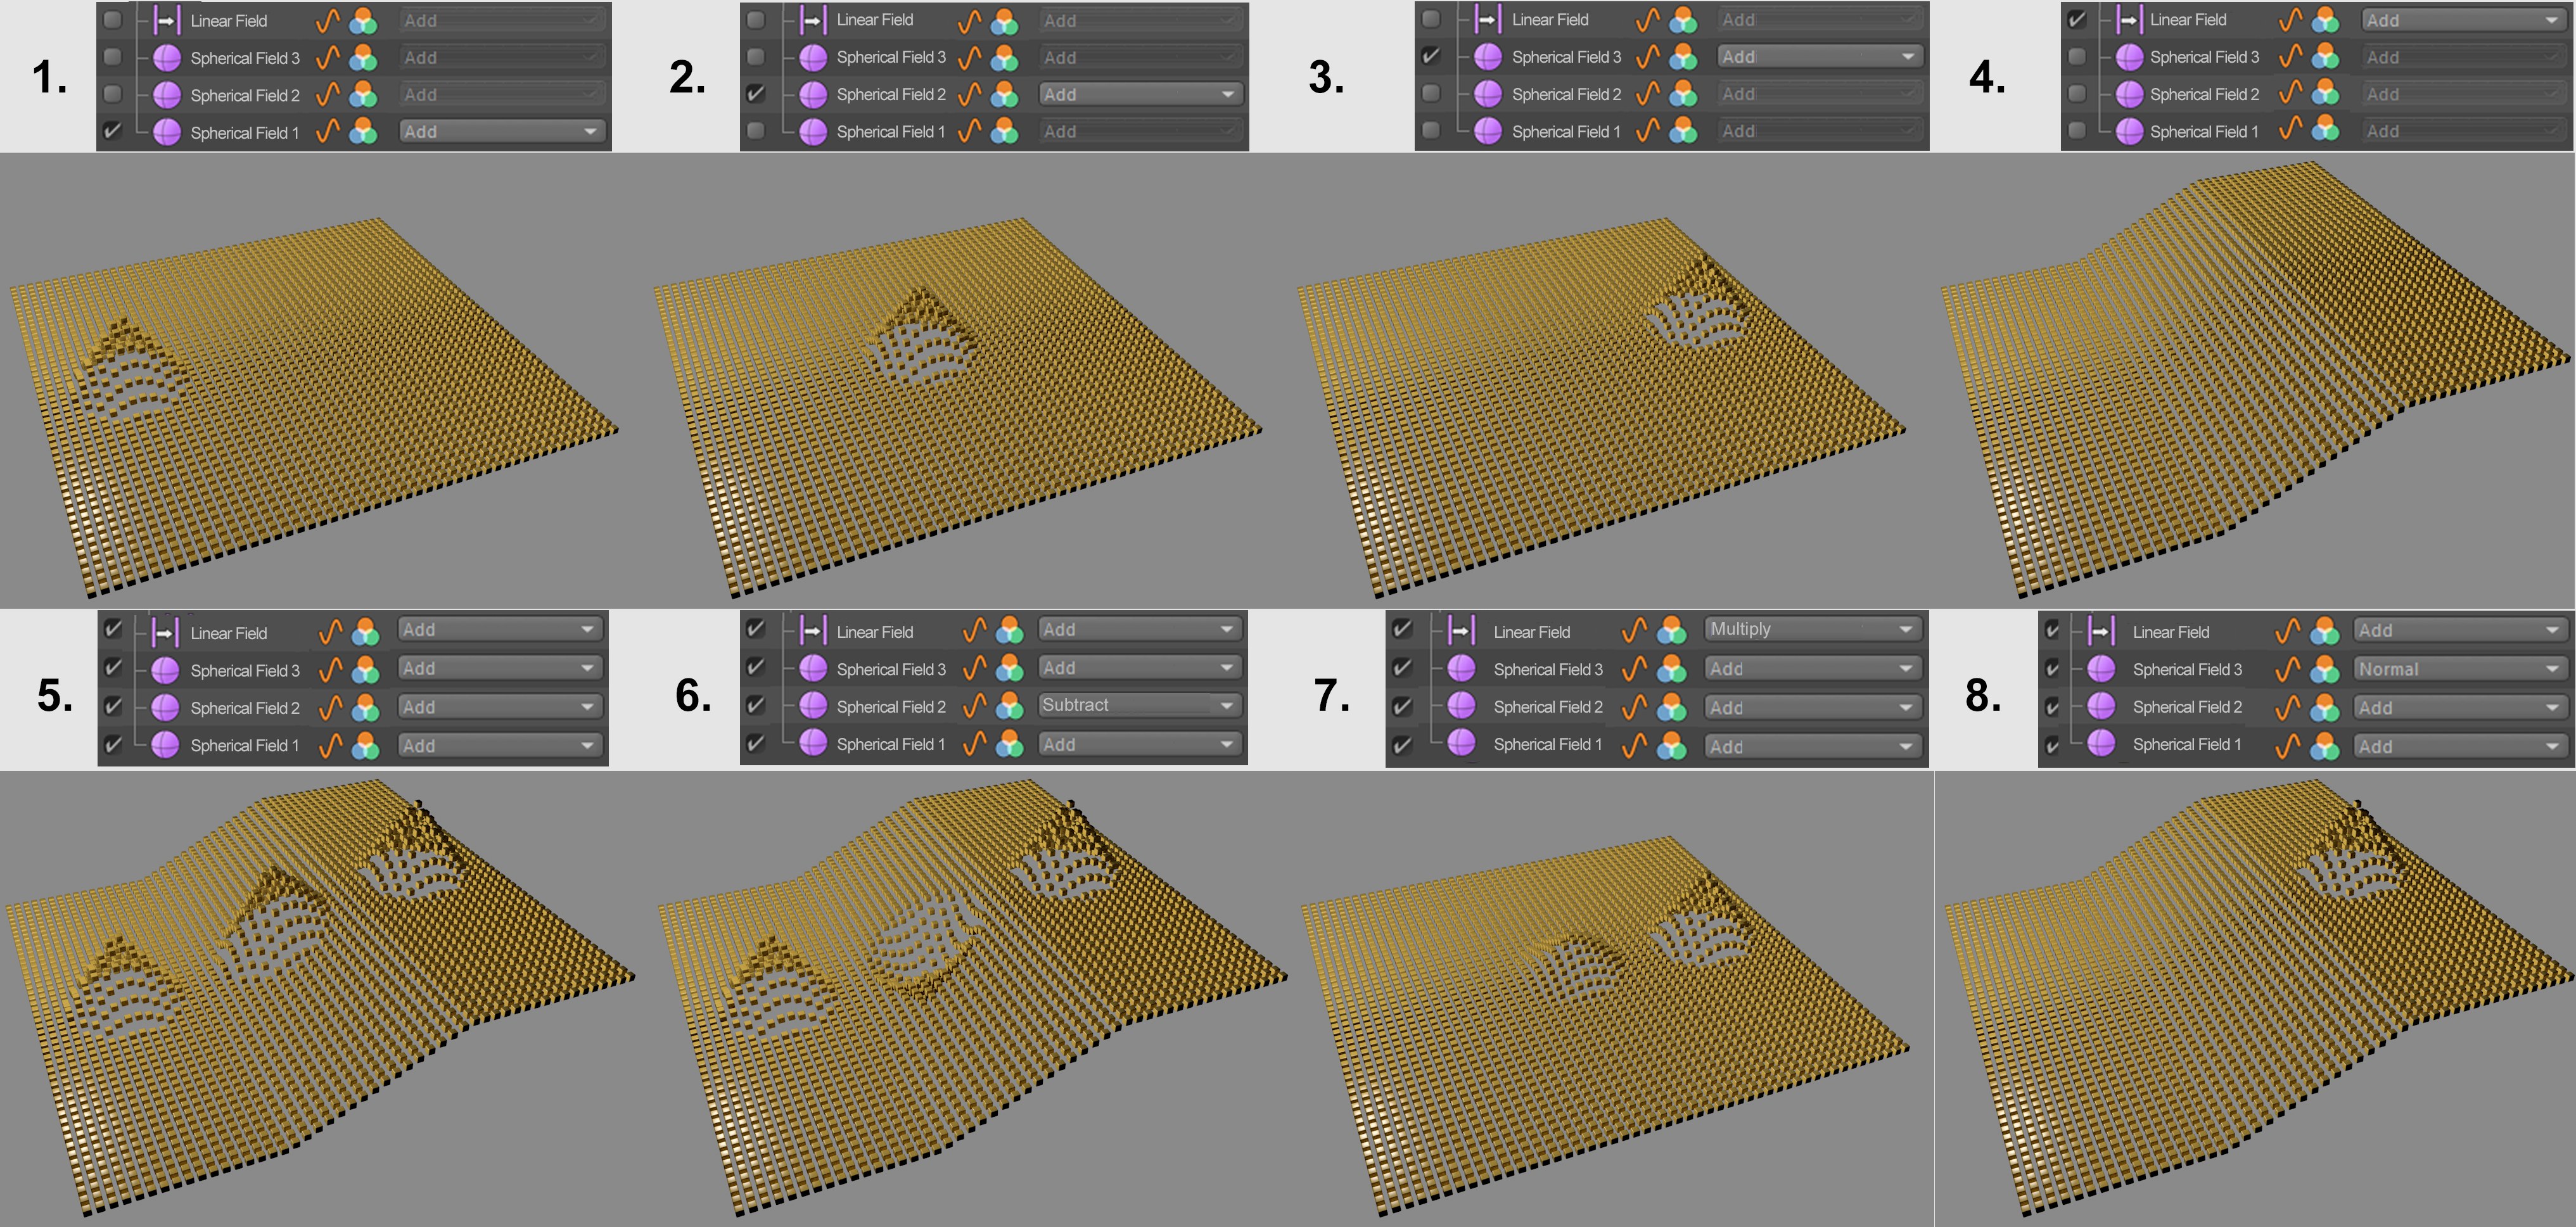 The most important Blending modes.
- In examples 1-4, only the individual Fields are activated (all use the Blending mode Add). Nothing is blended here.
- Example #5 is interesting (all Fields active): You can see here the cumulative effect of all Fields (the order of the layers - with regard to mathematical addition or multiplication - is irrelevant).
- In example #6, the 2nd Spherical Field uses the Blending mode Subtract and the effect is in fact subtracted.
- Example #7 is also interesting: The Linear Field uses the Blending mode Multiply. As you can see in the image above, the Field’s effect starts at its left edge (the Filter values increase to larger than 0 moving to the right). Onthe left, its effect is 0: 0 multiplies with the left Spherical Field is always 0, which nulls the effect of the 2nd Spherical Field. The center of the Linear Field lies approximately at the center of the 2nd Spherical Field, which means that a value of 0.5 will be sampled, which then halves the effect of the 2nd Spherical Field, while further to the right Linear Field 1 is calculated so the 3rd Spherical Field can unfold its full effect.
- Example #8 shows the effect of the Blending mode Normal: With Strength set to 100% (Spherical Field 3), it removes any effect from previous layers (the Clip to Shape option must be disabled for the Spherical Fields, otherwise only identical effects will be removed).
What exactly do the Blending modes calculate?
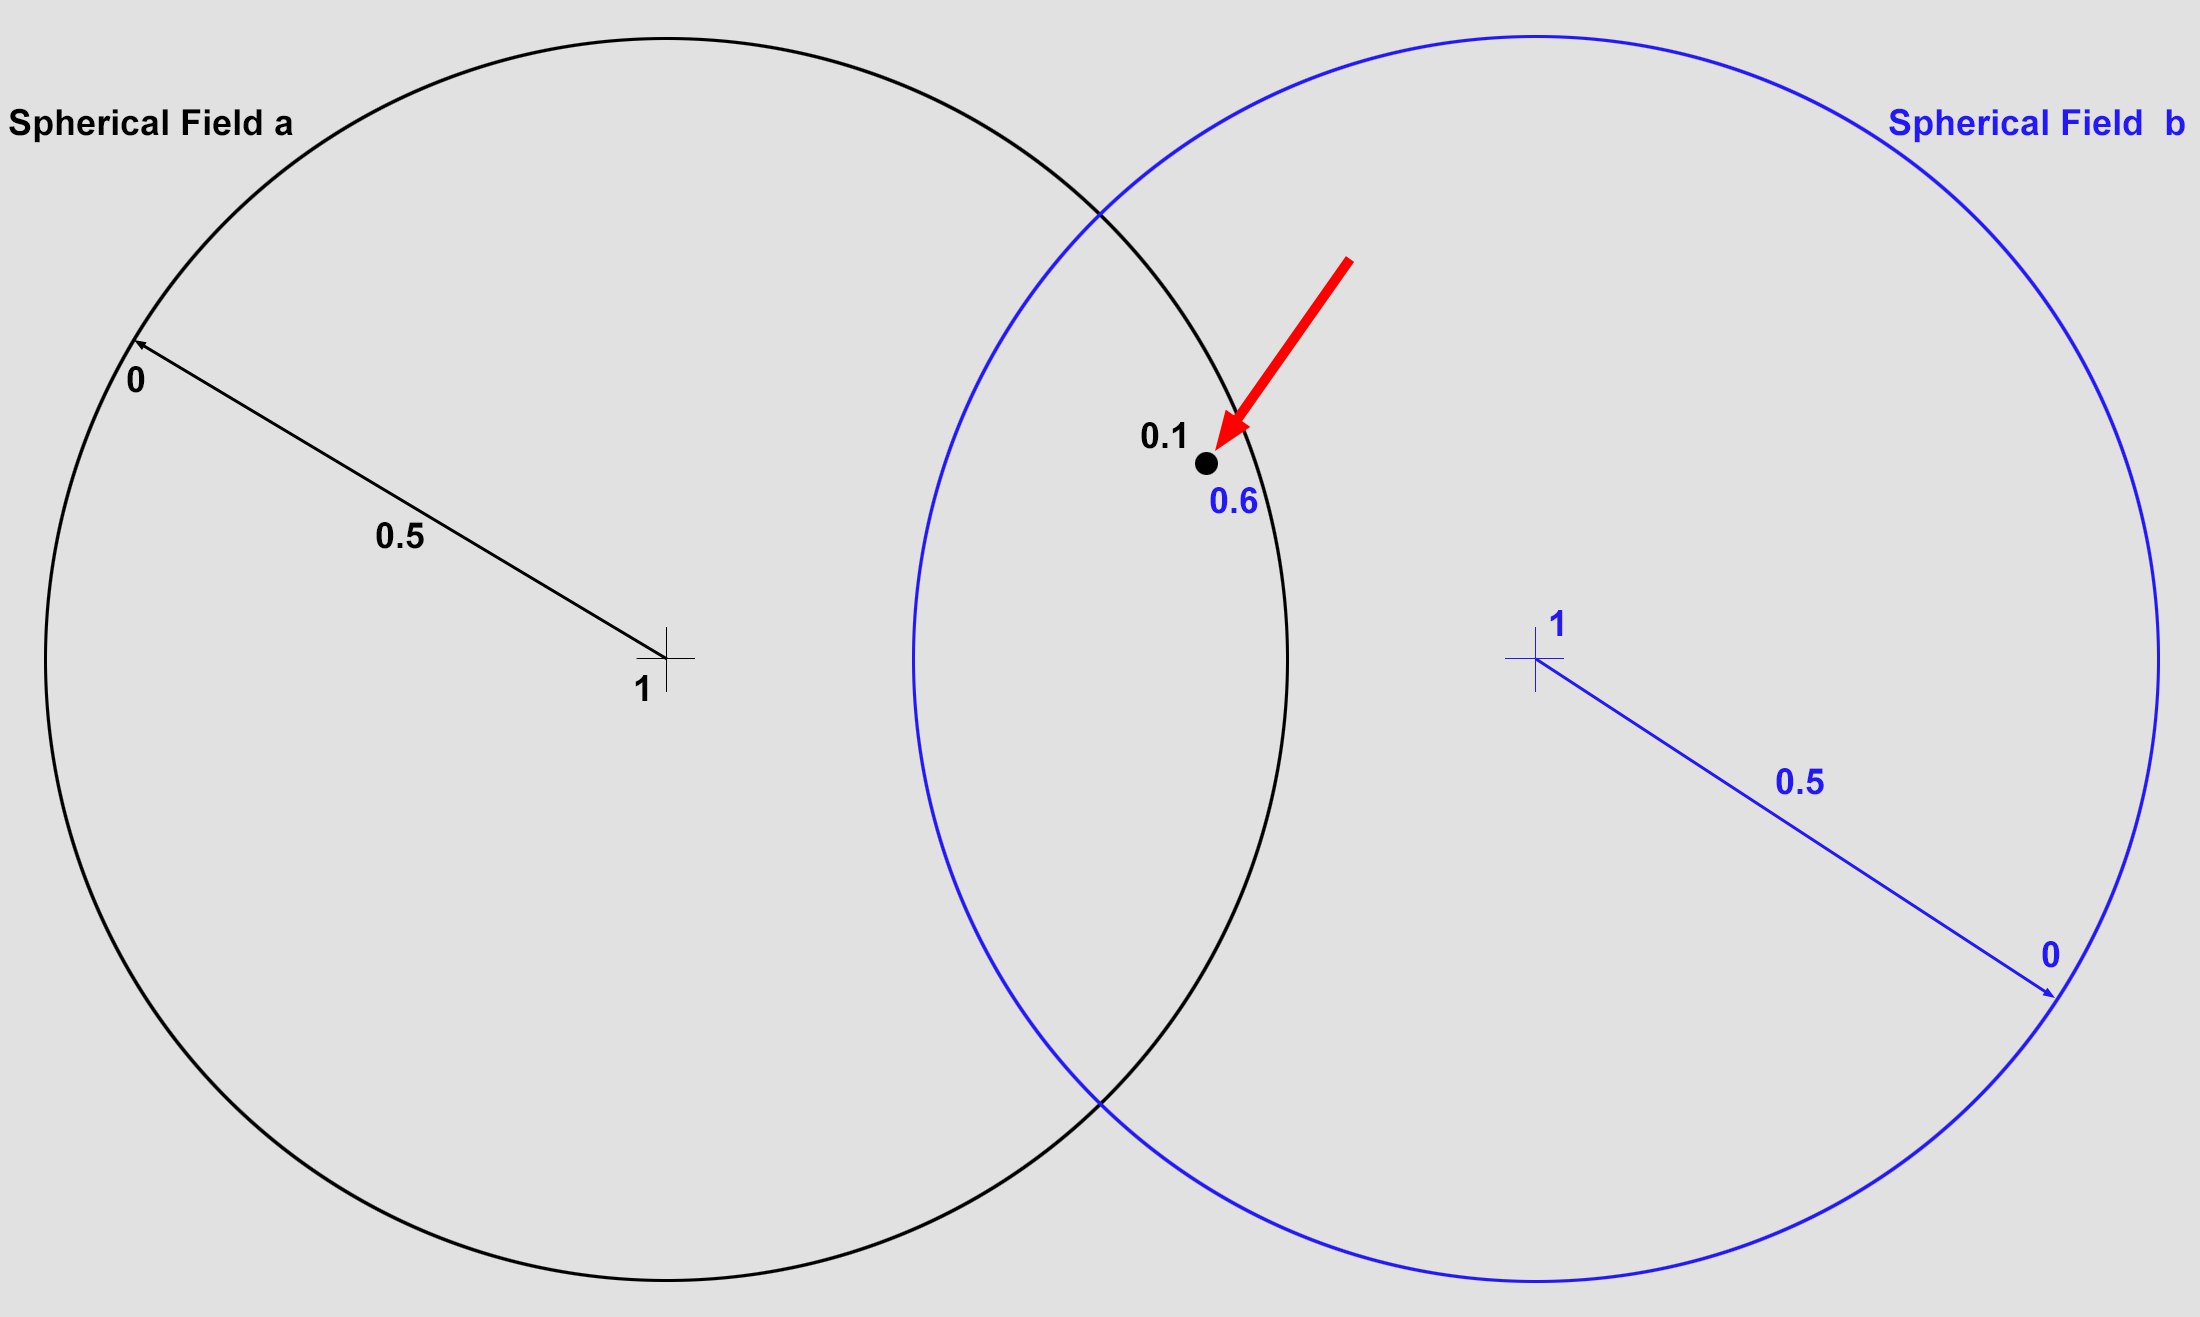
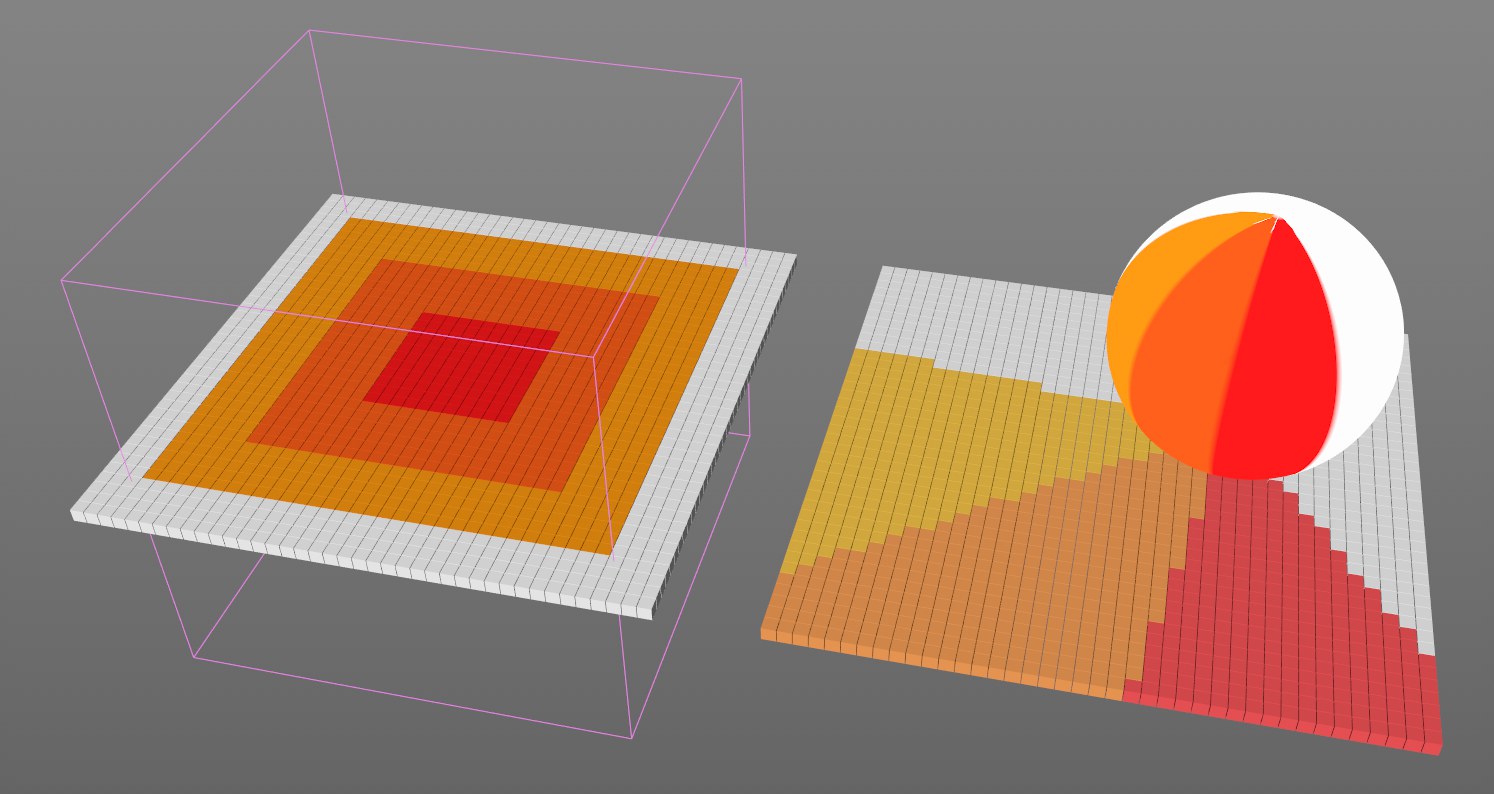
Example: 2 intersecting Spherical Fields:
 The spread of values for the radius (this way the 1 does not have to begin at the center - and it can, for example, be a 3 instead of 1) can be defined using the settings in the Remapping tag.
The red position lies within both Fields. A value can be ascertained (sampled) for each Field. The Spherical Field a ascertains a value of 0.1 and the Spherical Field b a value of 0.6. Both of these values will - depending on the Blending mode defined - be added, subtracted, multiplied, etc. Imagine many clone or point positions to be sampled for the red position, to which a corresponding effect will be added.
Of course, there are not only geometric Fields. There are also others such as the Step Field, which does not ascertain values from the center to an outer radius but does so based on the numbering of object points or clone numbers. Other Fields ascertain a value from animation times and the Random Field calculates random values.
All of these Fields’ values are combined to an overall result to create a final effect.
Sub-Fields
Sometimes you will find drop-down sub-folders for certain Fields or Layers (e.g., Radial Field or Time Layer), as in the example below for the Time Field Layer:
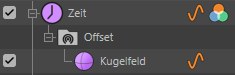
This sub-folder can even be made a subordinate of a sub-field. Explicitly for this value (and not for the entire layer), separate Fields can be defined that only affect the distribution of values for this setting.
If the Field objects in the Object Manager are selected, these will have an additional tab with the name of the sub-field setting to be affected. This does not apply to Field and Modifier Layers because these are not listed as separate objects in the Object Manager and only exist in the Fields list. It doesn’t make a difference if you generate sub-fields for Field objects via this tab or directly in the Fields list - both lists are identical/synchronized and only look differently.
Shift + clicking on a sub-folder will make newly created Fields and Layers subordinate to this folder.
Compared to Cinema 4D R20, you have a much better overview of the sub-fields being used.
Example
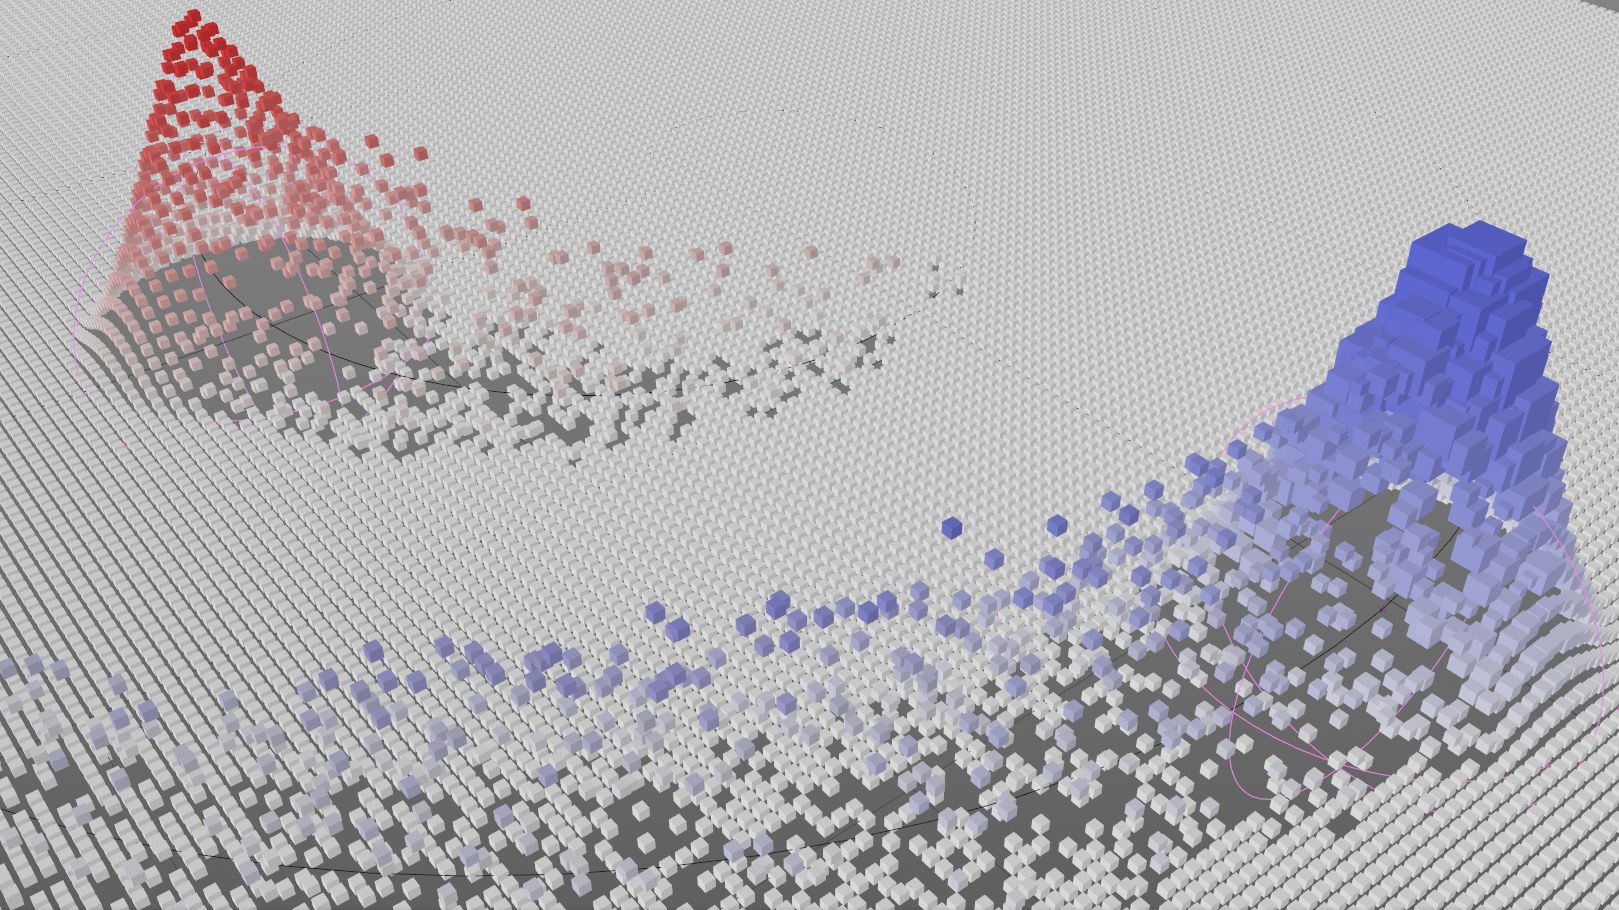 Here, a Random Field affects a Decay layer. In this case, the Effect Strength setting varies for each element.
General Tips and Tricks
’Reading’ a Field scene
If you open a scene that contains multiple Fields, it can be difficult to understand because of the many dependencies that cannot be sorted out in the Object Manager. In this case you can do the following:
- First, examine the elements that can use Field lists. These are, for example, MoGraph Generators (e.g., Cloner objects) that have a list of all Effectors in their Effectors tab - these contain Field lists. Which other elements are affected by Fields can be found here.
- Analyze the Field lists one after the other to find out which Field affects what and how.
Fields and MoGraph Effectors
General
Fields are a further development of the falloff function, e.g., for Effectors, from previous Cinema 4D versions (<R20): By moving the falloff, position, expansion and other new functions to Fields, these can in turn be linked with any Effector:
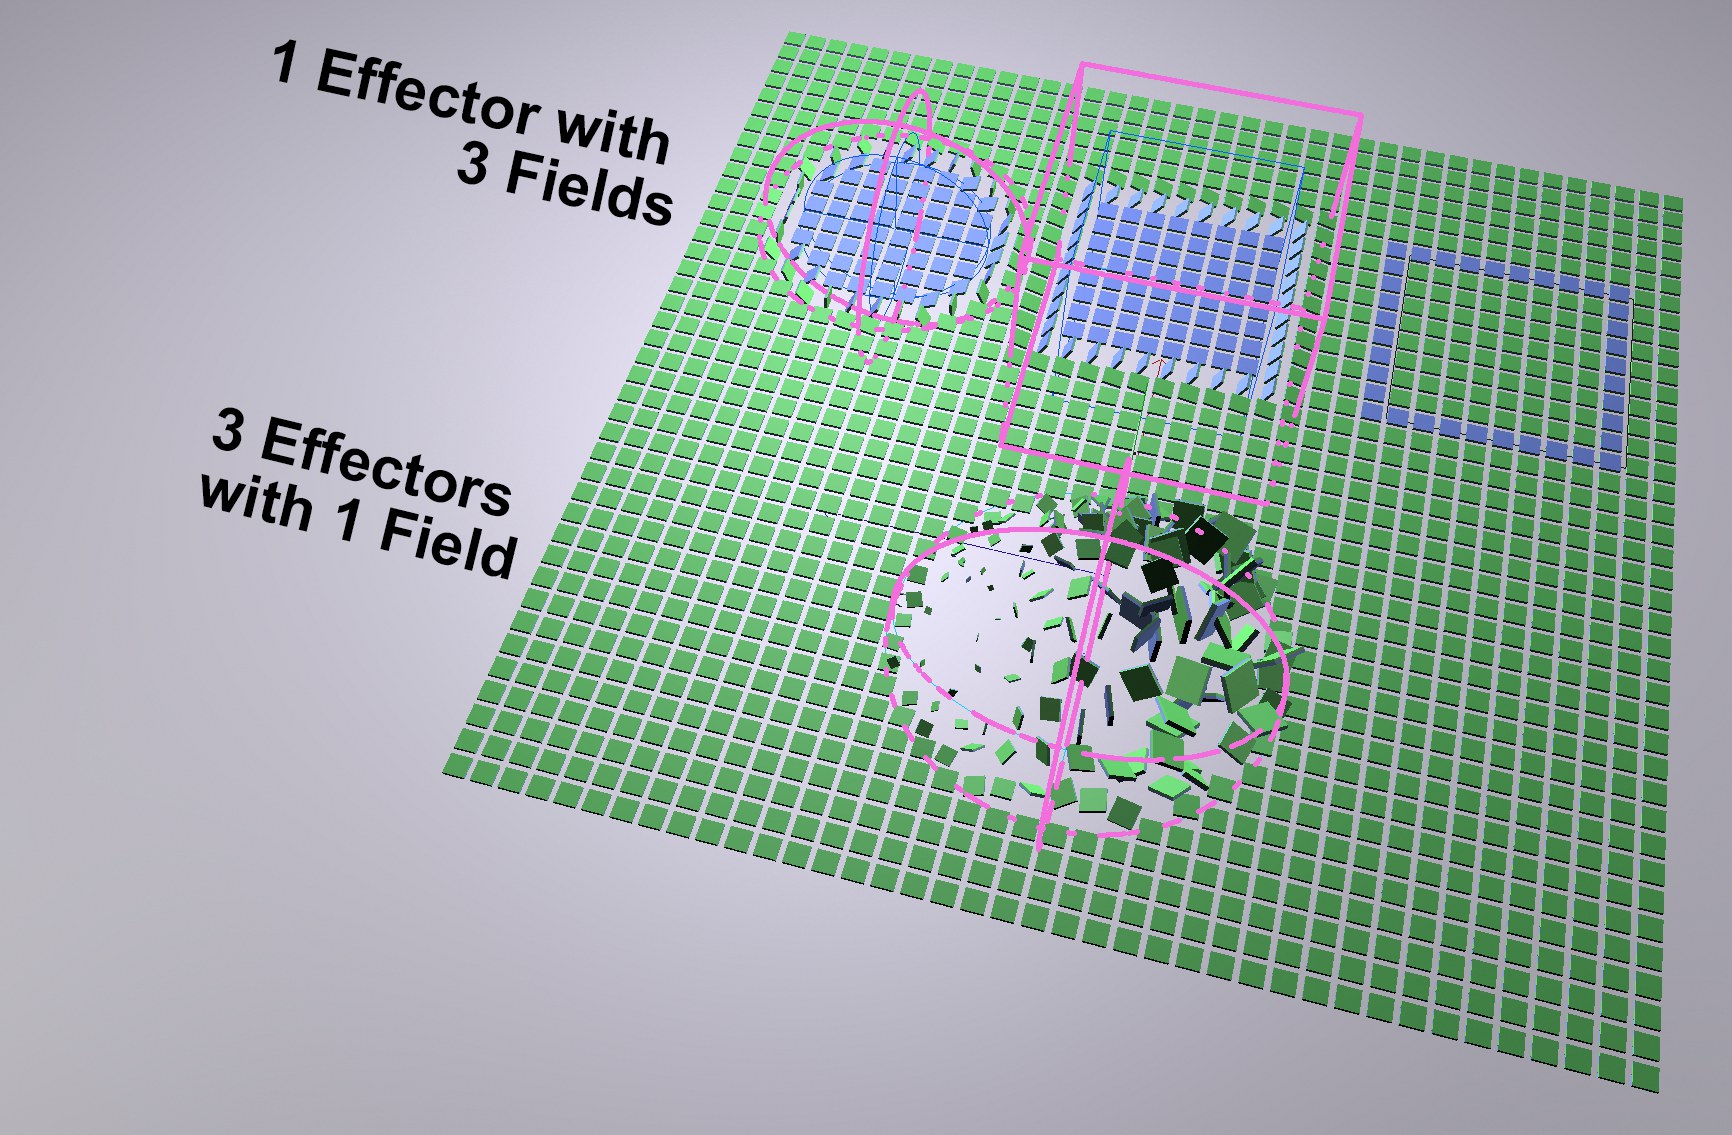 By separating the functions that define falloff to different Fields, you gain wide-ranging control over the Effectors’ effect.
New workflow for falloff
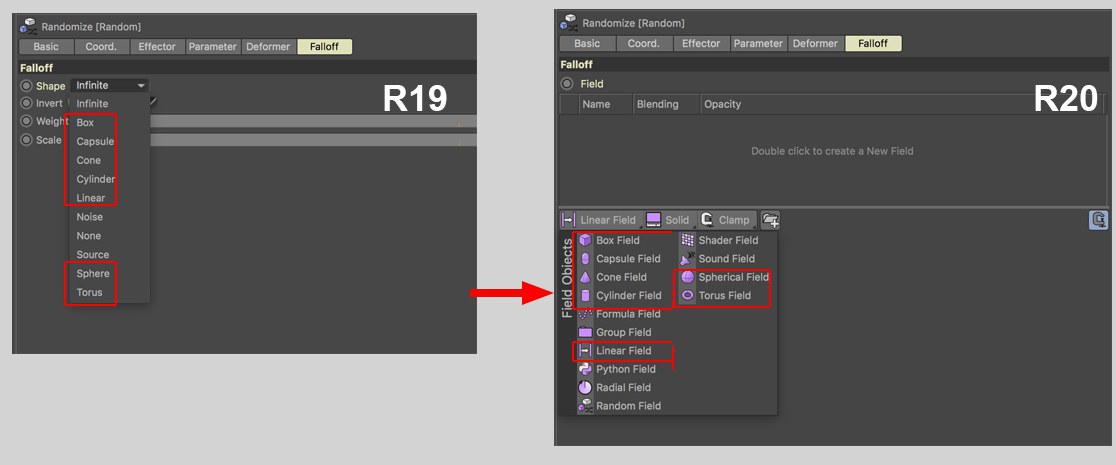 The old falloff types (and many more) can be found as a Field in the Field list. If the list is left empty, no restrictions will be applied. Noise is captured in the Random Field. To establish a source (e.g., a polygon object/Generator, spline or Emitter), simply drag the respective object into the Field list.
- Prior to Cinema 4D R20: Normally you switch to the Fields tab after you create a new Effector so you can restrict the spatial effect using the Shape (e.g., Sphere) setting.
- With the introduction of Cinema 4D R20 you can also switch to the Fields tab and use the button at the bottom left to select a Field (e.g., Spherical Field). These spatial Fields are now implemented as separate objects. You don’t have to move/animate the Effector manually but only the respective Field. Instead of stacking numerous Effectors in the Cloner object’s Effector list, you can now blend Fields in a Field list much more comfortably and with greater variety.
The Plain Effector can now be used to create multiple effects. All you have to do is feed it with the respective Fields or layer effects. The following Effectors can be replaced by a Plain Effector with the corresponding Field:
- Shader Effector
- Formula Effector
- Sound Effector
- Step Effector
- Volume Effector
- Time Effector
All other Effectors offer functions that - currently - cannot be entirely generated by such combinations. The Random Effector, for example, appears to be able to be replaced by the Random Field at first glance. However, contrary to the Random Effector, the Random Field cannot create separate random values for X, Y and Z (the X, Y and Z coordinates would, for example, be 354, 354, 354 or 23, 23, 23 and so on (i.e., identical)).
It’s basically easier to understand working with Fields and Plain Effectors than with Fields and old Effectors (e.g., Random Effector with a Random Field) even though such combinations will also work.
Loading old MoGraph scenes (< Cinema 4D R20)
Old MoGraph scenes will be loaded with unmodified Effectors - with the old Falloff tab - so that they work as usual (the description for the old Falloff tab is, however, no longer present in the documentation).
A Switch to Field button will be displayed in the Falloff tab with which the Effector will be switched to Fields (cannot be undone). However, old Falloff settings will not automatically be assumed. These must be recreated using Fields, which can be done quite easily (see New Falloff workflow) since the shape Fields have the same names.
When an old scene is loaded: old Falloff tab
When a new Effector is created: new tab with Field list
Colors
If coloring using Effectors was not so clear in previous versions of Cinema 4D, it is now. Now, Fields are used to define the colors and do the coloring. In the Effector itself, make sure that Fields Color is selected in the Parameter tab’ Color menu.
How do Fields create colors? Most fields apply spatial effect fields with which an effect is controlled. Imagine the distribution of the effect as a grayscale Gradient. These levels of gray can now be converted to colors using remapping. All Fields have a Color Remap tab with settings that can be used to control coloring. The levels of gray can then be replaced with an individual color or a color range (similar to the Colorizer shader) and passed on to the Effector.
A few special Fields also exist that do not create colors based on their effect strength but do so in a different way. These are, for example, the Shader, Sound and Random Fields as well as tags that have their own colors (e.g., Vertex Color tag). These can pass on colors directly to the Effector - without having to use color remapping.
 On the left a Box Field colors a group of clones using its quantized values; on the right is a Vertex Color tag painted onto a sphere and a group of clones. A Plain Effector is used in both examples.
In the Effector’s Field list, the colors of multiple Fields can be combined with different blend modes.
On the following pages you will find descriptions of all elements that can be added to the Field list.
The term Values on the following pages refers to the 3 channels Values, Colors and Direction, which can be used to affect Fields and layers.