Project Asset Inspector
General
- Bitmaps (*.tiff, *.jpg, etc.)
- Sound files (*.wav, *.aiff, etc.)
- XRefs, etc. (*.c4d)
- 3D files (*.abc, *.fbx etc.)
- IES lights (*.ies)
- GI and MoGraph cache files (*.gi2, *.mog)
- Substance files (*.sbsar)
- Volumes (*.vdb)
The Project Asset Inspector shows all assets of the current scene, including many of their properties. You can see at a glance if assets are missing and can re-link, exchange or combine these and much more. The Project Asset Inspector is especially useful if you suddenly get error messages for missing data when rendering. This can happen easily when copying projects and opening these on a different computer.
Example: What should you do if you load a project and textures are missing when it’s rendered?
For the most common case that the original texture folder was moved and the texture paths simply need to be reset, you can proceed as follows:
-
Call up the command. This will select all textures that need to be edited.
-
Call up the command. A selection menu will appear.
-
Navigate to the folder in which the missing textures lie and click on Open. That’s it. All textures will now be linked.
-
If you want, you can now save all of the project’s assets (
 Save Project with Assets...) and, for example, zip them and send them to another user. Alternatively, the new Consolidate Assets command can be used.
The Project Asset Manager interface
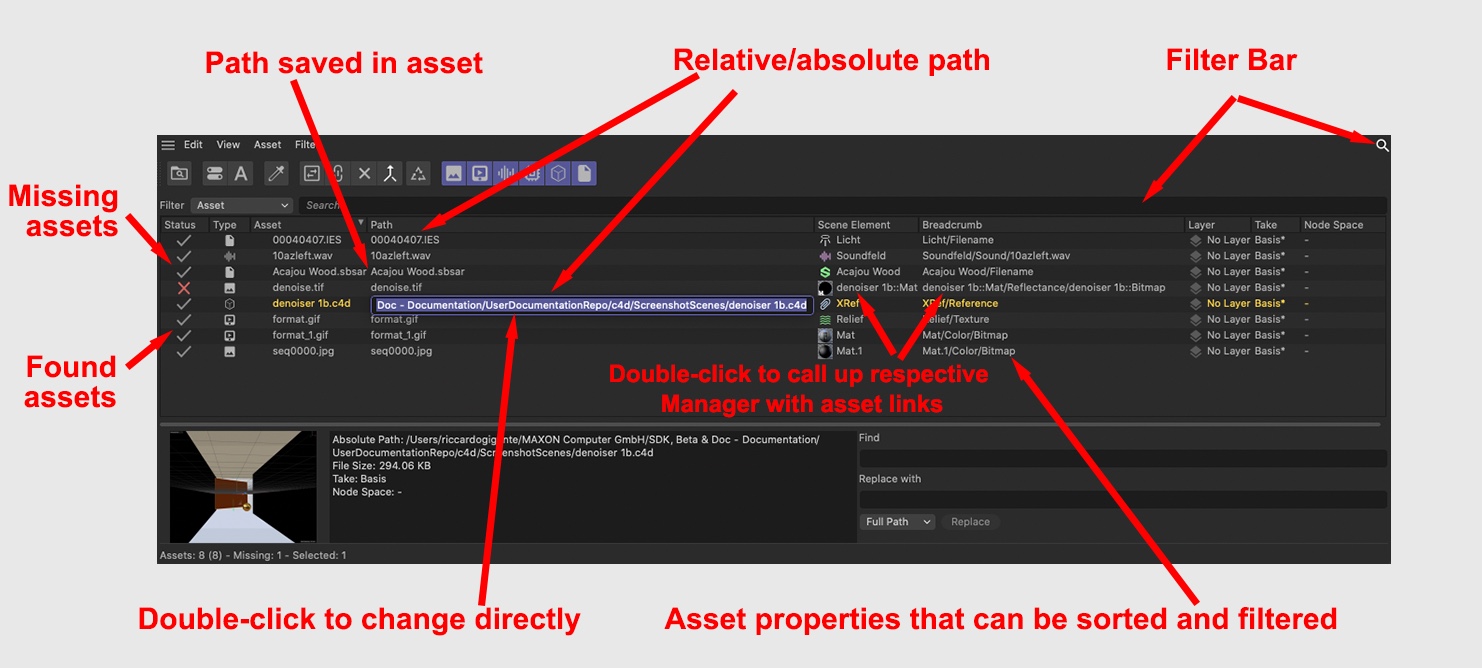
Asset list
In the Asset list you will find all assets in the opened project, including several of their properties listed below. Note that you can double-click on names the list to rename them, which means that you don’t, for example, have to switch to the Material Manager to select a new asset path.
Double-clicking on the asset icon under Scene Element will open the Manager directly at the location at which the asset is linked. This is very practical and lets you quickly see which function the respective asset has.
Assets can be selected and deselected in combination with the Shift and Ctrl/Cmb keys (you can also click and drag over several elements with the mouse.
If these columns are too narrow to show a complete path, you can hover the cursor over them and the complete path will be displayed.
You can click on the column name to arrange the list alphabetically. Click on it several times to change the sorting order. The columns can be moved horizontally by clicking and dragging them. Click and drag the dividing line between the columns to widen or narrow them.
Each column is explained in detail below (each column can be hidden or displayed in the View menu):
Status
3 asset states are available:
- Gray check mark: Asset was found.
- Red cross: Asset was not found and must be re-linked.
- Warning con: Asset was found but the absolute or relative path is wrong. The renderer will give you an error message and the asset hast to be re-linked.
Type
Displays the asset type (e.g., image, audio, etc.).
Asset
Displays the file name, incl. file type. For sequences, start and end frame numbers will be displayed.
You can double-click on a file name to change it (and therewith the link).
Path
Here, the path saved with the asset is displayed. If only the file name is displayed, the path is relative; if a path is displayed, the path is absolute. What are relative and absolute paths?

- The path displayed at the top is a relative path. These assets are located where the project is saved, i.e., in a sub-folder (e.g., tex). If you copy the complete project folder to another computer you will have no problem finding all of these assets.
- The path displayed at the bottom is an absolute path, which points explicitly to a specific file path. If the project is copied to another computer you may have difficulty finding this asset since this path may not exist on the new computer.
For the commands described below, both path types can be switch to the other.
You can double-click on the path to change its name to change the link.
Scene Element
Here, the element name is displayed in which the asset was linked. This can, for example, be the name of a material, sound field or node.
You can also double-click on this name to enter a new element name. Double-clicking on the icon will open the respective Manager at the location at which the asset is linked.
Element Type
This column displays the element type in which the asset is linked, e.g., material, XRef, sound field, etc.
Breadcrumb
Here, the path (incl. element name) is displayed in which the asset is located in the element (e.g., material object, tag, etc.). Double-clicking on the path will open the respective Manager at the location at which the asset is linked.
Layer
If the element in the asset (e.g., material, object) is assigned to a layer, this layer will be displayed here. You can double-click on the name to rename the layer (the assignement will remain unaffected).
Take
Assets can be exchanged if different Takes are used. Here, the Take in which the asset lies is listed. If you don’t use any Takes, Basis will be displayed. The Take that is currently active in the project will be displayed with an asterix (*).
The assets of all takes will always be listed, regardless if the Take is active or not.
Node Space
Materials can be assigned different node spaces (e.g., Physical Renderer). The corresponding node space is displayed here. The node space currently defined in Cinema 4D is denoted here with an asterix (*).
Absolute Pfad
Here, the absolute path will be displayed, regardless of whether it’s a relative or absolute path.
New File Path
If you change paths using the replace function described below, the path entered will be displayed using a type of preview function (before the Replace button is pressed).
Format
Here the asset’s file format (JPG, ies, c4d, etc.) will be displayed.
File Size
Here, the asset’s file size is displayed.
Resolution
Here the image (if present) resolution is displayed in pixels.
Preview/Info
At the bottom left of the Manager you will see a preview of the asset, if it is able to be previewed as an image (e.g., bitmaps, c4d project files, ies, substances, etc.). The preview will stay blank or a symbol will be displayed for other file types.
You can double-click on the preview image to display it in full resolution. The enlarged display can be moved using the mouse and a small navigation display will make it easier to orient. Double-click again to display the entire image.
At the right of the preview you will find an information field that displays information pertaining to the currently selected asset such as resolution, color depth, alpha channels (bitmaps) or number of frames, channels, sample rate (sound files), etc.
Find/Replace with
At the right of the information field you will find the Find and Replace with functions with which you can find and replace any asset path, directory or asset name. This works as follows (for demonstration purposes with only 1 texture instead of the actual 324):
Assuming you have a texture in the path "/Users/olibecker/Desktop/Bunny/Textur/Hase.jpg"
2 years later you open the scene file and this texture file can no longer be found because the texture folder and the texture are now located here:
"/Users/olibecker/Desktop/alte Projekte/xxx/Textur/Hase.jpg"
In order to redirect to the new path, type Bunny in the Find field and old project/xxx (either Full Path or Directory selected in the drop-down menu). If the textures are selected, an new absolute path will be displayed in the New File Path column, which should reflect the actual path. If you now click on the Replace button, the paths for all selected textures in the material will be changed.
The Replace function, the part (or texture name) of the path that is defined in Replace with will be replaced with what was defined. This way, paths for numerous textures or assets can be quickly replaced.
In the selection menu you can define which part of the path should be affected by the Replace function. The path can be separated as follows:

The previously described expressions * (random text), ? (random, single mark) and # (random, single digit).
Brief example: These settings can be used to replace all texture names with a date prefix with textures of the same name with a "final_" prefix.
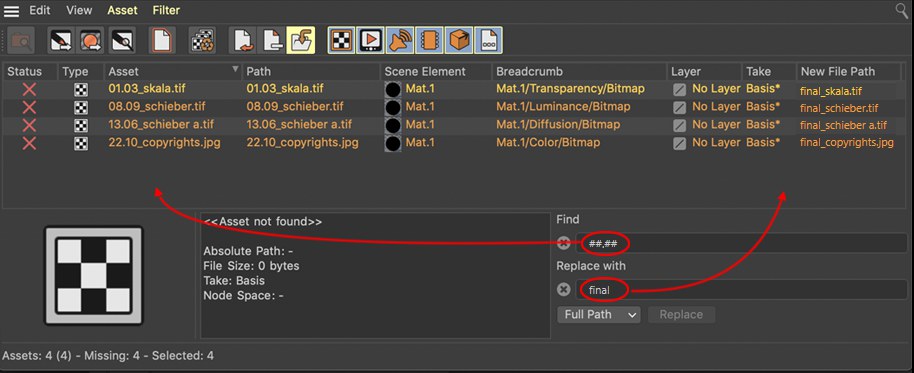
Of course this all works especially well if you adhere to defined rules when assigning path and texture names (e.g., adding the date, numbering conventions or adding "low_" to low-res textures that will later be replaced by high-res textures). You can then easily and quickly replace textures and set those not found to a new path.
Menu
Edit Menu
All of the following commands always only refer to the asset paths within Cinema 4D. The asset files themselves remain unchanged.
The following still applies: Assets omitted by the filter will not be taken into consideration (exception: Deselect All)
Most of these commands can also be called up in a context menu by right-clicking on the Project Asset Inspector.
Displays the file in the Explorer/Finder for further editing.
Opens the file type with the corresponding application used by the operating system.
Loads the file in Cinema 4D’s own Picture Viewer. This only works with bitmaps.
Opens the corresponding Manager (e.g., Material Editor or Node Editor) at the location at which the file is linked.
Opens the link in the respective Manager (Material Editor or Node Editor).
This option (not a command) determines if the elements in assets selected in the Project Asset Inspector should be displayed in the Attribute Manager.
Selects all assets displayed in the asset list.
Deselects all selected elements (including those hidden by a filter).
All assets displayed in the list and not found will be selected.
Deselects selected assets and selects those that were not selected.
The assets of the elements selected in the respective Managers (e.g., material in the Material Manager, object in the Object Manager) will be selected in the Project Asset Inspector. This does not work with all assets (e.g., cache files or Assets in the Scene Node Editor).
View menu
Grouping
Grouping assets, e.g., according to their properties (name, type, layer, etc.) can improve your workflow. In this column, groups will be created (the column can then not be hidden). In the image below, assets were grouped according to type, whereby all images are placed in a single group.
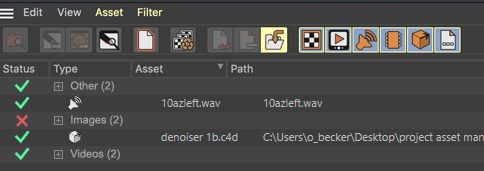
The group can be opened or closed by clicking on the +/- icon. Combined with the Cmd/Ctrl key, all groups will be opened or closed. The same happens if you scroll through the list and click on the left or right cursor button.
Clicking on a group name will select all subordinated assets (e.g., to make a command affect all group assets). Cmd/Ctrl + click to deselect all grouped assets.
You can select from the following grouping options (it doesn’t matter if the assits are located in different scene elements (material, nodes, effectors, etc.)):
Removes all grouping. All assets will be listed individually.
All assets with identical names and paths will be grouped (e.g., identical bitmaps in different materials).
All assets of an identical type will be grouped (e.g., all sound files or bitmaps).
All assets of an identical element type will be grouped (e.g., all bitmaps and sound files that are used in a given material).
All assets that belong to an element of an identical layer will be grouped. For example, if a light’s IES file on Layer A and a material (also assigned to Layer A) have a bitmap loaded, both the IES and the bitmap will be grouped.
All assets of the same Take will be grouped. For example, if a bitmap is loaded into Take B and a sound file in a Sound Effector in Take B, these will be grouped.
All assets of the same node space will be grouped.
This option lets you group assets with identical file formats. For example, all JPEG files, all .wav files, etc.
Visible columns
Use this option to define which respective column should be displayed in the Project Asset Inspector.
Asset menu

These commands create and delete entire file paths, respectively.
Localize Filenames removes the asset paths from all selected assets and only utilizes the file name. This makes turns an absolute path into a relative path (which Cinema 4D looks for here). This also happes automatically if you save a project using the ![]() Save Project with Assets... command.
Save Project with Assets... command.
Globalize Filename turns a relative path into an absolute path for all selected assets. The complete file path will be used.
A single file can be reassigned for selected assets.
This command re-links selected assets with assets of the same name in a selected directory. Depending on the location, absolute (outside of Cinema 4D’s search paths) or relative (within Cinema 4D’s search paths) will be created.
This command is always useful if no assets at all can be found. This is most often the case when the asset folder is at a completely different location. Then simply select all assets, call up this command and select the new directory. All asset paths will then be re-linked and you can start rendering.
Deletes all links to the selected assets. This can, for example, be used to remove all texture links to non- existent files in disabled material channels. These are denoted by the red cross in the Project Asset Inspector.
This command works similarly to the ![]() Save Project with Assets... command with the difference that no new directory must be created and the assets will be saved at the location at which the project is saved. This command only affects assets selected in the asset list (no selection = all assets).
Save Project with Assets... command with the difference that no new directory must be created and the assets will be saved at the location at which the project is saved. This command only affects assets selected in the asset list (no selection = all assets).
This command collects all assets and saves them at the location at which the project is saved (sub-folders will also be created, e.g., tex for textures, illum for GI cache files, etc.). Absolute paths will be turned into relative paths.
If the file was not yet saved, you will be asked to enter a file path to which the file, including assets, should be saved.
Filter menu
The search list that is displayed provides you with a powerful filter that offers an overview of up to hundreds of assets. Use the Filter selection menu to define what should be filtered (in the main Display menu you can display all possible columns to see what exactly can be filtered).
The string search field is only a display field that works in real-time. Simply type a series of characters and each element made up at least in part of these characters will be listed. Upper and lower case will be taken into consideration. Clicking on the "x" at the left of the text field will clear the field and all respective assets will be displayed. There are 3 expressions that can be used here (as well as in the Replace with field):
- * dummy for arbitrary text.
- ? dummy for individual character
- # dummy for a digit or multiple sequential # numbers (see example below).
Several examples will help shed more light on this:
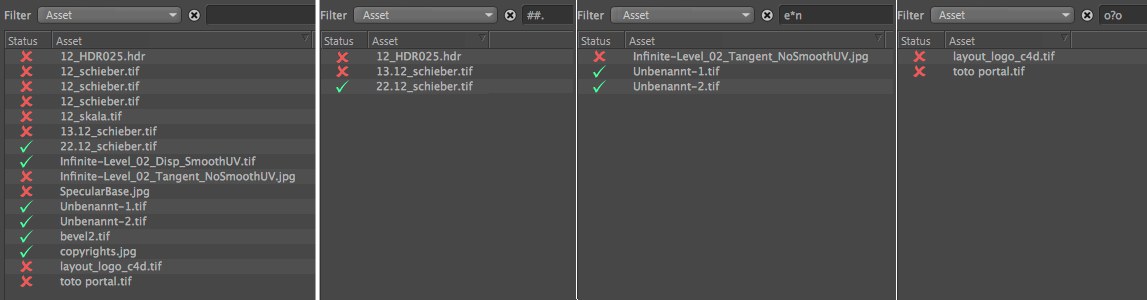
At the left you see the unfiltered asset list, then filtering from left to right:
- ##.: Everything will be listed that contains a series of characters of at least 2 digits, followed by a period
- e*n: Everything will be listed that contains a series of characters begins with a lower-case e, followed by arbitrary text and ends with a lower-case n.
- o?o: Everything will be listed that contains a series of characters that starts and ends with a o and has exactly ONE random letter/number in-between.
The following filters are not text filters but were set up using the following selection menu in order to filter specific properties:
- Status: Here you can select if want to display existing or missing filters or those with warnings.
- File Size: Here you can select if the asset should be displayed if it is smaller, larger or equal in size to the defined file size.
- Resolution: Here you can define if bitmap assets should be displayed if they are smaller, larger or equal in size to a defined image width and height. For example, enter a Height of 0 if the height should be ignored and only the width should be taken into consideration. For values not equal to 0 for each, both conditions must be met.
Filter according to asset type
These filters can be used to define which asset types should be displayed in the asset list.
Note also the filters described above that can be used to fine-tune filtering (e.g., according to asset properties such as file name, file size, etc.).
Filters bitmaps.
Filters Videos.
Filters sound files.
Filters separate cache files (such as those generated by MoGraph or GI).
Filters external 3D files (e.g., *.abc, *.c4d).
Filters everything that is not included in the other filter types (e.g., *.ies, *.sbsar).