Effectors
Effectors are objects that can affect the following:
- Clones, matrix, Text objects, etc., i.e., all MoGraph clone-generating objects.
- Spline points and segments on MoSpline objects will be affected.
- When the PolyFX object is used, object polygons and spline segments will be viewed as Clones (and can be affected by each Effector).
- MoGraph extruder objects (see chapter Extruder Object).
- Normal Cinema 4D deformation-free objects (e.g., those that can be made a child of a Fracture Object).
- As deformation objects on object position, scale or rotation, on points or polygons (see also Deformation Tab).
Effectors must be arranged in the following manner in order to work:
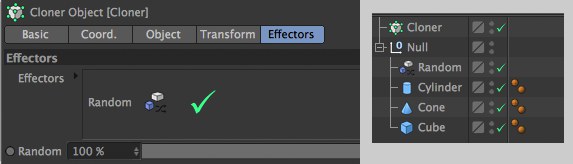 Left, the Random Effector affects a Cloner Object; right, the Random Effector effects Cinema 4D objects.
An Effector created for a clone-generating object will be placed in the Effector list (left).
What do Effectors do?
Effectors take existing clones, objects, object points (only their respective positions) or object polygons and vary their position, size, angle and many other properties, according to Effector-specific idiosyncrasies (see Parameter Tab):
- The Random Effector.
- The Step Effector sequential.
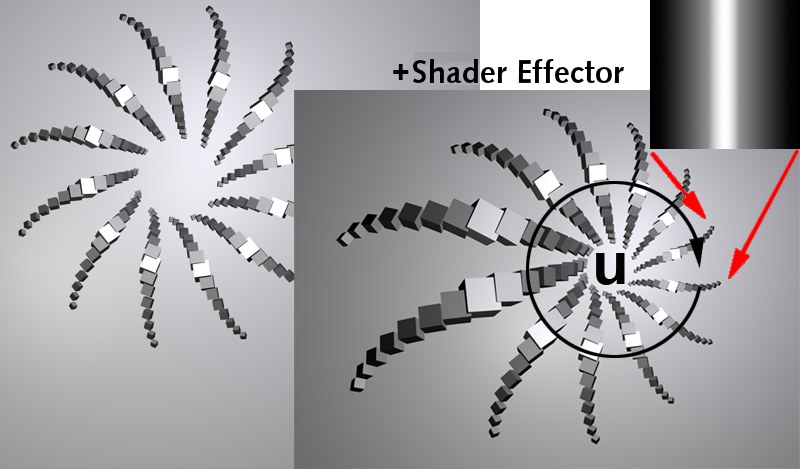
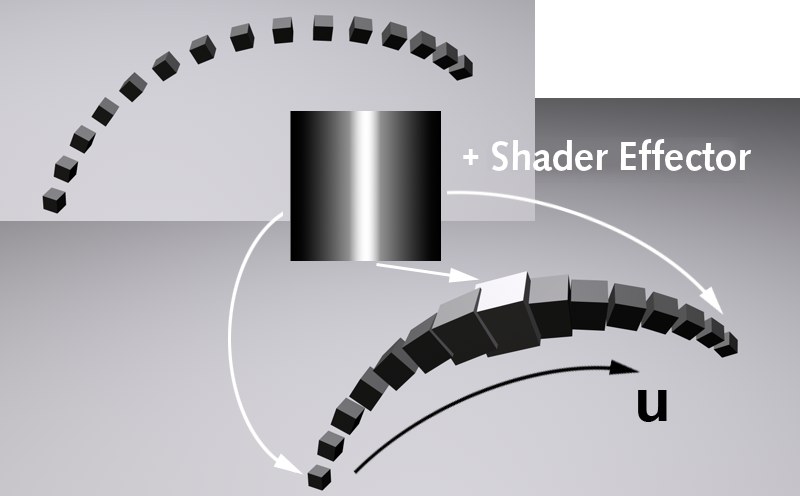
- The Shader Effector in conjunction with a texture, etc.
How do Effectors work?
For those who really want to know the nitty-gritty:
Effectors can be separated into two groups:
-
Effectors that ascertain an initial value per clone and transform them based on individual clone parameters (those that can be found in the Parameter tab). These Effectors are, for example:
- Shader Effector: Ascertains an initial value from a texture’s gray scale.
- Formula Effector: Ascertains an initial value based on a formula.
- Random Effector: Ascertains an initial random value.
- Sound Effector: Ascertains an initial value based on the sound level of various frequencies.
- Step Effector: Ascertains consecutive initial values between 0 and 1, which are then assigned to each clone.
- Time Effector: Ascertains a steadily increasing initial value in the course of an animation.
- Plain Effector: If Falloff is set to 0, constantly outputs the maximum of 100%, i.e., all values defined in the Parameter tab will be assigned directly to each Clone. This Effector is special in combination with Fields: many effects can now only be realized with this and the respective Fields (i.e., Shader, Formula, Sound, Step and Vomume Effectors no longer have to be used at all).
-
Special Effectors that, for example, use a spline or other animated object, etc. to carry out some sort of action. These Effectors are, for example:
- Inheritance Effector: Assumes the position or animation of a reference object.
- Delay Effector: A special effect that affects every clone modification with regard to position, size and rotation simultaneously, e.g., to let them all bounce.
- Spline Effector: Arranges clones on a spline.
- Target Effector: Arranges clones.
- Group Effector: Groups Effectors into one Effector.
- Volume Effector: Limits an Effector’s effect to a given object’s volume.
- Push Apart Effector: Pushes clones apart
- ReEffector: Can be used to restrict the effect of other Effectors
Parameter Tab
Most Effectors have a Parameter tab in which all clone properties that should be affected by the Effector can be. Of course there are exceptions to the rule, as is the case with the Target Effector – it does not have a Parameter tab.
Some Effectors, like the Spline Effector or the Delay Effector, only have an effect on part of the clone properties described below. Irrelevant properties will be grayed out.
Deformer Tab
The main function of Effectors is to work together with Cloners, whereby the clones will be deformed differently, depending on the Effector used.
All Effectors can also be used as deformation objects for normal polygon objects. Simply make the Effector a child of the object or make it, together with other objects within a hierarchical level, a child of a parent object. The Deformer tab also offers several additional useful settings. As you can see in the screen shot above, there are only a few transformations from which you can choose.
Fields Falloff Tab
This tab contains the Field functionality (see Fields).
About UVW Mapping in MoGraph
MoGraph has a lot of mysterious settings beginning with U or V. The reason for this is that all clones possess internal U,V, and W coordinates. This coordinate system always has a range from 0 to 1. How this coordinate system spans the clones is illustrated in the image below:
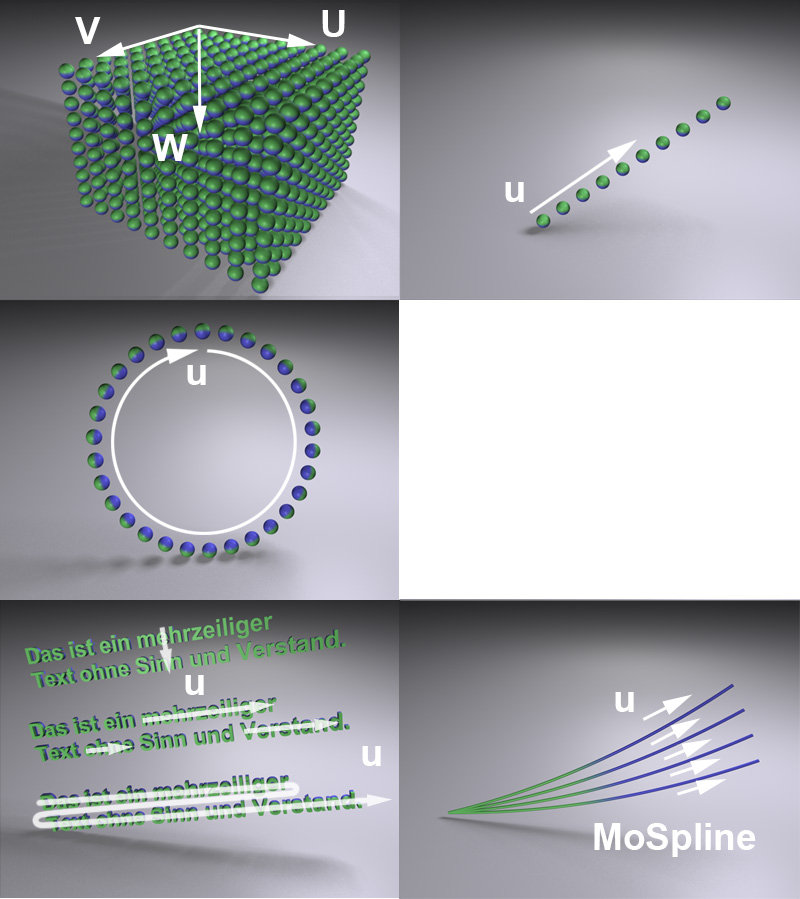 U,V,W coordinate span; Text object from top to bottom; line text index; word text index; all text index.
These UVW-coordinates have nothing to do with the texturing of clones. They serve exclusively to help Effectors assign each clone a value so that it may be transformed
Example:
If the first Cloner Object is now placed into the second Cloner Object (this time with clone mode set to Radial), the result will be as pictured at the top left (insert).