Filter
Don’t be surprised that all filters are described on a single page. We will be using one and the same object only with different settings.
This slider is used to adjust the strength of the filter.
Type Signed Distance Field (SDF)
Here you will find a description of the Volume Type Signed Distance Field.
Note that the Smooth filter’s settings are identical to the SDF, Fog and Vector options and are therefore also shown here.
 The three SDF filter types.
The Smooth filter smoothes the transition of Voxel values.
Depending if the Offset has a negative or positive value, the surface will be offset inwardly or outwardly.
Depending if the Offset setting has a positive or negative value, the outer surfaces will first be moved inwardly and by the same distance outwardly (closes holes and smoothes details, for example) or these surfaces will first be moved outwardly and then by the same distance inwardly (connects objects that lie in close proximity).
These filters can produce very interesting results. As always, it’s a good idea to experiment. You can, for example, use Hair (the Hair object can generate both splines and polygons) in a Volume Builder. Interesting structures can be created using these filters:
 Here, a Hair object with a volume shape filter Dialate / Erode.
 Note how both Operators on the lift smooth all details (peaks, holes) while those at the right maintain these irregularities for the most part (with greater render times); Volume Type Signed Distance Field and Fog have much fewer options.
The following is done to render the current Voxel:
- Gaussian: neighboring Voxel values wil be used based on a Gaussian curve.
- Mean: the mean value of the neighboring Voxel values will be used (corresponds to a rectangular filter)
- Median: the Mean value (median value of the ordered Voxel value list) of the neighboring Voxel values will be used. The local maximums (peaks) will be ignored.
- Mean Curvature (only SDF): the average curvature will be ascertained and applied at each position. Soap film, for example, behaves like this. This can be used to smooth minor irregularities.
- Laplacian Flow (only SDF): with an increasing Iterations value and a largely consistent volume, maximums will be reduced accordingly.
This is all rather abstract. Since the results are often similar, the best thing you can do is experiment in your scene to see which results are produced.
This value can not be defined for all Filter Types.
This value defines how many neighboring Voxels (in all 6 directions), in a cube-shaped area, will be used to further calculate the individual Voxel. The greater the value, the broader the smoothing effect will be. Render times will increase accordingly as the value increases!
This value is added to each Voxel value. Negative values are also possible. In practice, this means that the surface will be raised or sunken for most filter types.
Here you can define how often the filter should be applied. The render time will increase accordingly with increasing values and the filter effect will be stronger.
 Filter Options
Here you can select from 6 filters. These define how precisely or exactly the calculations should be made. The filters are arranged in order of increasing accuracy per type (Bias or Weno) from top to bottom (render times will increase accordingly). Test each one to find out which one works best for your respective scene.
These settings are used to create more volume so the filter can work better. This is a reference to the problems described here. Note the hierarchy and the order in which the filters are arranged in the object list (processed from top to bottom!). The volume resize is only applied to the volumes directly below it. Objects that appear later in the list are not affected.
However, Voxel Range will generate Voxel layers both above and below the original surface. This can be defined separately in the Volume Builder, which can result in faster calculations (and is definitely the recommended and more precise method).
Type: Fog
The Smooth filter smoothes the Voxel transitions (see Signed Distance Field above).
Here, the value range can be converted not linearly but using a spline.
This filter multiplies the current Voxel value with a multiplier defined below.
This mode mirrors the Voxel value range around a mean value or a freely definable center point.
Use this mode to add the Voxel values to the Add setting that appears.
Works like the Range Mapper XPresso node. A Voxel value range will be converted linearly to another value range (see below).
Here, you can enter the values for the Multiply and Add modes described above.
These settings will be made available if Type is set to Invert. Auto-Detect Center uses the largest and smallest Voxel values to ascertain a mean value on whose basis the value range will be mirrored. Disable this option if you want to freely define the mirror mean value using the Mirror setting.
If Type is set to Range Map, the Voxel range will be replaced by a new one (similar to the Range Mapper XPresso node). The Min and Max settings can be used to define this very precisely.
Example: these 4 Voxel values are present: 0, 1, 4, 5.
- If you set Min Input to 0 and Max Input to 5, Min Output to 0 and Max Ouput to 10, 0, 2, 8 and 10 will result.
-
If you set Min Input to 0 and Max Input to 5, Min Ouput to 2 and Max Output to 8, 2, 3.2, 6.8 and 8 will result.
The Voxel values will be transferred proportionally to the new value range.
This is useful if a value range is incompatible with another. Example: A grid’s Voxel values range from 0.1 - 0.2. A shader, for example, works best with values between 0 and 100. By entering exactly these 4 values, the best possible result will be achieved.
If Type is set to Curve, the Voxel range will be converted based on this definable spline (and not linearly as with Range Map).
Type Vector
If Volume Type is set to Vector, 6 options are available for affecting the Volume Vectors:
- Smooth: Aligns the orientation of the vectors to each other within the Voxel Distnce
- Curl: Converts the existing vector field into a special new one (see Curl below).
- Normalize: Sets all directional vectors to a constant length of 1.
- Invert: Inverts all directional vectors, which means the effect will be in the opposite direction..
- Scale: Scales the directional vector length using a value defined by the Scale setting.
- Rotate: Rotates all vectors around a definable axis (see Rotate below).
Curl
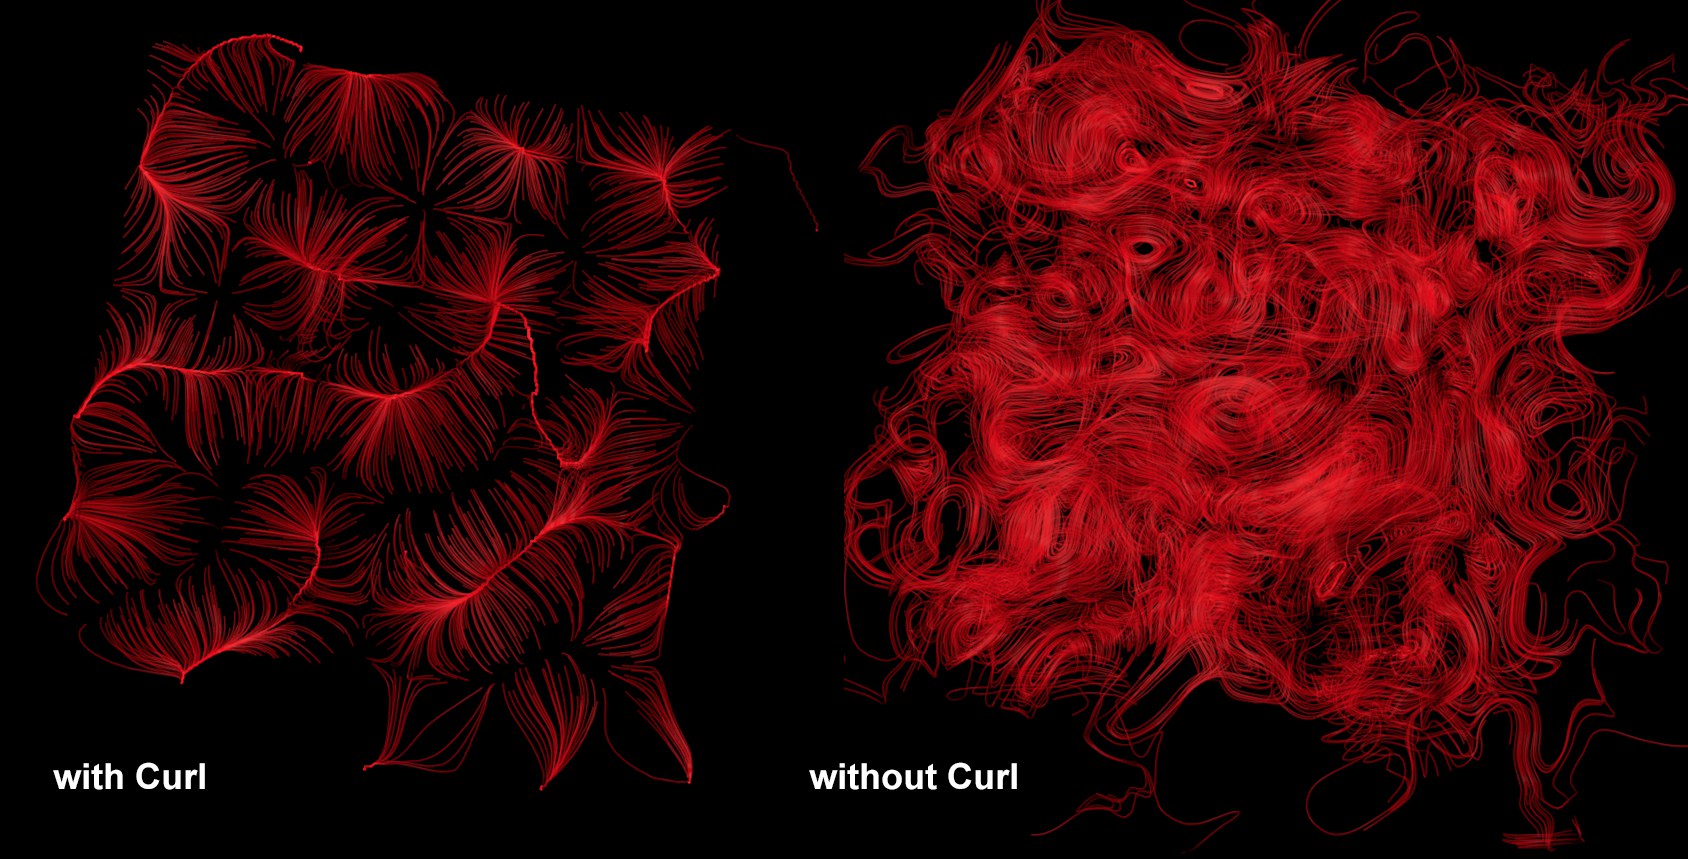 Curl makes it easy to control the movement of particles.
Curl converts an existing volume vector and is a function that converts the existing volume vectors in a special way. To explain this in detail would take us into the depths of math. This is why only the main purpose of this filter will be explained: It creates random fields (noise) from vectors that always target the null region of the noise - particles can get caught up here - vectors that produce looping movements with circular or vortex-like paths (see also Field Force object).
This is illustrated in the image above. On the left the particles remain stuck in certain regions and on the right they continue their movement.
Rotate
If Rotate is selected, each individual vector (representative for all vectors per Voxel) will be rotated around its axis at its origin.
Here you can define the rotational axis starting from the Volume Builder’s object coordinate system. If Custom is selected, a unique vector can be defined:
Here you can define the axis direction around which the vector should rotate. 1, 0, 0 will define a vector parallel to the X axis and 0, 1, 0 parallel to the Y axis. The Volume Builder’s object coordinate system will be used.
Here you can define the angle around which the vectors should rotate.
Scale
The following settings are available for the Scale function:
Use this setting to scale the length of the directional vector. A value of -1 will reflect the Invert function’s behavior.