Navigation
In the following are described all settings for interactive navigation in the Viewport.
Camera Navigation
One of the most important features of a 3D application is the navigation in the Viewport, i.e., how the editor camera is controlled. You want to be able to keep the region in which you are working in view as easily as possible. This is also true if you rotate the camera around this region, move away from or closer to it (see Point of Interest option below). All parameters relevant to controlling cameras can be defined here.
The navigation hotkeys (press hotkey + (mouse)click + move camera) that should be noted are:
- 1: Move
- 2: Dolly in/out ("larger/smaller")
- 3: Rotate
In the default Cursor mode, set the POI on the object (or on the region to be zoomed in the orthogonal view) under the cursor.
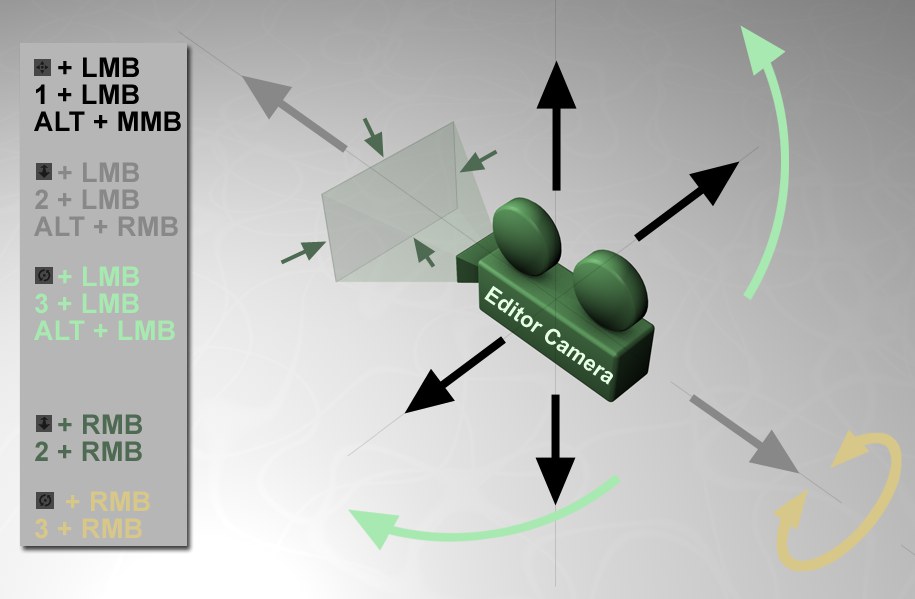 The camera navigation icons and hotkeys (LMB, MMB and RMB are left, middle and right mouse buttons, respectively).
In addition, the following keys can be pressed when moving the camera:
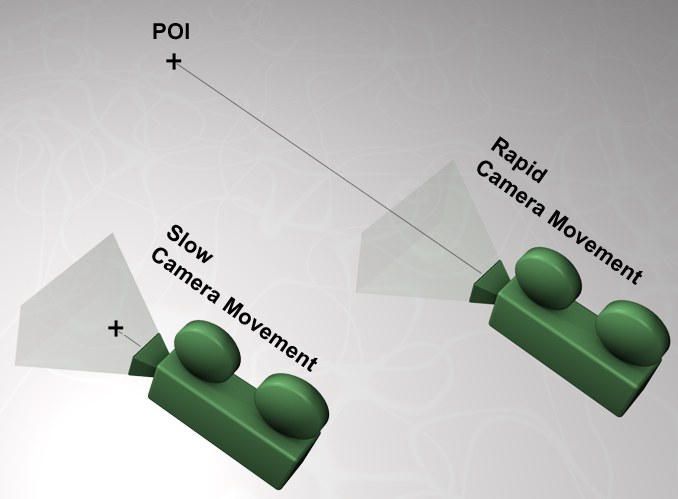
- Shift: The speed with which the camera moves will be doubled. For a camera movement in the direction of view (Dolly in/out), the POI will move with the camera. This results in a constant (rapid) velocity, also near the object. You can then easily move right through an object. Furthermore, the POI can temporarily be positioned on non-selected object surfaces during camera rotation, even if the Program Settings in fact prohibit this (e.g., Cursor Placement set to Selected).
- Ctrl/Cmd: The speed with which the camera moves (with regard to lateral shift) will be halved, which allows for more precise navigation. Furthermore, if set to Object or Camera, the POI will temporarily be set to "screen center" (and to Object if set to Screen Center, to do so press Ctrl/Cmd prior to moving the mouse). The cursor will be ignored when moving in or out and will move to or from the screen center.
Many navigation processes have been automated to ensure fluid, intelligent navigation in scenes of any size. The camera will, for example, slow when nearing an object and not simply pass through it, as was the case in previous releases. Generally speaking, the camera moves slower the closer it is to the POI. Such mechanisms function automatically and will not be described specifically. However, numerous navigation settings can be defined according to your own preferences. These can be done using the following settings:
The POI will be displayed in the Viewport in the shape of a cross (can be disabled in the filter settings). If you want to know the distance the camera lies from the POI, simply enable the Camera Distance option in the Viewport’s Configuration menu’s HUD tab.
When in the most important camera modes, the camera movement will slow in proximity to the POI. In extreme cases, this can lead to the camera freezing. In such an event, it can help to set the POI to an object that lies farther away from the camera.
The Camera Mode (note the settings made available when clicking on the arrow next to the option name) defines default settings for four parameters, respectively.
One exception applies: The camera – if included AND selected in the Viewport – rotates around its origin independent of the defined Camera Mode.
The camera mode can also be defined via commands in the respective views via the Cameras / Navigation menu.
The camera will rotate around the selected object point. If you click on an empty region of the scene, the camera will rotate around the screen center at the depth of the last defined POI. This is the recommended mode.
The camera will rotate around the screen center. When approaching the POI, it can occur that the camera freezes in very close proximity of the POI (the POI does not move with the camera).
The camera will rotate around the center of the selected objects/elements.
The camera will rotate around its own axis. It will rotate only and not move.
As long as the modifications you have made to the settings are not too complex, this mode will switch to Custom.
This is the point around which the camera will rotate if Cursor Placement is set to Off, if you click on an empty region of the scene or on a non-valid object.
The camera will rotate around the screen center. The depth of the point of rotation will lie on the previous navigation movement’s POI.
The POI will lie on the common axis of the selected objects or components (points, edges, polygons). If neither components nor objects are selected, the camera will rotate around the world origin.
The camera will rotate around its own axis.
This is the position of the cursor on an object when clicked upon around which the camera will rotate. This point will be marked by a small cross. Environment objects such as Background, Sky, etc. will be ignored.
This is the most up-to-date and therefore the most recommended mode.
A fixed (green marker) position can also be set on an object by pressing the Ins (PC) or Home (Mac) key (pressing again will remove the marker). The corresponding command is named Set Camera Pivot and can be found in the Customize Commands… Manager. Note also the Lock Camera Pivot command. This works the same as the previously described command only that the POI will be set to the last used position.
No cursor position will be ascertained and the camera will rotate around the defined Point of Interest.
Only objects selected in the Object Manager will be used. The click position will only be able to be ascertained for these objects. For all other objects or when an empty region is clicked, the camera will rotate around the Point of Interest.
Only the objects selected in the Object Manager (and their Child objects) will be used. The click position will only be able to be ascertained for these objects. For all other objects or when an empty region is clicked, the camera will rotate around the Point of Interest.
No limitations. The camera can rotate around any object that can be selected. If an empty region is clicked, the camera will rotate around the Point of Interest.
If a valid object is clicked upon, either the object surface (option disabled) or the center between entry and exit points of a straight line in direction of the cursor will be used as the point of rotation. This is, for example, useful if you want the camera to rotate around the entire object instead of only a point on the surface.
This option only applies to the moving in/out of the camera (2 key). The POI that is defined at the start of the camera movement will move with the camera (option disabled) if no other object lies in its path. The camera velocity will be constant.
If this option is enabled, Cinema 4D will ascertain the position beneath the cursor that lies nearest to an object and will set the POI there. Visually, this resembles a soft, slow stopping zoom. This can be problematic if you click in an empty region because the camera will slowly approach the empty region and might "freeze" there (this can be avoided temporarily by pressing the Shift).
In such an event, press the 2 again and click on a visible object. The POI will then be re-positioned.
Pressing the hotkey 2 will move the camera forwards or backwards (enlarges or reduces the portion of the scene that is displayed).
The camera will move only in the direction of view and will enlarge or reduce the portion of the scene that is displayed.
Enables/disables the display of the navigation cross, which is shown when moving, zooming or rotating the Viewport.
When moved, the camera will move slightly vertically to the angle of view by moving towards regions around the cursor – at the moment in which the mouse button is pressed, which means that you can determine which region will be enlarged.
Synchronize Orthographic Viewports
If enabled, each of the other orthogonal views (Top, Right, Front, etc.) will be moved when you navigate in the active view (i.e. the camera coordinates and zoom will be matched accordingly). This makes it possible, for example, to zoom in equally on a specific regions in all three views.
This is very useful if you have blueprints loaded in each of the views as backgrounds for modeling.
If enabled, the camera rotation can be reversed when rotating the camera interactively.
It can occasionally occur that the camera behaves unusually. Normally, when the Viewport is rotate (option disabled in which case it would be a ,Euler’ rotation), the camera will always rotate around a Y axis parallel to the world Y axis through the POI. Subjectively the PDI will always rotate horizontally in relation to the camera detail past the camera. It becomes problematic when you view the PDI from the top or bottom (world coordinate system). Instead of rotating left to right in the field of view as usual when the mouse is moved, the PDI will more or less rotate around the camera’s angle of view. You get used to this effect after a while and you automatically compensate for it. However, this effect can be irritating when working in detail (e.g., vertex weighting) when you need to position the camera very close to a particular region because mouse movements provoke the opposite camera movement.
In such cases, press the Ctrl/Cmd key (this temporarily activates the Trackball Rotation function or disables the function if it’s already enabled). The PDI will then always rotate horizontally when the mouse is moved left/right, independent of the camera detail. In short, Trackball Rotation lets you combine the advantages of the Euler navigation with a trackball function.
If you then zoom back with the camera to view the entire scene and you want the rotation to behave as usual (as described above: horizontal rotation in relation to the world coordinate system), press the Shift key during rotation and the rotation axis will be set back.
Another use would be the ![]() Selected Object as Camera command with which cameras and lights, for example, can be positioned for which the Trackball Rotation can be helpful for the aforementioned reasons.
Selected Object as Camera command with which cameras and lights, for example, can be positioned for which the Trackball Rotation can be helpful for the aforementioned reasons.
If enabled it will be possible to:
- Switch between cameras in the Object Manager
- Switch from Viewport cameras to cameras in the Object Manager and vice-versa
… during which the change of view can be made using a smooth camera flight. If this option is disabled, you will jump between cameras.
You can use these three velocity values to define the Default camera’s navigation speed separately for moving (Pan Speed), zoom in/out (Dolly/Zoom Speed; this setting also applies to the Texture preview!) and rotation (Orbit Speed). The smaller the values the "longer" it will take to navigate and vice-versa.