Objects Area
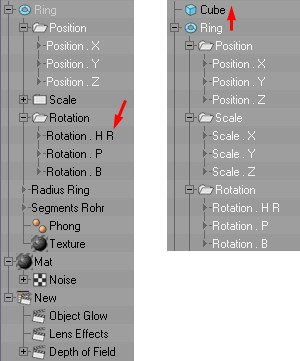 Left: the R will be displayed for curves in Auto Relative mode. Right: A complete animation track, including keys, is transferred onto another object (copied with Ctrl).
In the Objects Area you will find all objects, tags, materials, shaders, post effects, XPresso and Material Nodes and their corresponding animation tracks.
Almost all items, with the exception of directory names such as Objects, Position, etc., can be renamed. To do so, simply double-click the item or select an item and press the F2 key.
Using the layer functionality you can determine which items should be displayed in the Objects Area. The view is hierarchical, which ensures a better overview of the items it contains. All animated properties belonging to a given object are displayed in this hierarchy, as well as any tags assigned to that object. Clicking on the + or - will open and close the hierarchy (the entire hierarchy can be opened by simultaneously pressing the Ctrl-key).
Shaders and post effects will appear in the hierarchy of the corresponding material or render settings (make sure you know in which scene’s path they are located). Materials and render settings are only displayed in the Document path. To display the current path, activate Show Path Bar in the
Each object, tag, material, shader, etc., as well as each vector track (e.g., if all position tracks have been consolidated under Position) has a master track in the Keys Area. The master keys are located on the master track (see also Selection and the Concept Behind Master Keys).
An item can have any number of animation tracks. If an item has more than one of the same track, e.g., two Position X tracks, only the first one will be used, the second will be ignored.
Once an item has been selected, all child animation tracks (also those of child objects within the hierarchy) will be selected, including all corresponding keys. This lets you easily select and edit entire hierarchical animations.
Items can be selected as follows:
- Click on an item (the cursor keys can be used to move up and down from one object to the next; Page Up and Page Dn let you jump to the first or last object accordingly.
- Drag a selection box around the desired item(s).
-
Shift + click to make a multiple (consecutive) selection. -
Ctrl/Cmd + click to select or deselect several items that do not lie next to each other at once.
The following keyboard shortcuts apply when selecting certain tracks:
- ALT + click on a track: Selects this track and all similar tracks of child objects. For example, clicking on Position X will select this track and all Position X tracks of the child objects.
- ALT +
Shift + click: Selects this track and all similar tracks throughout the entire scene.
Selected tracks, including keys, can be easily transferred to another object via drag & drop. Simultaneously pressing the Ctrl-key will copy, not move, the tracks.
The following limits apply:
- Only copy / move tracks that can be read by the target object. For example, a parametric sphere’s radius track cannot be applied to a parametric cube. Unproblematic on the other hand would be its position, rotation or scale tracks, which any object can read.
- A track selection containing tags, materials, etc. cannot be transferred to another object, even objects of the same type. This only works object to object, tag to tag or material to material.
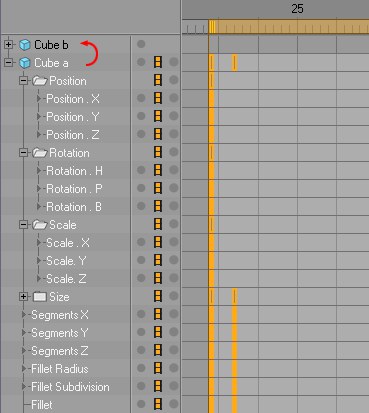 Select Cube a (all tracks will be selected automatically) and drag it onto Cube b. All animation tracks from Cube a will be transferred to Cube b.