Layers Palette
The Layers Palette contains the following three items (their state can be changed interactively by click + dragging over them or by simply clicking a single item):
Each item in the Timeline can be assigned to a layer. Assigning objects, materials, tags, etc. is done globally, i.e., if you assign a cube to a yellow layer the same cube will be displayed with a yellow layer in the Objects Manager. Each animation track, on the other hand, can be assigned to a different layer.
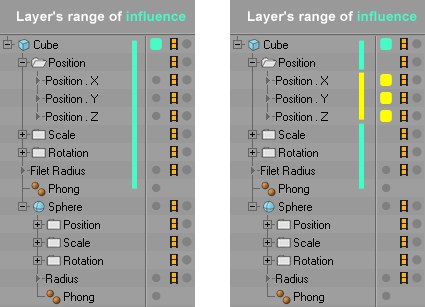 The sphere is a child of the cube. The turquoise-colored layer to which the cube is assigned affects the corresponding tracks but not the child sphere. The image at right shows some of the tracks assigned to a yellow layer. These layer properties have a higher priority than those of the cube!
Layers in the Timeline function differently from those in the Objects Manager. Layers in the Objects Manager do not affect hierarchies, only items on the layer itself, i.e., if the parent object is hidden, the child object will still be visible.
In the Timeline (where an object’s animation tracks are hierarchically ordered) a layer’s properties apply to all of an object’s child tracks (but NOT to the object’s child (Objects Manager) objects and their corresponding tags!).
Example: You have animated a cube’s position and rotation. The cube itself has been assigned to a turquoise-colored layer but its position and rotation tracks have not been assigned to any layer. If the animation on the turquoise-colored layer in the Layer Manager were deactivated, no animation would be played. This is because the parent objects’ properties were inherited by their corresponding child objects. This can be taken even further: Assign the position tracks to a yellow layer and do not deactivate any items. Now the layer with the child tracks has a higher priority. Only the position will be animated and the rotation tracks not assigned to a layer will move accordingly.
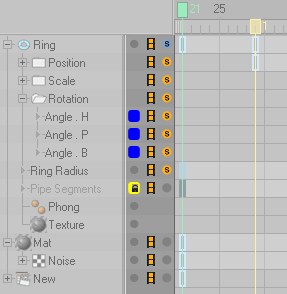
Assigning layers works as described in the Objects Manager (the simplest method is to drag & drop a layer from the Layer Manager onto the placeholder). The following options (marked by arrows) are especially useful when performing the aforementioned function:

Use the first icon (manager) to hide all corresponding items in the Timeline; use the second icon (lock) to protect tracks from accidentally being edited; use the third icon (animation) to turn animation tracks off or on.
Use this icon to turn the animation tracks off or on. The tracks will not be animated despite the existing animation. Child objects will automatically inherit this state (can be switched independently of parent objects). If this icon is deactivated, the corresponding track will not be animated. Icons of a parent object can assume a tri-state status if several of its children have differing states. Repeated clicking on an icon with tri-state status will set this and all children to the same status.
The Timeline has its own Solo mode (separate from the mode of the same name in the Layer Manager). All icons are initially deactivated by default. If you want to switch a track to Solo mode (i.e. only this track will be animated, all other animations are off) simply click on the filmstrip. This state will automatically be inherited by the children (children’s states can nevertheless be switched independently of the parent objects). Icons of a parent object can assume a tri-state status if several of its children have differing states. Repeated clicking on an icon with tri-state status will set this and all children to the same status.