View
Sets the preview range between the first and last keys of the current key selection. If no keys are selected, the preview range will be set to the length of the document.
Sets the preview range to the currently visible Timeline.
Opens a dialog window in which the preview range can be defined manually.
If the timeline is stretched too far resulting in large gaps between frames, grid lines will be added between individual frames.
Turns off the grid.
Defines the horizontal grid spacing in Dope Sheet mode and F-Curve mode.
The Per Second setting will set the spacing to 1 second between grid lines, i.e., if the frame rate is set to 30 in the
Define the icon size here. In addition to the size of the icons, the size of the rows in the Timeline’s Objects Area will also be affected.
Use these options to fold or unfold hierarchies in the Objects Area. Alternately you can open or close the entire child hierarchy, including all vector tracks, by pressing
Use these commands to fold or unfold a selected object’s hierarchical structure in the Timeline.
If activated, animated items will be shown and items without animation tracks will be hidden.
If deactivated all items will be shown.
One small exception: If automatic mode is deactivated, at most only items that were manually placed into the Timeline per drag & drop will be displayed.
This command is for use in conjunction with the Cinema 4D Take system (Take Manager). If this option is enabled, only the animation Tracks created or modified in the active Take will be shown (i.e., those in the Main Take will be hidden).
If enabled, only the active Animation Layer’s Keys will be displayed in the Timeline in Key or F-Curve mode. Otherwise all of a given object’s Keys will be displayed, including those that lie on different Animation Layers.
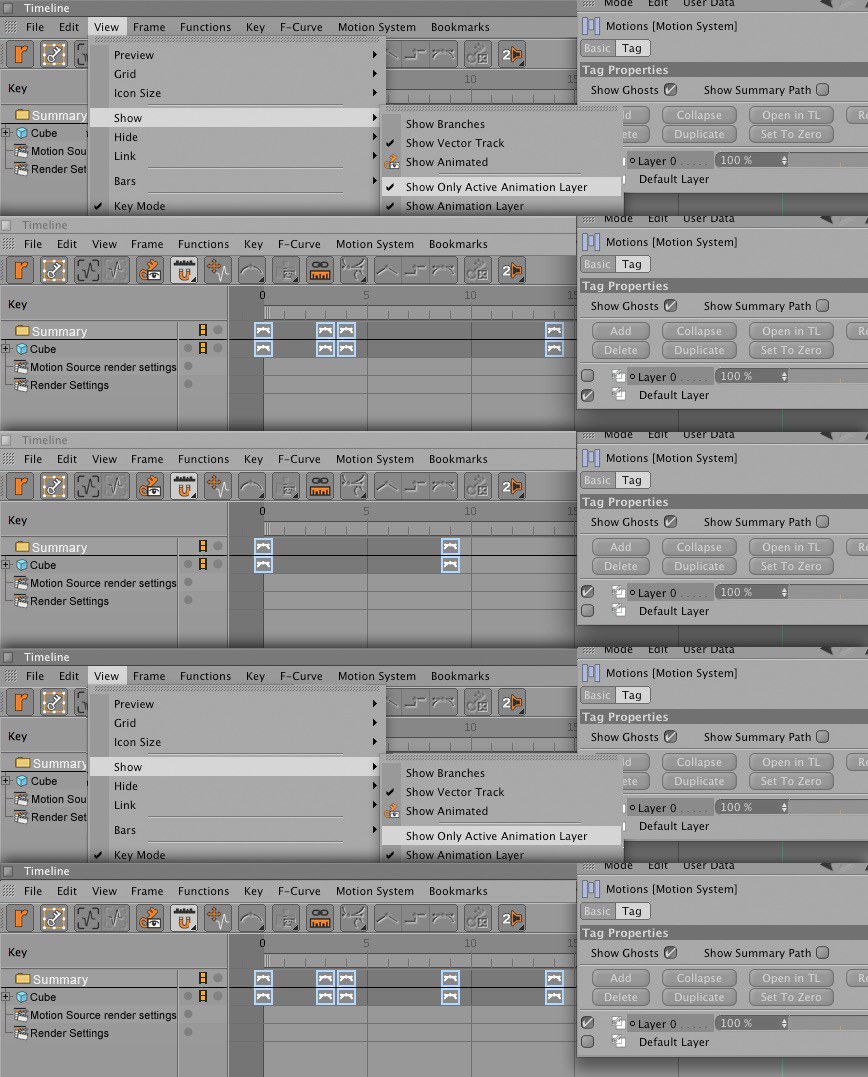
This option is for use in the Timeline’s Motion mode. If enabled, all Animation Layers will be displayed. Otherwise only the Motion Layers will be displayed.

The minimum and maximum will be displayed for each F-Curve as a horizontal dashed line in the color of the F-Curve. This makes it possible to quickly recognize and react to these important settings. The minimum and maximum lines can be interactively moved vertically, which will scale the F-Curve vertically as a whole.
The key value will be applied, not the curve point that may have resulted due to an exaggerated curve, producing a value in excess of the key value.
 Key Values are framed in red.
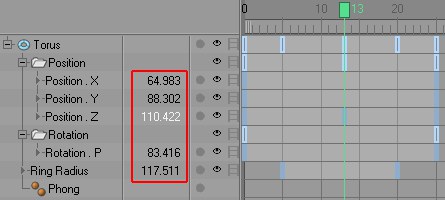
Activating this option will add an additional column to the Timeline in which the interpolated track value for each animation track that can be interpolated will be displayed at the current time in the animation. If the Timeslider lies on a key the corresponding track value will be highlighted in color(in this case the key value).
This value can be changed by double-clicking on it. The following will occur:
- If the Timeslider is located between two keys a new key will be created containing the new value.
- If the Timeslider is located on a given key the key value will be changed.
If you and the Preview Range just don’t get along anymore, simply use this option to turn it off. The Preview Range will still exist internally since other Cinema 4D functions will continue to rely on it (e.g., the Preview Range function).
Use this option to define whether or not the Curves before and after should be displayed.
Activate this setting if the keys of all visible F-Curves should be displayed. If no keys should be displayed at all, deactivate this setting and the next setting (Show Keys of Selected Curves).
Activate this setting if only keys of selected F-Curves should be displayed. Show All Keys should be deactivated.
Activate this setting if only the tangents of selected keys should be displayed. Show All Tangents should be deactivated.
Activate this setting if all tangents of all visible keys should be displayed. If no tangents should be displayed at all, deactivate this setting and the Show Tangents of Selected Keys setting.
Enable this option if all tangents of all visible keys should be shown. If no tangents should be shown, disable this and the previous option.
Use this option to temporarily hide items (including their keys and F-Curves) without having to deal with layers or filters.
Use this option to temporarily hide all deselected items (see also Hide Selected Elements).
Use this option to unhide all items hidden using the two previous options.
Activating this option will link the Timeline and the Animation Palette’s Powerslider. The Preview Range defined in the Powerslider is the exact temporal range that will be displayed in the Timeline. In turn, the Powerslider will adapt accordingly to any scaling or moving of the Timeline.
The Powerslider thus assists in the navigation of the Timeline.
Enable this option when all objects and tags selected in the Object Manager should also be selected in the Timeline and vice-versa (with all corresponding Tracks and Keys). This functionality was removed from Cinema 4D with version 9 but has now been reinstated.
If this option is enabled, the previously described synchronized selection will only take place from the Object Manager to the Timeline (however, no deselection will be made in the Timeline when new objects are selected in the Object Manager). If other elements are selected in the Timeline, it will not affect the selection in the Object Manager.
If activated, only those objects selected in the Objects Manager (if their Child objects and tags should also be shown can be defined precisely in the Timeline’s preferences menu) will be shown. Objects not selected will be hidden. Only relevant objects will be shown – no filters must be defined.
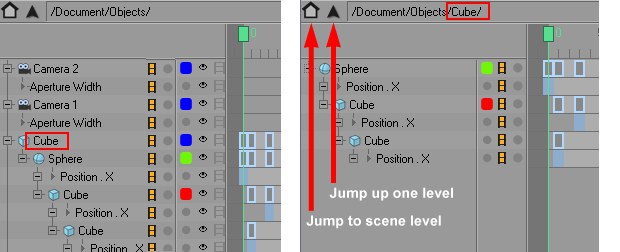 Left: Document or scene layer; Right: After the cube was set as root using the Set As Root option.
Since tree hierarchies in the Objects Area can become very complex when working with larger animations, individual branches can be set as roots (Set As Root), which will result in only a given hierarchical branch being displayed. This hierarchy’s path will be displayed in the Path Bar so you can keep track of which hierarchy you are currently in. Tracks cannot be set as roots (exception: render settings and post effects).
Click on the House icon to jump back to the top hierarchical level. Use the Arrow next to the House icon to move up a single level at a time.
Otherwise, animations are completely independent of the aforementioned settings, even those that are not currently visible in the Timeline.
If you jump to the top hierarchical level, i.e., the document or scene level, a parent directory named Document will be displayed. Selecting this folder will automatically select all animation keys within the scene (alternately, you can press
At left the Project layer, at right the marked curbe was set as a root using the Set as Root command.This simple but effective search function covers all items displayed in the Objects Area – objects, tags, materials, shaders, render settings and post effects Project elements (e.g., animated, global Dynamics settings). Animation tracks themselves cannot be hidden or unhidden using this option. They will be hidden and unhidden together with all other aforementioned items.
Applying this option will not select any items. Show Search Bar is a real-time display filter only. To search for an item, simply enter its name in the search bar. All items containing the same sequence of letters in their respective names will be displayed. The Search Bar is not case sensitive. To clear the search bar, click on the arrow to its left.
Animations are completely independent of the aforementioned settings, even those that are not currently visible in the Timeline.
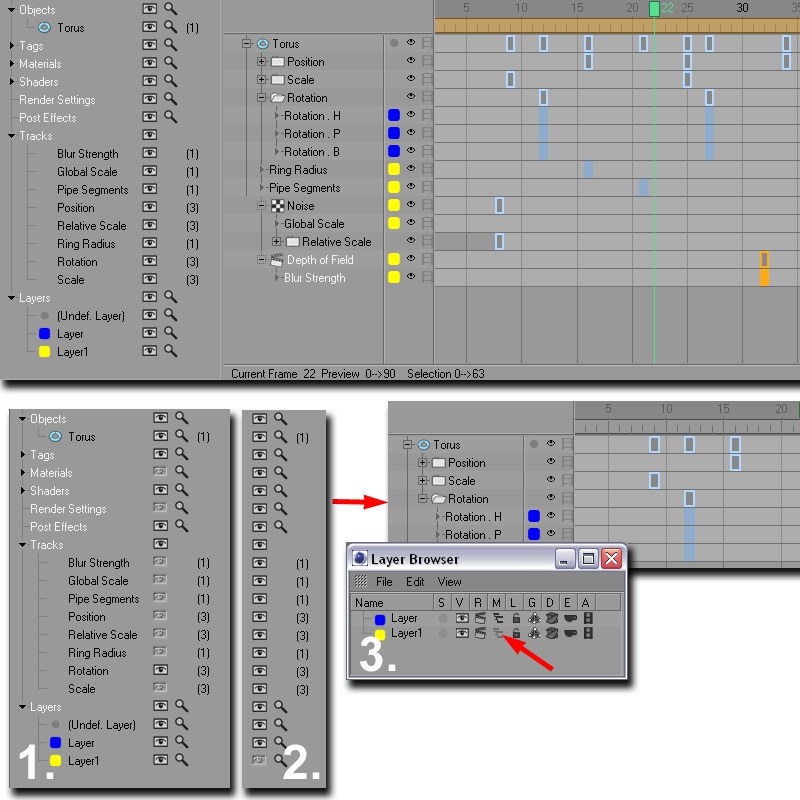 Complex Timelines can be cleaned up using filters. At top: A complex Timeline in its original state. Below: Two filter settings and one layer setting that both achieve the same result. In example 1, items and their corresponding tracks have been hidden. Example 2 shows how all non-relevant layers have been hidden. In example 3 the manager switches were deactivated in the Layer Manager to achieve a clearer Timeline.
Activating Show Filter will display the Filters Area. The Filters Area can be used to define which items, including their keys and F-Curves, should be displayed.
Show Filter only affects whether or not an item is displayed and has no effect on the items’ respective animations. Use Show Filter to give yourself a concise view of only the items you currently need.
At the left of the Filters Area you will see all of a given scene’s items displayed in a tree hierarchy. Elements specific to each item (as well as how many elements are present) will be shown as subordinate items of that item.
At the right of the Filters Area you will see two options, which can be applied separately for each item type. These options have the following functions:
- Eye icon: Display state in the Timeline.
- Magnify icon: If not activated, all corresponding items in the Search Bar will be filtered out and NOT displayed.
Open the Tracks filter to display all animation tracks (can also be hidden and unhidden).
The last filter type is the Layer filter. Opening this filter will display all layers of a given animation (layers to which no objects have been assigned will not be displayed). You will also see a layer named Undef. Layer (which is not really a layer). All items not assigned to a specific layer will be assigned to Undef. Layer.
Shows or hides Motion Sources when in Motion Mode.
Lets you switch between Dope Sheet mode and F-Curve mode. Alternatively you can click on the key icon / graph icon at the top right of the Timeline. You can switch between modes by Ctrl+spacebar.
Select the mode in which you want to work. An easier way of switching is to press the  icon at the top left of the Timeline.
The following applies when switching between Dope Sheet Mode and FC Mode:
Simultaneously pressing the
Automatic Mode is the default mode. It ensures that all items that can be animated located in the various Managers, such as objects, tags, materials, render settings, etc. are automatically displayed in the Timeline.
If this mode is not active, the Individual Mode will be in effect. Items must then be placed into the Objects Area from the corresponding Manager per drag & drop. Only these items will then be shown. This means that the first time you switch to Individual Mode the Timeline will be empty until something is dragged into the Objects Area. If you press the
When in Individual Mode, all objects displayed in the Timeline’s Objects Area can be moved via drag & drop or defined as children of other items without affecting the real internal object hierarchy.
For example, a blur track can be made a child of a material. This is practical if you want to synchronize both animations and they lie right next to each other. Only the display in the Timeline will be affected.
This option can only be applied in Individual mode (deactivated Automatic mode). Applying this option will remove all selected objects from the Timeline view. Their animations will not be affected - they simply will not be displayed.
This option can only be applied in Individual mode (deactivated Automatic mode). Applying this option will clear the Timeline. Existing animations will not be affected – they simply will not be displayed.
Activating this option will play only the defined preview range of the animation instead of playing through the entire length of the document.
Sets the currently selected item as a root, i.e., only this item’s hierarchical tree will be displayed in the Timeline. Activating Show Path Bar will display the hierarchy’s path and make navigating easier.
This and the following two commands only work in automatic mode.
With this option you can jump directly to the top hierarchical level – the document level. The same can be done by clicking on the House icon at the left of the Path Bar.
Clicking on Summary Track will select all existing keys. The entire animation can then be moved or scaled temporally using the Selection Range.
Selecting this option will bring you up one level in the hierarchy. The same can be done by clicking on the Arrow icon at the left of the Path Bar.