Time Track
Take your time in reading the next pages because the possibilities of Cinema 4D’s time control offers are virtually one-of-a-kind. Time Tracks is a very powerful tool that lets you easily influence and control animations. In order to make the simplicity of this tool understandable you must first get to know how it all works.
You are already able to animate objects, i.e., move them spatially, animate light and camera properties, etc. A key contains an initial value (e.g., an object’s position or the brightness of a light). The second piece of information is the time in the animation this defined state should be reached. The simplest case in point would be a start and end state. Complex animations will contain several intermediate states.
The right timing is often very important in achieving a realistic look, especially when animating objects that accelerate and / or decelerate. Animating such movements manually is difficult, very time-consuming and offers little flexibility. A single change can result in having to make dozens of subsequent changes!
This is where Time Curves come in. As soon as a Time Track has been assigned to a track, only the values contained in the keys and the sequence in which the keys lie will be analyzed. The relative temporal position of an event is determined by the Time Curve.
Here is an example that might shed some light on all of this:
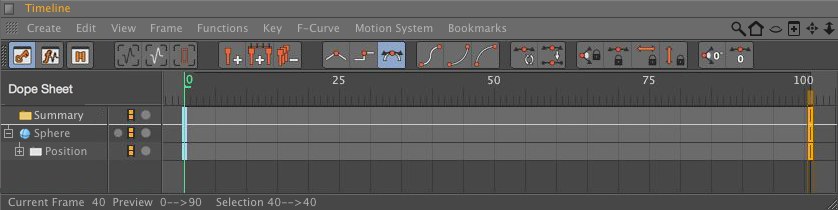
Assume you have animated a sphere that moves on its X axis from X=0 (frame 0) to X=300 (frame 100).
The Timeline would look like this:
The result is a movement that begins and ends slowly. Now create a Time Curve and assign it to the Position X track.

In the Timetrack, set an additional Key at frame 50. Give this Key a Key value of 100 in the Attribute Manager. Click on the third Key at the right and enter a Key value of 0.
The Timeline should now look like this:
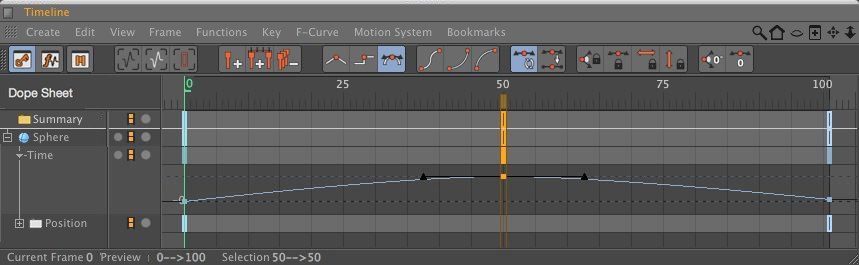
How will the sphere move now? Simple: The Time Track reaches its maximum value of 100% at frame 50; this means that the sphere’s property that was assigned to it, Position X, also reaches its maximum value of X=300 at frame 50. Subsequently, the Time Track returns to a value of 0% at the end of the animation. The sphere returns to its original position even though only two keys were set for the animation. The Time Curve determines the interpolation between the two keys.
So when are Time Curves needed?
Let’s say you have created a complex camera movement containing 40 keys. These keys define the various positions along the camera’s path and they cannot be changed due to time constraints.
The movement of the camera can easily be accelerated or decelerated by applying a Time Curve.
A further example:
A character that has been given a complex walk cycle consisting of around 253 keys should complete this walk cycle three times and subsequently take two steps backwards. You can either copy the 253-key walk cycle a couple of times and work on them until they fit seamlessly or you can use a Time Curve and six keys.