New Texture
The following window opens when you choose New Texture:
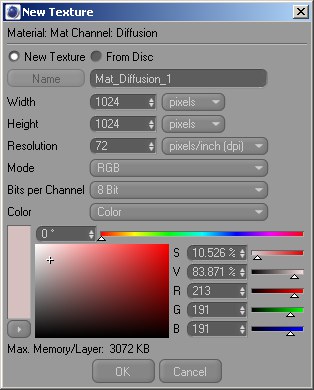
You can now do one of two things: you can either create a new texture (specify the dimensions, color mode, etc.), or you can load an existing texture from a storage medium (e.g., hard disk).
You can type a name for your texture into the top input box. This name will be used to refer to the texture in the Attribute Manager and it is also used to form the filename when you save the texture (although you may opt to specify a different filename at save time).
These fields define the width and height of your new texture. Select the unit of measurement using the drop-down lists to the right. You can choose pixels (the default), inches or cm.
In most cases, the default resolution of 72 pixels/inch (dpi) is appropriate because this is the resolution used by most monitors.
Exception: you may need to change the default resolution if you want to print out the texture and you have specified the dimensions (Width and Height) in inches or cm.
This is where you choose the color mode used by the texture (grayscale or RGB)
Define the color depth for your new texture. You can select from 8, 16 or 32-bits per channel.
This defines the texture’s background color. You can choose one of four options:
The current background color is used.
The current foreground color is applied.
Use the color chooser to pick a color for the texture’s background.
This allocates a transparent background to the texture.
The Max. Memory/Layer value, near the bottom of the window tells you the maximum RAM required for each layer.
Once you have set the parameters as required, click OK to create the new texture. The window will close and you will see the new texture appear in the Texture view.
Assigning a texture to a material channel
To assign a texture to a material channel:
- Double-click on the material in the Material Manager to open the Material Editor (or simply click once if you want to make changes in the Attributes Manager). In the Material Editor, activate the material channel to which the texture should be assigned. Next, click the triangle right of the Image. From the menu that opens, choose the desired texture from the Bitmaps sub-menu. All bitmaps in RAM are displayed on this menu.