Convert to 8/16/32-bit per Channel
![]()
![]()
![]()
These options let you convert bitmaps to different color depths.
Here, you can reduce 16-bit or 32-bit bitmaps to 8-bit.
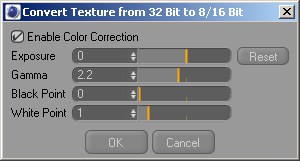
When converting 32-bit textures, a window will open with the following additional conversion settings:
With this setting you can define which color profile should be embedded in the image/texture. In versions prior to R12, Cinema 4D automatically saved using the sRGB color profile. This can now be set to any color profile desired. However, you should only make changes to this setting if absolutely necessary.
Note that many programs cannot read color profiles (for example, Windows 7 can only partially read color profiles).
When using Linear Workflow in conjunction with Multi-Passes we recommend that you render with at least 16-bit color depth. If this is not possible, disable the Linear Workflow option to restore the normal Cinema 4D R12 properties (reason: Multi-Passes are saved with a linear profile.
More information regarding color management can be found here.
Generally speaking, the default sRGB profile will be the correct profile.
Clicking the button at the right will make the following menu items available for selection:
No color profile will be embedded (will be read in accordance with the Project Settings or bitmap shader settings when the file is opened).
Here you can load a color profile or save an existing one. These files have the extension "*.icc". If an image is loaded here, its color profile will be assumed.
You can use monitor(hardware) profiles. However, this is not recommended since your monitor’s color profile will almost never match that of another monitor.
Saves the image with sRGB color profile.
Saves the image in a linear color profile.
Deactivate this option and click on OK if you want to convert a texture to 8-bit without using the settings described below.
If you want to correct the texture, activate this option, change the settings as desired, and click on OK.
This will reset the Exposure, Gamma, Black Point and White Point values to their default values.
Change this setting to better evaluate the brightness properties of HDR images.
Defines a gamma value for a given texture. You’re wondering what gamma is? Gamma defines to what degree the brightness of an image will be displayed, e.g., whether or not a particular pixel within an image should be displayed brighter or darker.
These options define the darkest and brightest point of an image to a history file. If one of these points is moved, the tonal values will be changed accordingly.