Automatic UV
These commands attempt to optimize the UV mapping while avoiding overlapping polygons. Depending on which settings you choose, the UV mesh will be separated into various groups of UV polygons with gaps between them.
You can choose one of three algorithms:
- Packed: This is an automatic process that will unwrap, relax and optimally align (pack) your UV mesh. This is the most state-of-the-art solution and recommended for use.
- Cubic takes a cubic projection of your model and separates the UVs based on the polygons facing each side of that cubic projection.
- Angle separates the UVs based on the direction of the surface Normals.
RELEASE 22
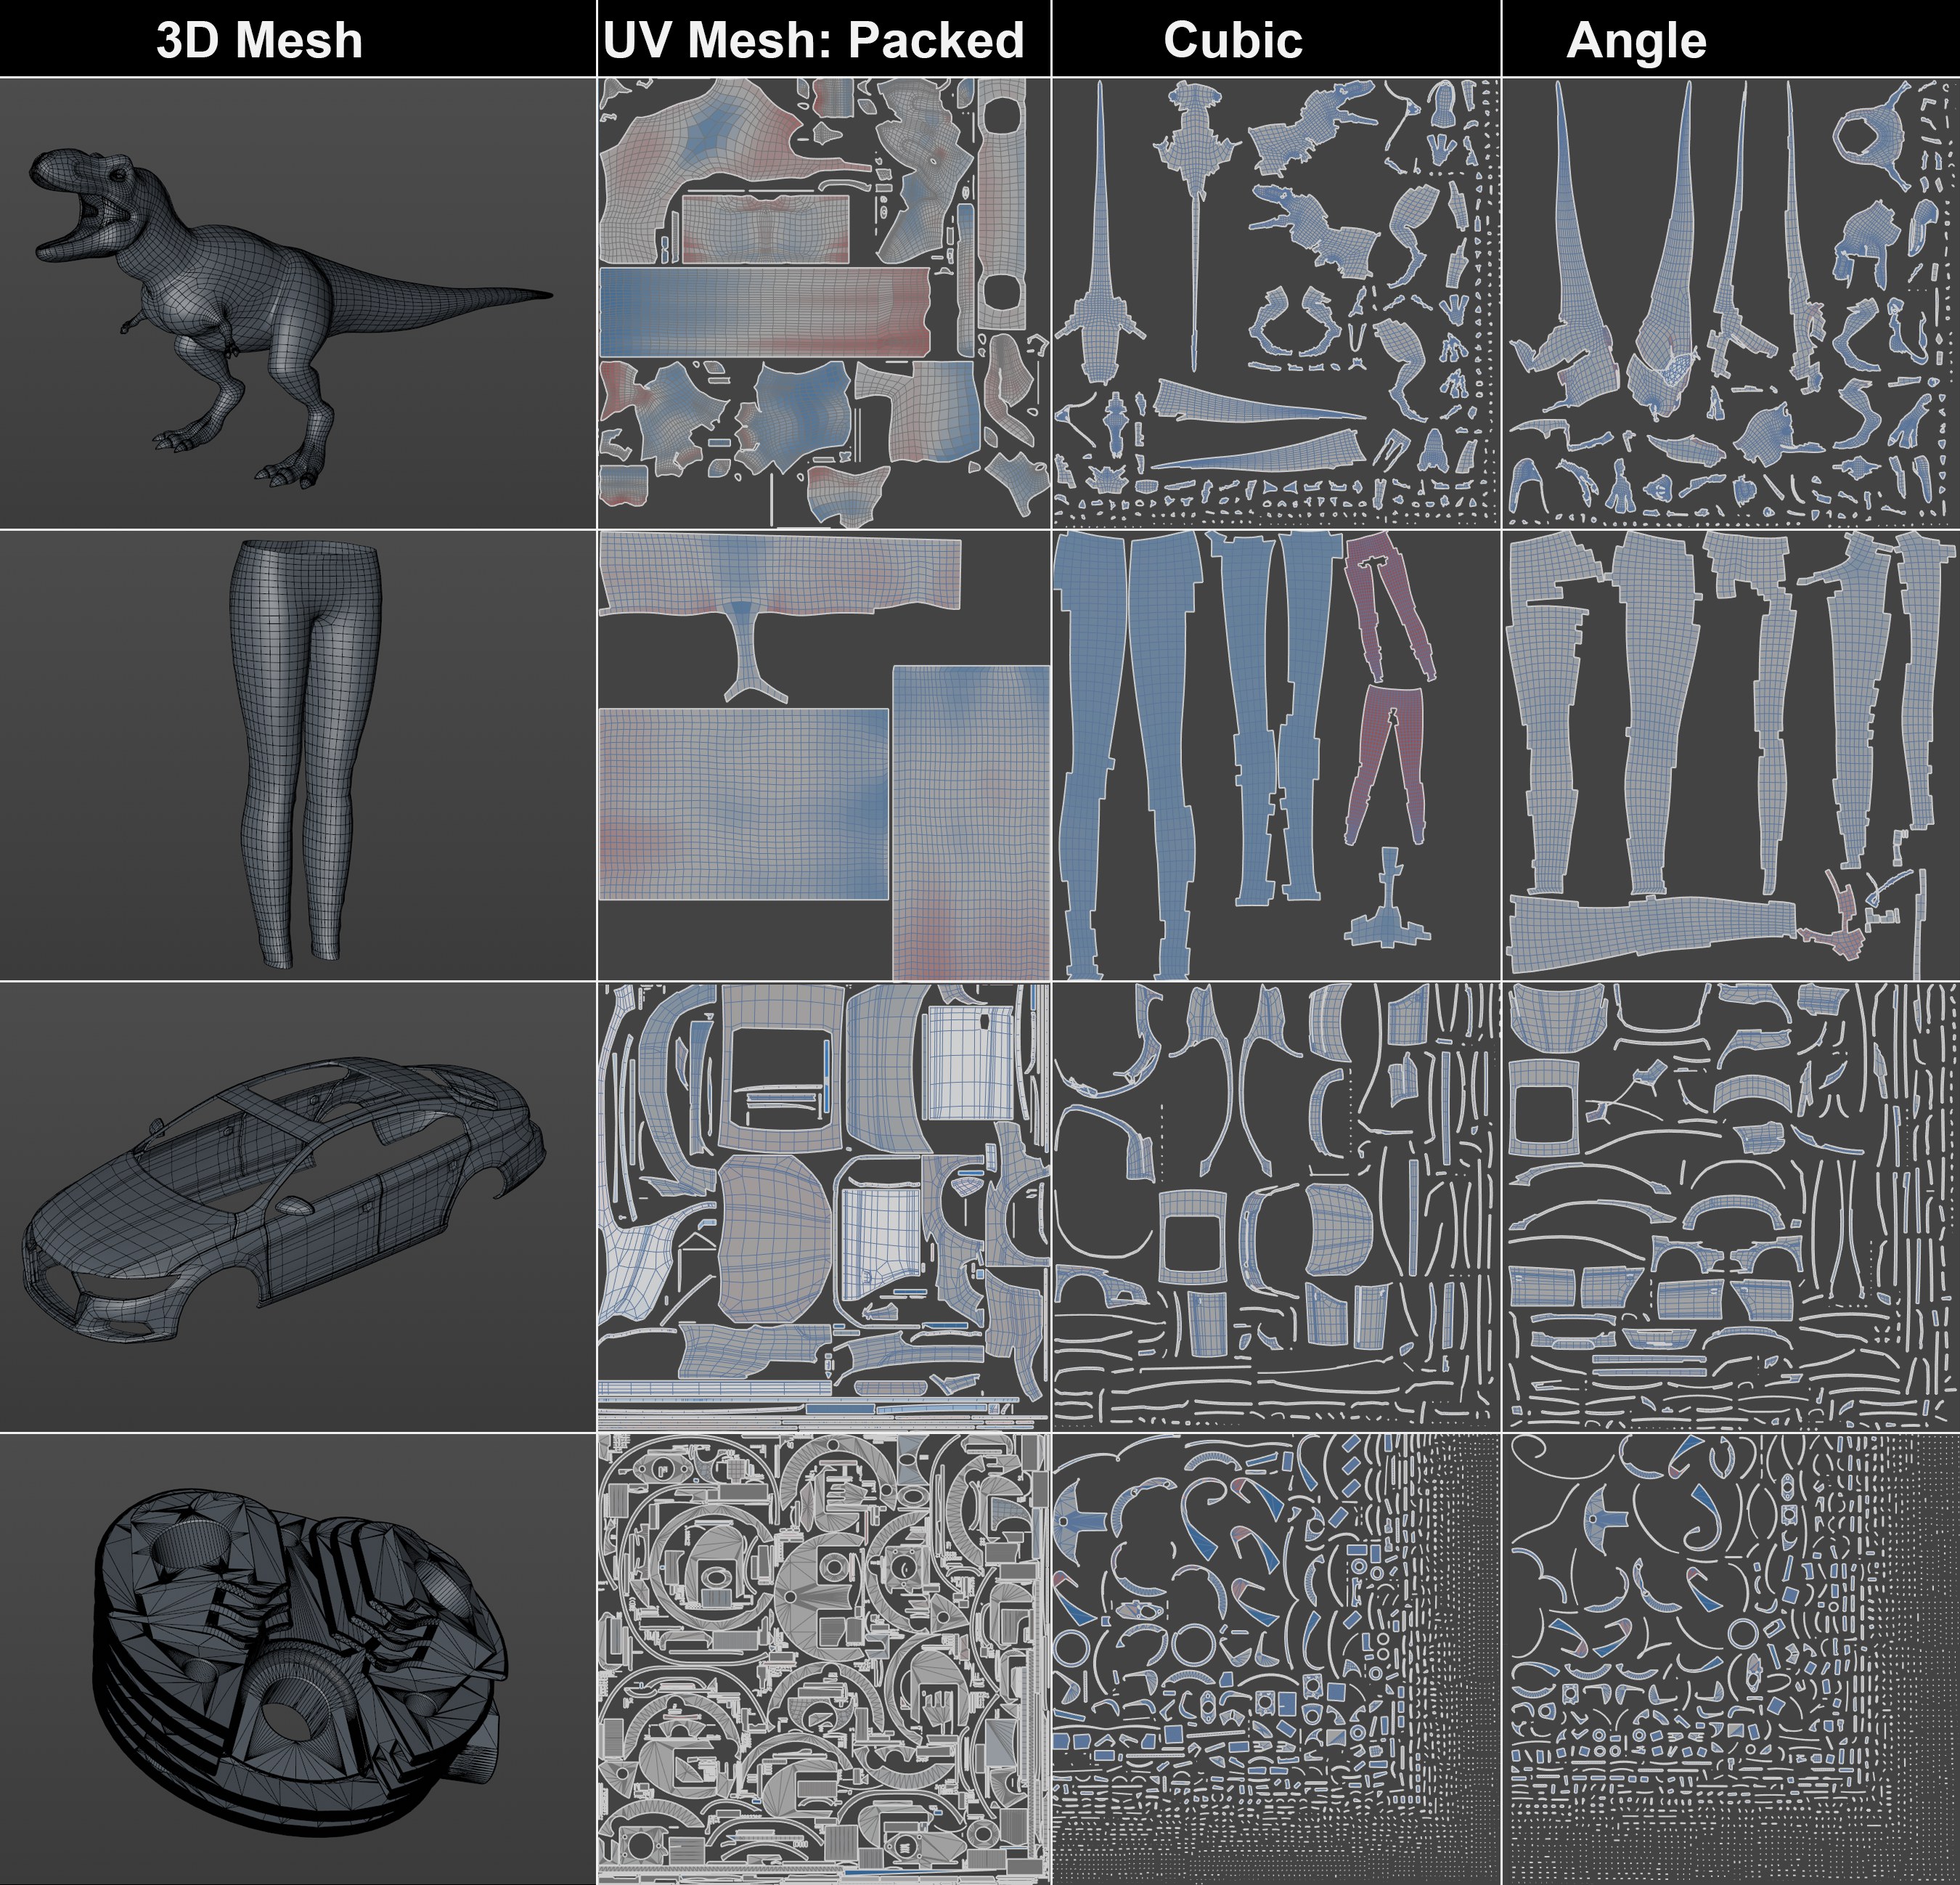 Various automatic methods to unwrap a UV mesh. As you can clearly see, Packed produces the best results. Note in particular how dense the UV Islands can be packed and how efficiently the texture space can be utilized.
This algorithm does many things at once: it breaks the UV mesh down into as few UV Islands as possible, with as little distortion as possible and scaled as precisely as possible to the 3D geometry. The algorithm can recognize cylindrical or cone sections and can unwrap these. Banding contours will also be recognized and unwrapped accordingly. A number of other useful functions are also included and are executed automatically.
The UV Islands will then be packed, i.e., they will be arranged as densely as possible and without overlapping in the UV work area utilizing the surface area as efficiently as possible.
This automatic method is the all-in-one solution if, for example, you want to quickly:
- Paint on an object via Project Painting in the Perspective Viewport
- Bake materials (also multiple using shaders) via the Bake Object function onto an object.
You will receive a fully functional UV mesh with which you can easily process the aforementioned actions.
If you want to maintain complete control of the unwrapping process you will have to do a lot more manual work (e.g., via the UV Unwrap function). If you have the right know-how you can edit your mesh to your heart’s desire.
This new algorithm can be found in the UV Manager’s Optimal Mapping menu and everywhere where UV meshes can be unwrapped, e.g., under the UVW from Projection command (here you can, without any UV coordinates, generate a usable mesh from an object in just 2-3 clicks). This generally produces the same result, only the spacing between the UV Islands will differ slightly.
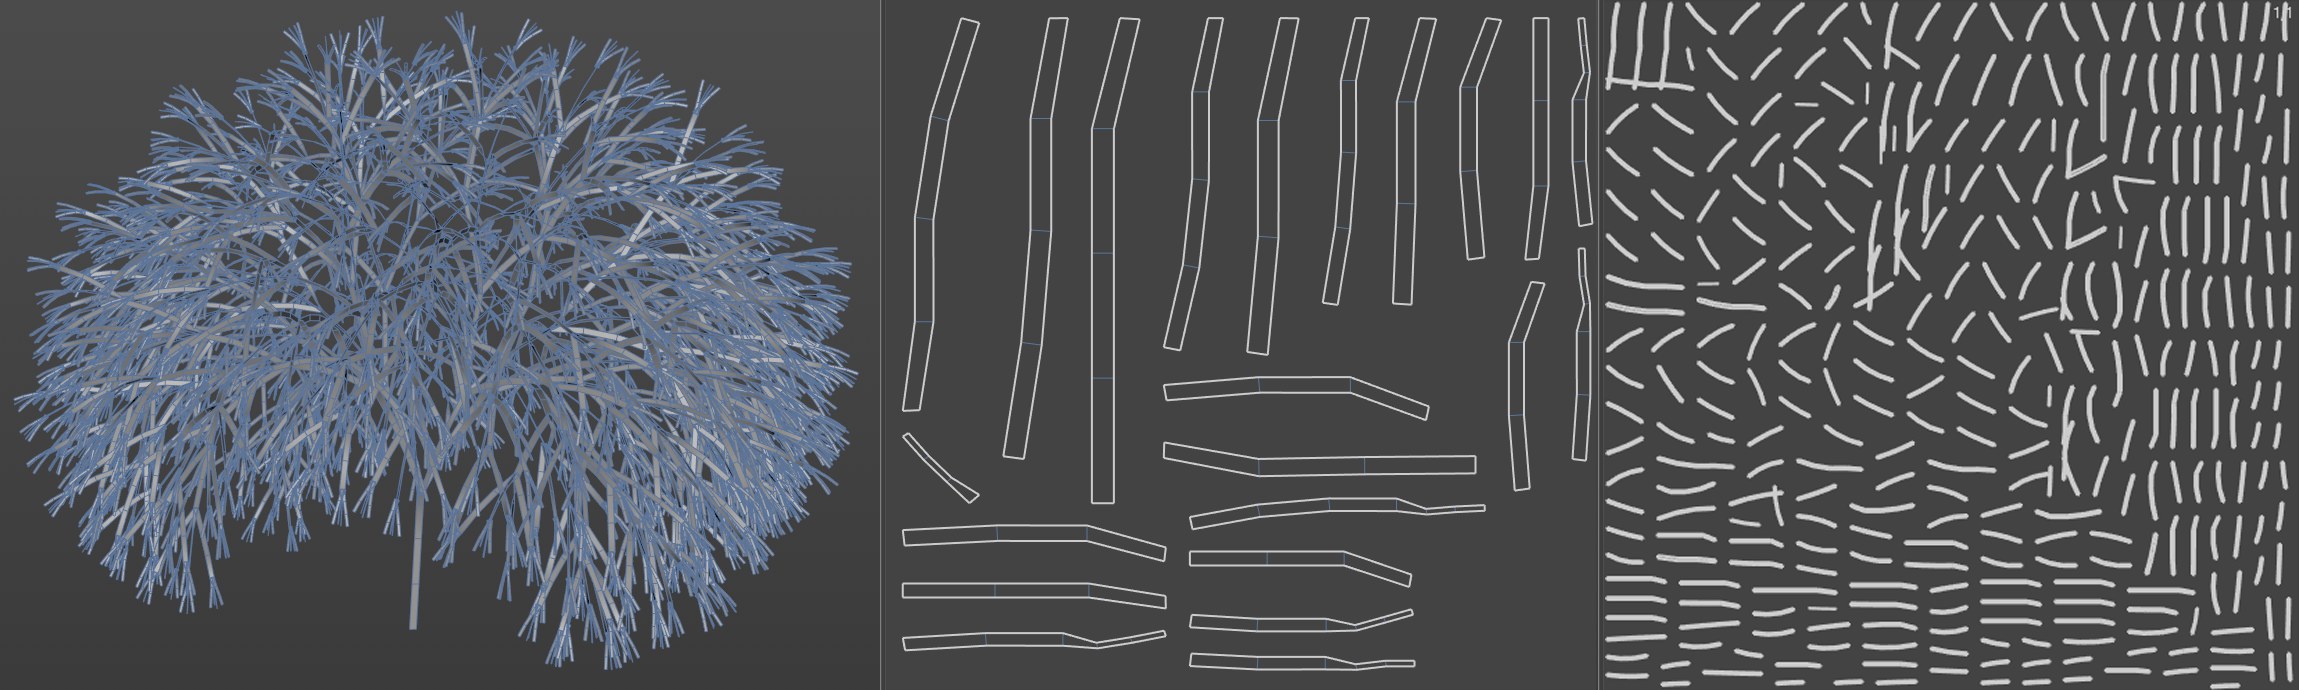 Center: Overlap Identical Geometry enabled, right disabled. This option was able to reduce the tree (originally Turtle MoSpline in a Sweep object) to its repeating polygon bands and stack the identical UV Islands.
If this option is enabled, the algorithm will attempt to find identical based on identical geometry but mirrored UV Islands and stack these congruently on top of one another. This works better with Hard Surface Modeling (technical objects) and less well with organic shapes.
See also here.
If this option is enabled, Cinema 4D will attempt to locate identical UV Islands based on identical geometry and stack them congruently on top of one another. Identical geometry will then have the identical texture. This works well with generated, identical or cloned objects.
If this option is disabled, each polygon band will be assigned its own UV area.
See also here.
See Spacing.
Cubic places a cube around the object and separates the UVs based on which side of the cube they face.
In the pictures below, the torus has been observed from six sides. Ten UV polygon groups in total have been created: one group as seen from the top of the cube, another as seen from the bottom of the cube, and two groups for each of the cube’s four sides (this is because the torus has two sides when seen from the side: an inside and an outside).
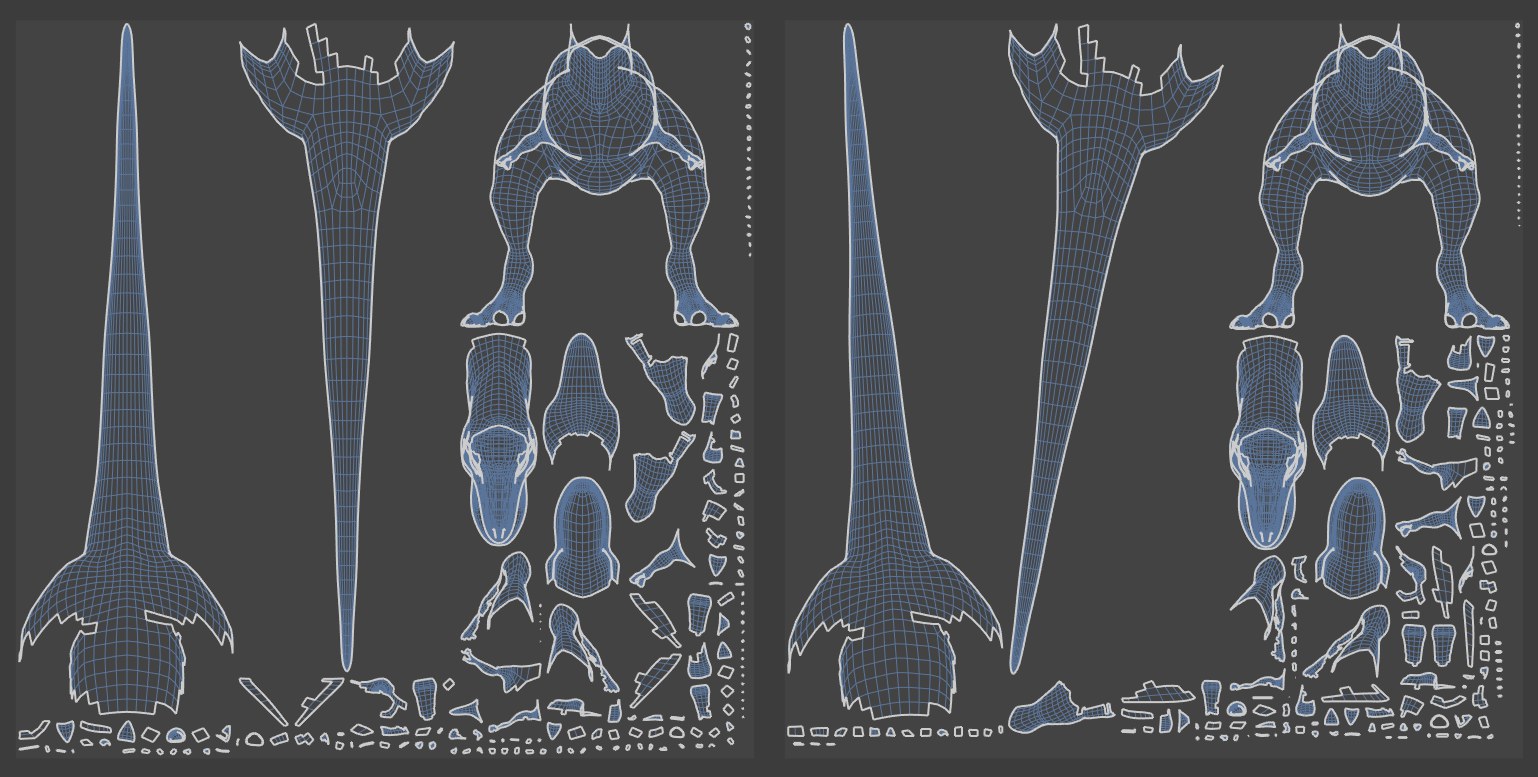 Preserve Orientation disabled (left) and enabled (right).
Enable this option to prevent BodyPaint 3D from arranging the polygon groups in the optimal direction. This saves time when the positions of the UV polygons are calculated. UV Islands will not be twisted if this option is enabled. They will, at most, be scaled.
 Stretch To Fit disabled (left) and enabled (right).
If this option is enabled, the UV Islands will be stretched independently of one another in the U and V directions to cover the entire bitmap taking into account the Spacing value. If this option is disabled, the axes will be scaled proportionally in both directions.
If this option is enabled, a different algorithm is used (Max Area Factor no longer has an effect). The algorithm checks if the first UV polygon overlaps any of the other UV polygons. If it is overlapping, a new UV polygon group is created and the following UV polygons are added to the group. If it is not overlapping, no action is taken. The algorithm repeats the check for all UV polygons.
This factor only has an effect if 2D is disabled. It defines the lower limit of a range within which UV polygons are added to existing groups, even though by definition (see the cube mentioned above) they should not be added to the groups.
More precisely, Max Area Factor defines how much smaller in percent the polygons may be than the average surface area.
Defines the size of the gaps between the separated UV polygon groups. Use low values, otherwise the UV polygons will be scaled down to fit the texture.
If the angle between two connected object polygons is less than or equal to the Maximum Distortion value, their UVs are placed in the same group; otherwise, they are placed in different groups.
In general, set Maximum Distortion to a low value, otherwise the changes to the UV map will be minimal. Lower values mean more UV polygon groups will be formed. The lowest value, 0, means each UV polygon is separated from its neighbors. A value of 100% corresponds to a 90° angle between the object polygons, 50% corresponds to 45°, and so on.
Preserve Orientation, Stretch To Fit, Spacing
See Cubic, above.