Context Menus
All of the right-click commands described below can also be called up via the Projection Man Manager’s main menu.
Right-clicking on a camera or object (multiple selection also possible!) will open a context menu with the following commands:
This selection menu (only available for clicked objects to be textured) lets you define which bitmap should be used for the newly generated projection camera:
Lets you load a bitmap of your choosing that will be projected onto the clicked object (and this in the currently active view).
Select this command to render a tentative texture (for subsequent modification in Photoshop or BodyPaint 3D) from the angle of view of the active camera. The objects to be textured will be displayed on the rendered bitmap background layer so the areas to be painted are easily recognizable in Photoshop/BodyPaint 3D.
The following dialog window will open:
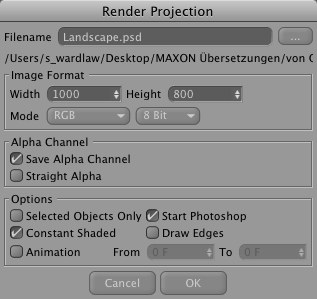
Define the file name and file path (button to the right of the name field) for the rendered image. If you only enter a name and not a path the image will be saved to the same location (displayed below) as the Cinema 4D file by default.
Defines the dimensions (resolution) in pixels of the rendered image. The image size that should always be used automatically can be entered in the Preferences menu’s Projection Man tab.
Select the desired color depth for the rendered image.
Enable this option if an additional alpha channel that masks all existing objects should be saved in the texture. It’s not a bad idea to keep this option enabled at all times. The render times will increase only minimally and an alpha channel always comes in handy.
Defines the alpha channel type. Information regarding alpha channel types can be found here. Normally this option remains disabled (the alpha channel will then be output as "premultiplied"). This, however, depends on your individual workflow pipeline and how the texture will subsequently be used.
If enabled, only selected (active) objects will be rendered. This is useful for excluding specific objects within a given hierarchy.
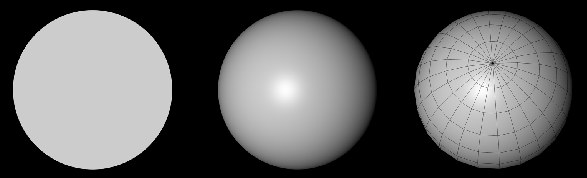 Left: "Constant Shading" enabled. Center: Disabled. Right: "Draw Edges" additionally enabled.
This is where you define how rendered objects that are subsequently opened in Photoshop/BodyPaint 3D should be shaded.
The texture will automatically be opened in Photoshop after it has been rendered.
If enabled, polygon edges will be rendered as black lines.
Enable this option if several frames of an animation should be output and enter the desired range.

Lets you create a new, monotone texture that is projected from the current camera. This functionality should be familiar to you from here.
All textures previously loaded into Cinema 4D/BodyPaint 3D will be made available for selection.
The scene will be rendered from the view of the clicked camera. This is a good method of determining if the object is textured completely.
A more circuitous method as opposed to right-clicking on an object and selecting "New Projection Camera/Coverage Render". This command renders a coverage render from the view of the current camera. However, texture assignment and creation must then be done manually.
Set the scene camera for the active view. Alternatively you can simply double-click on the camera.
Once you have determined the final positions for the projection cameras these cameras should be protected from accidentally being moved.
This command lifts the protection that was place on a given camera and its position, rotation, etc. can again be modified.
Duplicates the right-clicked camera.
Use this command to render a texture form the view of that camera for subsequent modification in Photoshop.
The following dialog window will also open when the "Projection Rendering (File)" command is called up.
The texture will be loaded into the texture view for modification.
The texture will be opened in Photoshop (the correct path to the Photoshop application must be defined in the Preference menu’s Projection Man tab!)
If you have modified the bitmap using an external application, Cinema 4D needs to be informed of these changes in order to update the file in your scene.
Removes the bitmap.
Depending on the selections made in the Projection Man Manager one of the following will happen if this command is selected:
- Bitmaps: Will be opened in Photoshop
- Objects: A new projection camera will be created and a coverage render will be started
- Camera: A coverage render will be started using this camera
Nothing new as you can see. This just saves you from having to call up the corresponding command using the context menu.
If you want to add UVW mapping to projected textures that will be modified in external applications, the corresponding object must first be baked. More information regarding the Bake Object function can be found here.
The following will happen, depending on which object was right-clicked:
- Camera: The camera will be deleted
- Object: Only the Material tag, including the material, will be deleted. The object itself will not be deleted and can be returned to the "Unassigned Objects" status.
Right-clicking a channel will open a menu with the following options:
Activates the option of the same name in the material’s Alpha channel. The bitmap’s own Alpha channel will then be used. This will not work if layers are selected using the layer selection command.
Deactivates the corresponding material channel and deletes its loaded texture.
Lets you select layers (or alpha channels) in multi-layer files that should be made visible to Cinema 4D (see also Layerset). Alternatively you can double-click on the channel’s icon.
Layer Selection to/from Texture Layer Visibility
Layers can be hidden in both Photoshop and BodyPaint 3D (independent of what is defined for Edit Layerset). If the layer visibility should define what is seen in Cinema 4D, select the Layer Selection to Texture Layer Visibility command. If you want to hide and show layers in BodyPaint 3D, select the Layer Selection from Texture Layer Visibility command. Don’t forget to save the texture.
At the top of the Projection Man Manager is its only menu item - Mode. Here you can select between Photoshop and BodyPaint 3D modes.
When in BodyPaint 3D mode the texture view will be opened when a new bitmap is created or an existing one is assigned. Clicking on a channel preview icon will activate the corresponding bitmap, channel and material for painting.
When in Photoshop mode the Edit Layerset dialog window will open when a channel preview icon is opened.
Which mode is used can also be defined globally in the Preferences menu’s "Projection Man" tab.